Sending Prepared Notices to Patrons
Perform the following steps to manually send prepared notices to patrons via email, telephone notification, or the printer.
- Create the notices job. After you select the parameters for the notices job and prepare the notices job, you can send the prepared notices to patrons from the prepared notices pane.
- Choose the notices to send to patrons (emailed notices, telephone notification notices, or printed notices). To do so:
- Select a delivery method from the Notice Method drop-down list (e.g., 38 to E-mail) in the Notices tab.
- If you want to send the notices listed in the Email or Telephone Notification queue to the printer—instead of sending the notices by the specified delivery method—select the desired queue and click the Move to Print Queue button.
Patrons Not Charged for Involuntary Notice Printing
Even if your system is configured to charge patrons for printing overdue notices, the system does not charge patrons if you move overdue notices from the Email or Telephone Notification queue to the Print queue.
- Ensure the system is displaying the notice queue from which you want to send notices. For example, if you chose the email notice delivery method and then moved all email notices to the printing queue, you must select a different queue (telephone notification or print) before continuing.
- (Optional) If you do not want to permanently clear the notices that were successfully sent, click the Do Not Clear check box.
- Removes all the notices that were successfully sent; that is, the notices that are not listed in the Items Not Sent tabs. The system displays these unsent notices the next time you generate notices for this notice type.
- If you sent overdue notices, the system updates the OVERDUE and ODUE DATE fields in the related item records to show which overdue notices were sent.
- If you sent overdue notices, and the system sent the highest overdue level notice (or a notice containing all overdue levels) for an item, a replacement bill is generated for the item.
- Click Send Notices. The system displays a progress bar as it prepares and sends the notices.
If you do not permanently clear the notices, Sierra:
Cleared Notices Are Permanently Cleared
After you send notices, you can regenerate statements of charges, statements of checked out items, and title paging lists. All other sent notices are permanently cleared.
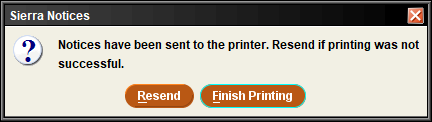
If you are printing notices to a local printer, Sierra displays the Sierra Notices dialog box after sending the notices to the printer.
- (Optional) To send the notices to a different printer, do the following:
- Click Resend. Sierra opens the Print dialog box.
- Select a different printer from the drop-down list.
- Click Print. Sierra sends the notices to the new printer and displays the Sierra Notices box again.
- If the notices print successfully, click Finish Printing. Otherwise, click Resend again and repeat this process using a different printer.
When you send the notices to a different printer, Sierra uses the same format selected for the first printer. If you select a different printer type (for example, you initially used a letter-sized printer and then selected a 40-column receipt printer), the notices might not print as desired.