Create a Personalized Page
Use this feature if your organization does not have a website. You create a page from the information you have entered in your organization’s profile, and then submit the page to common search engines so that people can find information about your organization when they search the web.
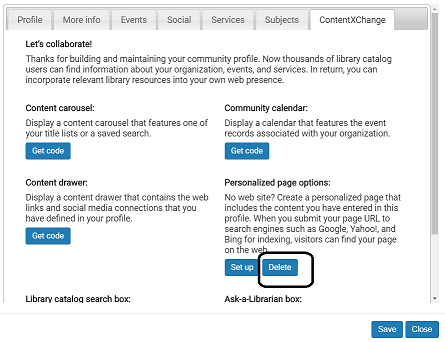
- Go to the ContentXChange page of the organization’s community record. See Access ContentXChange.
- On the ContentXChange tabbed page, under Personalized page options, click Set Up.
The Set up personalized page options dialog box opens.
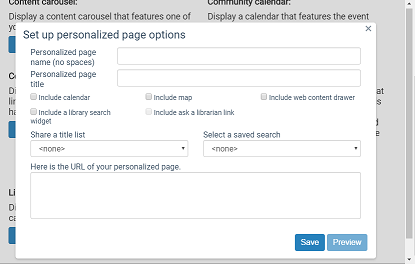
- Type a page name in the Personalized page name box.
This name becomes part of the unique URL (web address) for your page.
- Type a page title in the Personalized page title dialog box.
This title is displayed on the browser tab when a web user visits your personalized page.
- Check the features to include on your personalized page:
- Calendar - Displays a calendar of the events you have set up for your organization. See Embed an Events Calendar in a Web Page.
- Library search widget - Places a search box on your personalized page. The visitor to your page enters a search term and a search is launched in the library catalog. See Embed a Library Catalog Search Box in a Web Page.
- Map - Provides a map to your organization’s location.
- Ask a librarian link - The visitor to your page uses this link to send a reference question to the library from your page. See Embed an ask-a-librarian link in a web page.
Note:
This feature is available only if the library has enabled Ask Us (PowerPAC profile Navigation: Ask Us set to Yes) and does not require the user to log in (PowerPAC profile Ask us: Require login set to No).
- Web content drawer - Displays a “drawer” on your personalized page containing the web links and social media connections you set up on the Social tab of your organization’s profile. See Embed a Social Connections Drawer in a Web Page.
Tip:
To embed a content carousel in your organization’s Web page, a title list or saved search must already be associated with your library account. For information on creating a title list or a saved search associated with your patron account, see PAC online Help.
- Do one of the following steps to embed a content carousel in your organization’s web page:
- Select a title list from the Share a title list box.
- Select a saved search from the Select a saved search box.
- Click Save.
The page URL (Web address) is displayed in the code box.
- Copy the URL for submission to the search engine or engines, such as Google, Yahoo, or Bing. See Submitting a ContentXChange page to web searches .
- Click X in the upper right corner of Set up personalized page options dialog box to close it.
- Click Save on the ContentXChange tabbed page.
Submitting a ContentXChange page to web searches
- Submitting your page URL to Google - Google uses “spiders” to crawl the web and automatically add sites to Google’s index, so you may not need to submit your page URL. To ask Google to crawl your page URL, go to https://www.google.com/webmasters/tools/submit-url/
- Submitting your page URL to Yahoo - Yahoo also regularly crawls the web to update the Yahoo search index. Yahoo also offers several ways to submit web pages and content directly to the Yahoo! Search index and the Yahoo! Directory. For more information, go to
http://www.search.yahoo.com/info/submit.html - Submitting your page URL to Bing - To ensure your website is included in Bing’s index, you can sign up for a free Bing Webmaster Tools account. For more information, go to
https://ssl.bing.com/webmaster/SubmitSitePage.aspx
Deleting a ContentXChange personalized page
Click Delete on the ContentXChange page, under Personalized page options.