Process items for multiple patrons
Based on the patrons’ registered branch, next service date, and other options you specify, you can create a combined pick list for multiple patrons. To create a combined pick list, and process the items on the list:
Note:
You need the Circulation permission Outreach Services Manager: Access to do this procedure.
Select Patron Services, Outreach Services from the Polaris Shortcut bar, or click  .
.
The Outreach Services Manager opens.
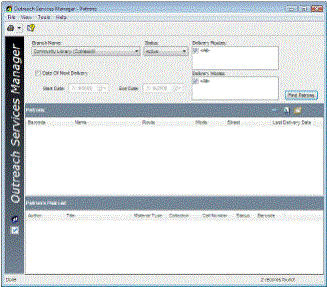
Select the patrons’ registered branch in the Branch box.
Note:
The logged-in branch (typically the branch where you are working) is selected by default.
Select the status of the patrons you want to process in the Status box:
-
Active - Process patrons currently due for service.
-
Inactive - Set up a selection list for inactive patrons. (You can select them when the Patrons list is generated, and change their status to Active.)
(Optional) To filter the list by the next scheduled delivery date, select Date of Next Delivery, and type or select a start date and end date.
This option sets the list to patrons due for service within the date range you specify. If you do not select this option, patrons due for service on today’s date only are eligible for the list.
(Optional) To filter the patron list by delivery method, select a method in the Delivery Modes box.
Example:
To create a pick list for all patrons due for service and who receive their materials by driver, select Driver in the Delivery Modes box. Polaris Administration settings determine the actual available options.
(Optional) If the delivery mode you selected has delivery routes, and you want to filter the list by route, select the route in the Delivery Routes box.
Click Find Patrons.
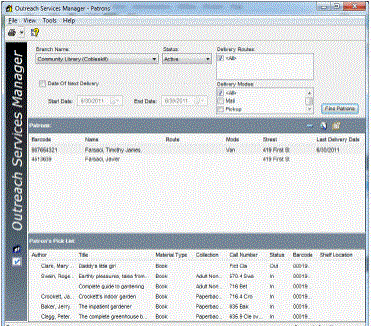
The Patrons list displays the outreach patrons matching your search criteria.
Notes:
To find any patron, regardless of the filters you set, and add the patron to the list, click  . The Polaris Find Tool opens. Search for the patron record, right-click it in the Find Tool results list, and choose Select from the context menu. However, this operation clears any combined pick list that already exists in the Outreach Services Manager.
You can double-click a patron line to open the Patron Status workform - Reader Services view for the patron.
Check for individual patron pick lists, and create them if necessary, by following these steps:
a) Select each patron in turn from the list. The patron’s pick list appears in the Patron Pick List portion of the workform.
b) If a patron does not have a pick list, right-click the patron’s name and choose Selection List from the context menu.
The ORS Selection List workform for the patron appears. Create a pick list for the patron, then save the list. See Process items for an individual patron for details.
Important:
Selection lists for Outreach Services patrons are generated by searches constructed from your patron preference entries (Subject, Author, Genre, Target Audience, Language, Material Type, Publication Date). All patron preference entries are used when the system constructs the search. If the record includes 50 or more preference entries, the selection list fails and a server error results. Enter fewer patron preferences to prevent the problem.
A message asks whether you want to refresh the Outreach Services Manager combined pick list. Select Yes to update the information in the Outreach Services Manager with the patron’s new pick list.
To add patrons or items in the Combined Pick List to a record set, follow these steps:
Important:
Record sets are useful if you want to preserve information for later processing. When the Outreach Services Manager workform is closed and re-opened, the old information is gone and the workform is ready for a new round of processing.
a) Select the line items in the Combined Pick List.
b) Right-click in the list, and select Add to Patron Record Set or Add to Item Record Set from the context menu.
c) Select New or Existing.
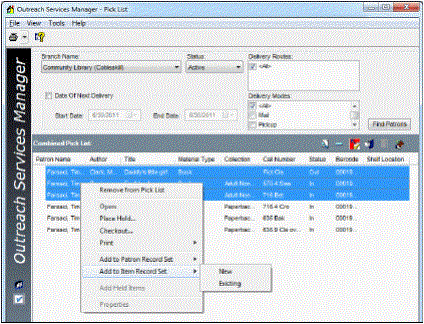
d) If you selected New, the new record set opens and the patrons or items are added to the set. Name the new record set and click the Save button on the Record Set workform.
e) If you selected Existing, the Polaris Find Tool appears. Search for the record set to which you want to add the patrons or items. Right-click the record set in the results list, and choose Select from the context menu. The record set opens, and the patrons or items are added to the set. Click the Save button on the Record Set workform.
Select View, Pick List, or click the Pick List icon ![]() at the left side of the workform.
at the left side of the workform.
The items from each patron’s pick list appear in the Combined Pick List, organized by patron.
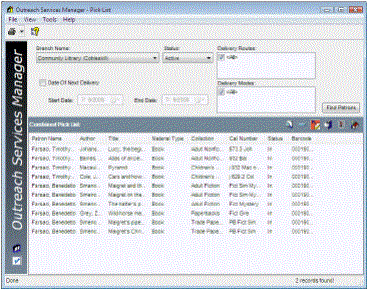
To edit the Combined Pick List, choose one of these options:
-
To remove an item from the pick list, select the item in the Combined Pick List and click
 .
. -
To find an item and add it to the pick list, click
 . The Polaris Find Tool opens. Search for the item, right-click it in the Find Tool results list, and choose Select from the context menu.
A dialog box prompts you to select the patron for whom you are adding the item. Select the patron, and click OK.
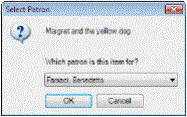
-
To add a patron’s held items to the pick list, select the patron and click
 . If no items are being held for the patron, you see a message. If there are held items, they are added to the pick list. A Held for Patron icon
  marks the held items in the pick list.
To place hold requests for items, follow these steps:
a) Select the appropriate items in the Combined Pick List, and click  .
.
Use the CTRL or SHIFT keys to select multiple items.
The Bulk Hold Requests dialog box appears.
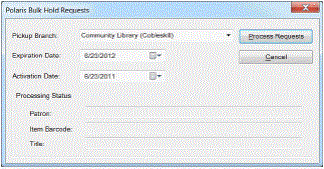
b) Specify the pickup branch, activation date, and expiration date for the hold requests, and click Process Requests.
As each patron’s request is processed, the information appears in the Processing Status boxes.
c) If there are any blocks on a patron’s account, the Patron Blocks dialog box appears. Resolve the blocks (see Manage patron blocks at circulation), or cancel the hold request for that patron.
d) Click X to close the Bulk Hold Requests dialog box.
For more information about hold requests, see Placing Hold Requests.
If you place a hold request for outreach services patrons who are scheduled on a regular delivery route, you may want to suppress the hold notice that is normally generated when the request is available for pickup. Select the Exclude from hold notice box on the Patron Registration workform - General view (see Add general data to a patron record) for these patrons.
Process the Combined Pick List, choosing the appropriate method:
-
Select File > Print > Pick List, or click
 and select Pick List. Take the printed list to the shelves and pull the items to be checked out.
 -
Check out the items directly from the pick list. See step 15.
If your library collects reader ratings, click the packing list icon ![]() above the pick list. If your library has set the packing list to print automatically when the items are checked out, you can skip this step.
above the pick list. If your library has set the packing list to print automatically when the items are checked out, you can skip this step.
A separate packing list for each patron, with a rating line for each item, is printed, ready to ship with the items. When the packing list is returned with the items, you enter the ratings in the patrons’ reading histories. See Working with Reader Ratings.
Note:
After the items have been checked out, you can also print the packing list from the Patron Status workform - Items Out view.
To check out items on the Combined Pick List:
a) Select the appropriate items in the Combined Pick List, and click  .
.
Use the CTRL or SHIFT keys to select multiple items.
The Bulk Check Out dialog box appears.
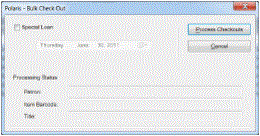
b) If you want to set a special loan period for all the items processed in this checkout, select Special Loan and type or select the due date.
c) Click Process Checkouts.
As each checkout transaction is processed, the information appears in the Processing Status boxes.
-
If there are any blocks on a patron’s account, the Patron Blocks dialog box appears. Resolve the blocks (see Manage patron blocks at circulation), or cancel the check-out for that patron.
-
If specific items have been checked out to the patron in the past, a message appears. You can continue to check out the item, or cancel the check-out.
d) Click X to close the Bulk Check Out dialog box.
Tip:
The bulk check-out receipt is a useful check list as you prepare the items for delivery. If your library collects reader ratings for outreach services patrons (see step 12), the packing list for reader ratings may print automatically in addition to the check-out receipt.
The items are checked out. If you have set Polaris to print check-out receipts from the Outreach Services Manager workform, the bulk check-out receipt prints. See Setting Up Receipt Printing from Workforms.
Note:
Select File > Print > Pick List Report, or click  and select Pick List Report, to print a report that indicates whether patrons have read or placed hold requests on their items. You can sort the information on the report by call number, collection, title, patron name, date of service, route, and/or delivery mode.
To update the last service date for all the patrons in the combined pick list manually, without checking out items from the pick list, follow these steps:
a) Select View > Patrons on the Outreach Services Manager workform, or click  .
.
b) Click ![]() above the Patrons list.
above the Patrons list.
The last service date is updated.
Related Information
-
Mailing labels - For outreach services patrons who receive their materials by mail, you can print patron mailing labels or export the patron addresses to use in another application. See Creating Patron Mailing Labels.
-
Borrow by Mail - Your library may use Borrow by Mail processing for outreach services and other patrons, where a patron can request a title and have the title checked out and mailed. See Borrow By Mail Circulation.
-
Reading histories for outreach services patrons - Your library may set limits on reading histories for outreach services patrons that are different from those for other patrons. Your library may also allow you to remove individual items from patrons’ reading histories. See Remove items from a patron’s reading history.