Process items for an individual patron
To create a pick list and check items out for a single patron:
Important:
You must set preferences for the patron before you build a list and process items for the patron. See Set the outreach patron’s preferences. Selection lists for Outreach Services patrons are generated by searches constructed from your patron preference entries (Subject, Author, Genre, Target Audience, Language, Material Type, Publication Date). All patron preference entries are used when the system constructs the search. If the record includes 50 or more preference entries, the selection list fails and a server error results. Enter fewer patron preferences to prevent the problem.
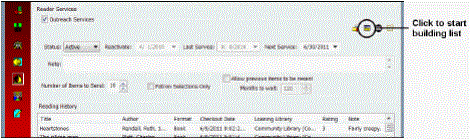
Open the Reader Services view of the patron’s Patron Status workform, if it is not already open. See Set up outreach services for a patron.
Note:
You need the Circulation permission Patron status: Modify reader services to do the next steps in this procedure.
Click the Selection List icon  .
.
The ORS Selection List workform appears.
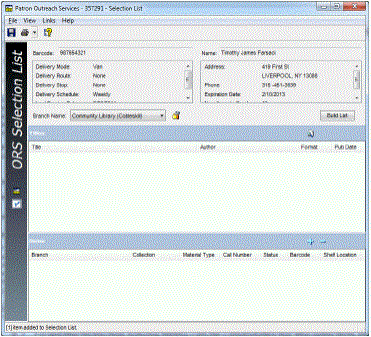
To set the branches whose items can be candidates for the selection list, select one of the following options in the Branch Name box:
-
Select Default Branches to restrict the items to a group of branches determined by your library. The default branches are set in Polaris Administration.
-
Select a specific branch to restrict the items to those belonging to the selected branch. Your library may allow only items from your logged-in branch, typically the branch where you are working, as selection list candidates. If this is the policy, only the logged-in branch is available in the list.
Click Build List.
The Titles list displays titles (bibliographic records) with attached items that fill the requirements set by the patron’s preferences and your branch selection. Titles are ranked by relevancy, but you can click a column head to sort by the list by title, author, or publication date. The physical items associated with these bibliographic titles are potential selections for the patron’s pick list.
-
To find any title, regardless of the patron preference and settings, and add it to the selection list, click
 . The Polaris Find Tool opens. Search for the title, right-click it in the Find Tool results list, and choose Select from the context menu.
Note:
The Find Tool searches all branches, not just the branches selected in step 3. If a title is manually added by this method, all items attached to the bibliographic record are returned as candidates to add to the pick list (not just those assigned to included branches). See step 6.
-
You can double-click a title to open the bibliographic record, or right-click the title in the selection list and select Preview to see more information about the title without opening the record.
Note:
From a bibliographic record, you can display a list of outreach services patrons whose reading histories include items linked to the bibliographic record; that is, they have checked out the items in the past. See Link from a bibliographic record to outreach services patrons.
-
To place a bibliographic-level hold request on the title for the patron, right-click the title in the selection list and select Place hold from the context menu.
Select a title in the Titles list.
The Items list displays the items associated with the selected title.
Note:
Using Polaris Administration settings, you can restrict the items that display by status; for example, you can suppress items that are Withdrawn or Lost. If all the items attached to a bibliographic record are restricted, the title is not displayed.
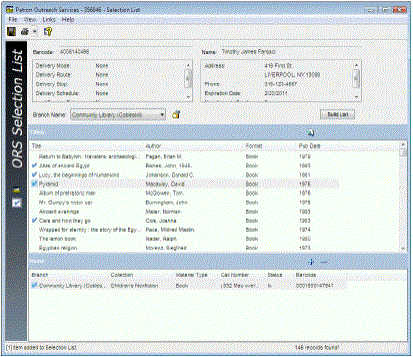
To add an item to the pick list, select the title in the Titles list and click  above the Items list.
A check icon  appears beside the title and its associated item to indicate that the item has been placed on the pick list.
Note:
To place an item-level hold request on an item for the patron, right-click the item and select Place hold from the context menu.
Repeat steps 5 and 6 to continue to add items to the pick list.
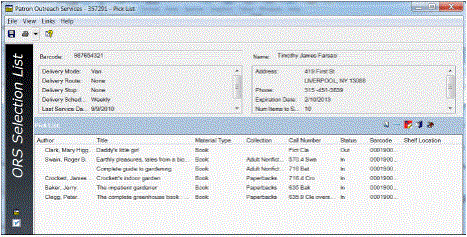
Select View, Pick List, or click the Pick List view icon  at the left side of the workform.
The items you chose from the selection list appear in the pick list. The specific columns in the Pick List view depend on Polaris Administration settings.
Tip:
If an item in the list is a serial, the serial designation (enumeration The designation reflecting the alphabetic or numeric scheme used by the publisher on an item or assigned when the holdings statement is created to identify the individual bibliographic or physical parts and to show the relationship of each unit to the unit as a whole. and chronology The date(s) used by the publisher on a serially-issued bibliographic unit to help identify or indicate when it was published. The chronology may reflect the dates of coverage, publication, or printing.) is added to the title. You may need to expand the title column to see the designation.
-
To remove an item from the pick list, select the item and click
 .
. -
To find an item and add it to the pick list, click
 . The Polaris Find Tool opens. Search for the item, right-click it in the Find Tool results list, and choose Select from the context menu.
 -
To add a patron’s held items to the pick list, click
 . If no items are being held for the patron, you see a message. If there are held items, they are added to the pick list. A Held for Patron icon
  marks the held items in the pick list.
Click the Save button to save the pick list.
Process the pick list, choosing the appropriate method:
-
Select File > Print > Pick List, or click
 and select Pick List. Take the printed list to the shelves and pull the items to be checked out.
 -
If this patron selects items from the pick list, mail the printed list to the patron. When you receive the list back from the patron, remove the unwanted items from the list.
Tip:
If the patron is scheduled on a regular delivery route, you may want to suppress the hold notice that is normally generated when the request is available for pickup. Select the Exclude from hold notice box on the Patron Registration workform - General view. See Add general data to a patron record.
-
Place hold requests on items as necessary. Select the item or items, and click
 . See Placing Hold Requests. If the outreach services patron has a hold request for a title in the selection list and or an item in the pick list, an icon
  is displayed for the title or item.
Note:
When an item that fills an outreach patron’s hold request is trapped An item is said to be trapped for a hold when an item that fills a request is scanned at circulation and the system links the item to a specific request, either automatically or by displaying a message that prompts you for a decision. at circulation, the note Outreach Services Patron appears on holds dialog boxes. See Fill a hold request at circulation.
-
Check out the items directly from the pick list. See Check out items from the pick list.
Related Information