Polaris PowerPAC Help
Polaris PowerPAC is installed with a default set of help topic html files. When the user clicks the Help option on the menu bar, a scrollable set of help topic links is displayed.
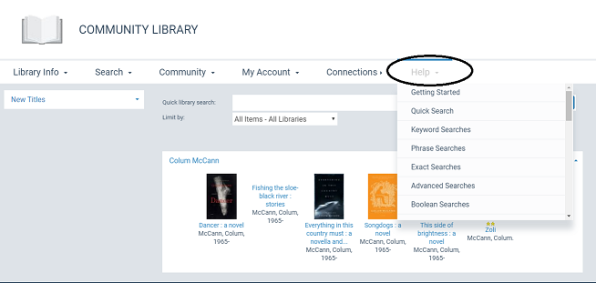
When the user clicks a topic link, the appropriate topic is displayed in a lightbox, without losing the current page context.

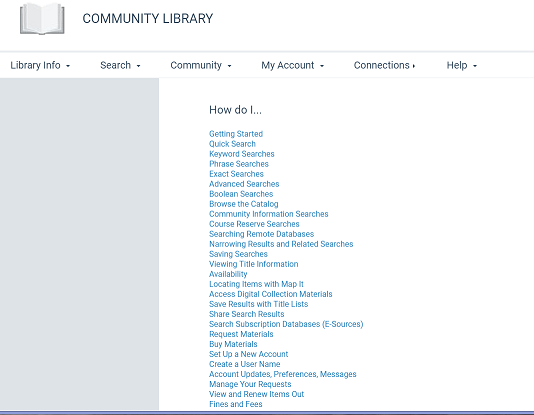
When the user clicks All topics at the bottom of the Help menu list, a page with the complete set of links is displayed. This page is also available by clicking the Help link in the site index list at the bottom of the page.
Certain links are always displayed because they are applicable to PowerPAC in general. Availability is an example of this type of topic link. Others are displayed only when the connection organization has enabled the corresponding feature in Polaris Administration. For example, if the organization has not enabled Google Maps, the topic link Locate Items with Map It is automatically suppressed. The table shows the PowerPAC feature settings in Polaris Administration that control whether a help topic is displayed. You can customize the link labels in Polaris WebAdmin (Language Editor); see Customizing Language Strings. The table lists the Language Editor string IDs.
| HELP TOPIC FILENAME | TOPIC LINK LABEL | LANGUAGE EDITOR STRING ID | POLARIS ADMINISTRATION FEATURE SETTING |
|---|---|---|---|
|
Overview.htm |
Getting Started |
PACML_HELP_INTRO |
[Always displayed] |
|
QuickSearch.htm |
Quick Search |
PACML_HELP_SEARCHQUICK |
PowerPAC profile Navigation: Portal |
|
Keyword.htm |
Keyword Searches |
PACML_HELP_SEARCHKEYWORD |
PowerPAC profile Navigation: Keyword |
|
Phrase.htm |
Phrase Searches |
PACML_HELP_SEARCHPHRASE |
PowerPAC profile Navigation: Phrase |
|
Exact.htm |
Exact Searches |
PACML_HELP_SEARCHEXACT |
PowerPAC profile Navigation: Phrase |
|
Advanced.htm |
Advanced Searches |
PACML_HELP_SEARCHADVANCED |
PowerPAC profile Navigation: Advanced |
|
Boolean.htm |
Boolean Searches |
PACML_HELP_SEARCHBOOLEAN |
PowerPAC profile Navigation: Boolean |
|
Browse.htm |
Browse the Catalog |
PACML_HELP_SEARCHBROWSE |
PowerPAC profile Navigation: Browse |
|
CommInfo.htm |
Community Information Searches |
PACML_HELP_SEARCHCOMMUNITY |
Community profile Navigation (PowerPAC): Community - Keyword Search |
|
CourseReserve.htm |
Course Reserve Searches |
PACML_HELP_SEARCHCOURSE |
PowerPAC profile Navigation: Course Reserves |
|
Filters.htm |
Narrowing Results and Related Searches |
PACML_HELP_SEARCHNARROW |
[Always displayed] |
|
SavingSearches.htm |
Saving Searches |
PACML_HELP_SAVESEARCH |
PAC profile Search agent: Enabled |
|
TitleInfo.htm |
Viewing Title Information |
PACML_HELP_TITLEINFO |
[Always displayed] |
|
Availability.htm |
Availability |
PACML_HELP_AVAILABILITY |
[Always displayed] |
|
MapIt.htm |
Locating Items with Map It |
PACML_HELP_MAPIT |
PowerPAC profile Google Maps |
|
Fusion.htm |
Access Digital Collection Materials |
PACML_HELP_FUSION |
[Polaris Fusion is enabled] |
|
TitleLists.htm |
Save Results with Title Lists |
PACML_HELP_TITLELISTS |
PowerPAC profile Title List: Enable |
|
Share.htm |
Share Search Results |
PACML_HELP_SHARE |
PowerPAC profile Bookmarking & Sharing: Enable |
|
ESources.htm |
Search Subscription Databases (E-Sources) |
PACML_HELP_ESOURCES |
PowerPAC profile Navigation: E-Sources |
|
Request.htm |
Request Materials |
PACML_HELP_REQUEST |
Request parameter Holds options |
|
Purchase.htm |
Buy Materials |
PACML_HELP_PURCHASE |
PAC profile Purchase options |
|
NewAccount.htm |
Set Up a New Account |
PACML_HELP_NEWACCOUNT |
PAC profile Patron access options (self-registration enabled) |
|
Username.htm |
Create a User Name |
PACML_HELP_USERNAME |
PAC profile Patron access options (patron user name enabled) |
|
AcctUpdates.htm |
Account Updates, Preferences, Messages |
PACML_HELP_UPDATEACCOUNT |
[Always displayed] |
|
AcctRequests.htm |
Manage Your Requests |
PACML_HELP_ACCTREQUESTS |
PowerPAC profile Navigation: Requests |
|
AcctItemsOut.htm |
View and Renew Items Out |
PACML_HELP_ACCTITEMSOUT |
PowerPAC profile Navigation: Items out |
|
AcctReadingHistory.htm |
Your Reading History |
PACML_HELP_ACCTHISTORY |
[Reading history is enabled for patron] |
|
AcctFines.htm |
Fines and Fees |
PACML_HELP_ACCTFINESFEES |
PowerPAC profile Navigation: Fines and fees |
|
AcctCourseStats.htm |
Course Reserve Statistics |
PACML_HELP_ACCTCOURSE |
[Course reserves enabled, patron is instructor] |
|
Donations.htm |
Make a Donation |
PACML_HELP_DONATE |
Credit Card Payment parameter Online payments: Configure (Allow donations from PowerPAC) |
The PowerPAC profile Navigation: PAC help controls whether the Help option appears on the menu bar. If you choose to offer your own help materials from the dashboard, set this profile to No to suppress the Help option from the menu bar.
You can also display the Help option on the menu bar but edit the default .html files, retaining the same filenames. The files, with the .css style sheet and appropriate graphic files, are located at {PowerPAC Root}/help/content.
Important:
If you edit the .html help files, be sure to back up your customized files in a location where they will not be overwritten if Polaris is re-installed.
If you have some programming knowledge, you can add your own links to the Help page. For more information, see the Polaris Developer Network.
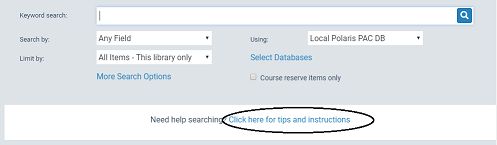
Help with Searching
On each search page except Advanced, the user can click a link to display the appropriate help information.
Creating Custom Help on the Dashboard
To provide custom help from the dashboard in Polaris PowerPAC:
Tip:
Your instruction pages can be any file format that the workstation can display. If patrons use Polaris PowerPAC from remote locations, choose a format that is accessible to most workstations and browsers, such as .html.
- Create and save the instruction pages you want to be accessible from the dashboard.
- In the Administration Explorer tree view, open the Profiles folder for the system, and select the PowerPAC tab in the details view.
- Double-click Dashboards: Web part construction. The Web Part Editor dialog box appears.
- Click the User Defined tab.
- Click Add by the Web Parts list to specify the heading for the instruction Web part. The Add Web Part Title dialog box appears.
- Type the heading text in the Title box, and click OK. The heading for the new Web part is displayed in the Web Parts list.
- Select the new heading in the Web Parts list.
- Click Add by the Data Elements list. The Add Data Element: Pick Type dialog box appears.
- Select URL. The Add … Element dialog box for the URL element type appears.
- Type the link text in the Title box, and type the complete path and filename or URL in the URL box.
- Click OK on the Add … Element dialog box. The new element is displayed in the Data Elements list on the Web Part Editor dialog box.
- Repeat steps 8-11 to add additional elements to the selected Web Part (heading), and click OK. The Web Part Editor dialog box closes.
- Select File > Save.
- To assign the instruction Web part to the appropriate pages, do these steps:
- In the Administration Explorer tree view, open the Profiles folder for the organization, and select the PowerPAC tab in the details view.
- Double-click Dashboards: Web Page / Web Part Assignment. The Web Page - Web Part Configuration dialog box appears.
- In the Web Pages list, select the page to which you want to assign the instruction Web part. See Polaris PowerPAC Pages Reference. The Web parts currently assigned to the page are shown in the Assigned Web Parts list.
- Click Add. The Web Page -Add Web Parts dialog box appears. It lists all the Web parts not currently assigned to the selected page.
- Select your instruction Web part.
- Click OK on the Web Pages - Add Web Parts dialog box. The selected Web parts are displayed in the Assigned Web Parts list.
- Click OK on the Web Page - Web Part Configuration dialog box.
- Select File > Save.
Related Information
More about dashboards - See Defining Web Parts for Dashboards.