Select Community Elements for Display in PAC
To select elements (entities) for display and edit their labels for PowerPAC or Mobile PAC community information search results:
Note:
You need the System Administration permission Modify community record title displays: Allow to do this procedure.
- In the Administration Explorer tree view, open the Profiles folder for the organization, and click the Community tab in the details view.
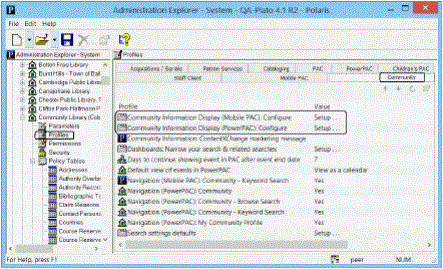
- Double-click Community Information Display (PowerPAC): Configure or Community Information Display (Mobile PAC): Configure.
The Community Information Display: Configure dialog box opens.
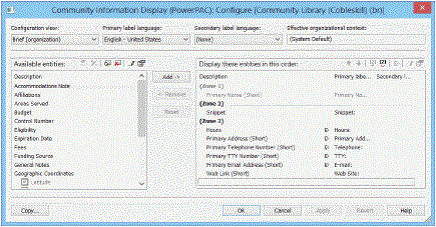
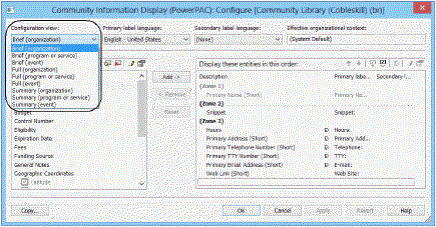
- Select the view you want to configure from the Configuration view menu.
You can configure separate displays for organizations, programs or services, and events. For descriptions of brief, summary, and full views, see PowerPAC Results Displays - Community Information and Mobile PAC Results Displays - Community Information.
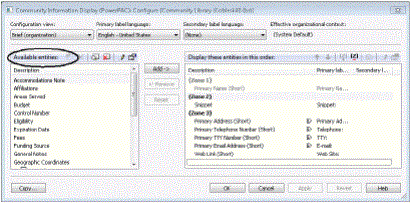
The Available entities list on the left side of the dialog box displays the elements that can be added to a view.
Note:
With the appropriate permission, you can edit the definition of an entity (system level only). See Edit a community information entity definition.
The Display these entities list on the right side of the dialog box lists those elements that are currently selected for the configuration view.
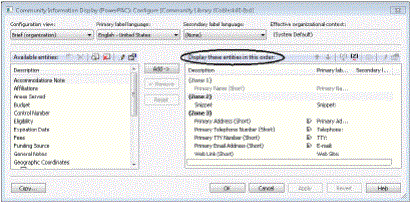
“Short” entities are not repeatable for a single view. “Long” entities are repeatable within a single view. You can double-click the edge of a column header to expand the column and display the full text if necessary.
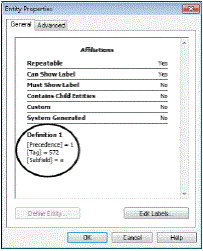
- To see the tags, indicators and subfields that are included in an entity, use one of these methods:
- Hover the cursor over the entity for a quick read-only display.
- Right-click the entity and select Properties on the context menu.
- Select the entity and click the Properties icon
 above the list.
The Entity Properties dialog box opens.
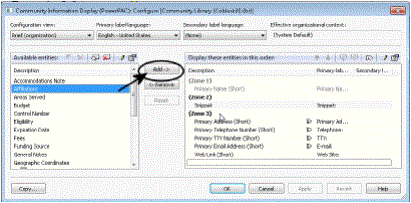
- To add a data element to the view, click the data element in the Available entities list, then click Add.
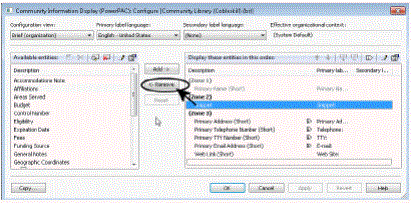
- To remove a data element from the view, click the data element in the Display these entities list, then click Remove.
- If the Available Entities or Display these entities list does not include the data element you want to display, follow these steps:
- Click the Browse icon
 at the top of the Available entities list.
- Click the Browse icon
The Browse Entities dialog box opens.
- In the Browse Entities dialog box, select the element you want to add to the Available entities list.
You can hover the cursor over an entity to see its properties.
- Click Reveal.
The element now appears in the Available entities list and can be selected for display.
Note:
You can shorten the Available entries list to reduce scrolling. Select the entity that you want to remove, right-click and select Suppress from the context menu, or click the Suppress icon  at the top of the Available entities list. To add an entry back to the list, repeat steps a-c.
- To edit the default English label for an entity, and to enter or change the labels for other languages, follow these steps:
Tip:
You can also edit the labels using Polaris Language Editor (WebAdmin). The Mnemonic field at the top of the Change Labels dialog box displays the language string ID for the entity’s label. In Polaris Language Editor, select the ERMSPortal “product” to edit entity labels. For more information about using Polaris Language Editor, see the online Help for Polaris Language Editor.
- Right-click the entity in the Available entities or the Display these entities list, and select Labels from the context menu, select Edit Labels from the Entity Properties dialog box, or click the Change Labels icon
at the top of the Available entities or Display these entities list.
The Change Labels dialog opens for the entity you selected.
- On the Change Labels dialog box, click the language you want to edit.
- To customize the label, click the Customize option and then enter your text.
Tip:
To enter diacritics or non-Latin characters, press and hold ALT while typing the code on the numeric keypad.
- To permanently save your changes and close the dialog box, click OK.
- Save or cancel your work in the Community Information Display Configure dialog box:
- To remove any changes that have not been applied and close the Community Information Configure dialog box, click Cancel.
- To remove any changes that have not been applied and keep the Community Information Configure dialog box open, click Reset.
- To permanently save changes and keep the Community Information Display Configure dialog box open, click Apply. See these topics for further information:
- To permanently save changes and close the Community Information Configure dialog box, click OK.
Important:
After saving your changes, use Polaris Language Editor (WebAdmin) to reload PowerPAC or Mobile PAC. Users may also need to clear their browser caches.
Related Information
- Revert to parent organization settings - After making changes to the Community Information Configure dialog box at the branch or library level, you can revert to the parent-level settings. Click Revert on the Community Information Configure dialog box. Only the currently-selected configuration view is inherited from the parent organization. If you make changes after clicking Revert, then inheritance is broken and you will no longer inherit settings from the higher organization.
Important:
When you click Revert, all branch-level configuration settings are lost. The action cannot be undone.
-
Copy a display configuration - See Share a community information display configuration.