Register a Polaris server
To do this procedure, Polaris server software must already be installed on the server computer, and the server must be available on the network.
To register a new Polaris server:
Note:
To set up a server record for a remote search target, see Set up a server record for a Z39.50 or other search server.
- Select Administration > Explorer > System on the Polaris Shortcut Bar.
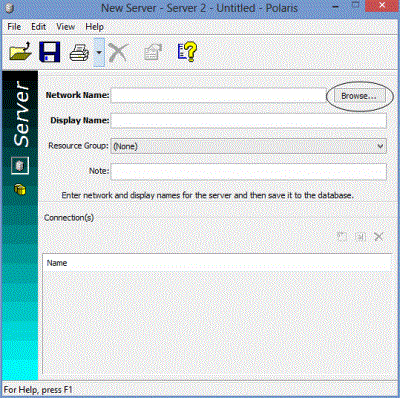
- Select File > New > Server on the Administration Explorer menu bar. The Server workform appears.
- Select Browse to select the server on the network.

- Select the server computer, and click OK. The system name for the server computer is displayed in the Network Name box.
- In the Display Name box, type the name that you want to display in the Polaris user interface for this server.
Note:
Leave the Resource Group option set to None. If you select a resource group, only those organizations associated with that resource group will be able to access the Polaris server. For more information about resource groups, see Setting Up Organization Resource Groups.
- Select File > Save to record this server. The new server is added to Polaris and assigned a server identification number.
- Define any of the following connection types for the servers installed on this computer:
- SQL Server - See Define an SQL server connection.
- Web Server - See Define a Web server connection.
- Telephony Server - See Define a telephony server connection.
- Search Server - See Define a Polaris search server connection.
- Define the Polaris databases available on the server with the Databases view. See Specify Polaris server databases.
- Select File > Save to save the server record.
Related Information
- Modify a database or connection entry - Select the entry and click
 . You can change database names, connection names, and the data link properties for connections. You cannot change existing connection types. See Change a table entry.
 - Delete a database or connection entry - Select the entry and click
 . Removing an entry removes the database from the search tools. See Delete a table entry. You cannot delete the Polaris database server.