Review automatic EDI invoices
EDI invoices are created automatically in Polaris using data retrieved from the supplier’s FTP server, and an email message notifies you that the invoice is available. You can search for EDI invoices by the invoice number suffix EDI.
When an EDI invoice is generated in Polaris, a log of the invoice creation is posted to an EDI invoice log. The log lists the invoice numbers, and includes whether one or more titles have holds. The log also lists any errors.
For more information about the invoice log contents, see The EDI Invoice E-mail Log.
Important:
To deal separately with EDI invoices where the quantity sent does not equal the quantity ordered, select the Hold partial shipment invoices option on the EDI Invoice Defaults profile.
To open and review automatic EDI invoices:
- Select Acquisitions > Invoices from the Polaris Shortcut Bar.
- Select Invoice number suffix in the Search by box, and type EDI in the For box.
- Double-click to open the invoice in the Invoice workform.
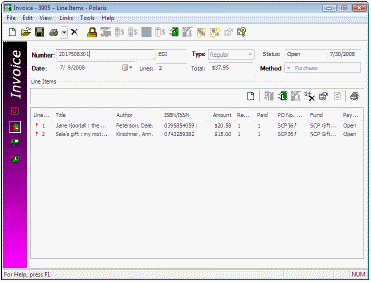
- Select View > Line Items to see the line items in the invoice.
- Check your e-mail for messages regarding EDI invoice transmissions. The email message is a detailed log of the invoices that the EDIAgent picked up from the supplier’s site. The log lists any bibliographic-level holds placed on the items, and any errors in the invoice. See The EDI Invoice Email Log.
- If an invoice line item is listed with a red exclamation point because it was not linked to a purchase order line item, you can manually link to the purchase order line item by doing the following steps:
- On the Invoice Line Item workform, select View > Additional Information.
- Click Find.
- Search for and select the appropriate purchase order line item.
The Find Tool appears with Invoices selected in the Object box.
Note:
You can also limit by the invoice number suffix, EDI. For example, you can search by invoice date range and limit by the EDI suffix. You can select a sort by option to sort the results list before it appears. For example, you could search by the number suffix EDI, limit by supplier, type Baker*, and sort by owner to list the Baker & Taylor EDI invoices sorted by the owning branch.
The automatically-created EDI invoices appear in the results.

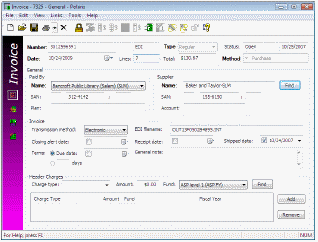
The EDI filename and the date the order was shipped are displayed in the workform (if the supplier includes this information).
Note:
If there are invoice line items with errors that prevented them from linking to purchase order line items, a red exclamation point icon appears next to the invoice line items. The icon also appears in the Find Tool results list for EDI invoice line items that have errors.
Important:
Correct any errors before paying the invoice.
The Additional Information view appears.
The Find Tool appears with Purchase Order Line Item selected.
Any information in the Invoice Line Item workform is overwritten with the information from the purchase order line item you selected.
Related Information
- Setting up EDI ordering - To communicate with a supplier via EDI, you must first contact the supplier and get specific information to enter in Polaris.
- Entering EDI information in the Supplier record - Set up the supplier record with the information you gathered from the supplier. See Enter the supplier’s EDI ordering data.
- Polaris EDIAgent - The Polaris EDIAgent is an SQL job that scans the library’s directory on the supplier’s FTP server. When it finds files, they are retrieved and used to create the purchase order acknowledgment and EDI invoice. If the supplier provides an Advanced Shipping Notice (ASN), it is also retrieved by the EDIAgent.
- Electronic Purchase Order Acknowledgment - After the supplier receives the EDI purchase order, an electronic purchase order acknowledgment is placed on the supplier’s FTP server. The Polaris EDIAgent retrieves the file and saves it in a local directory. You can generate the Electronic Purchase Order Acknowledgment from the Utilities menu.
- Processing partial shipment EDI invoices - If your library has selected the Hold partial shipment invoices option in the EDI Invoice defaults profile, you can generate EDI invoices with invoice line items where the quantity sent does not match the quantity ordered. See Process EDI invoices for partial shipments.