Set General Telephone Notification Parameters
After you have set up the telephony server or servers in Polaris Administration, set the general telephony server parameters for each telephony server as follows:
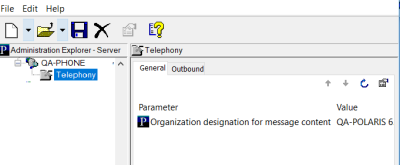
- In the Administration Explorer tree view, expand the telephony server and select Telephony under the server name. The telephony parameters appear in the details view with the General and Outbound tabs.

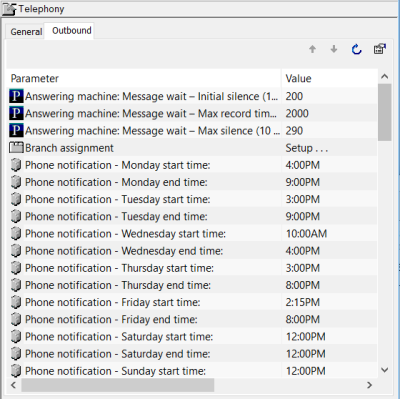
- Click the Outbound tab in the details view. The Outbound parameters appear.

- If you have multiple telephony servers, assign branches to this particular server by following these steps:
- Double-click Branch assignment.
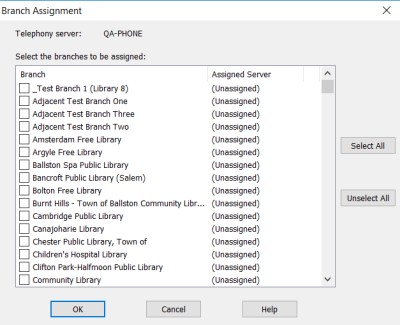
The Branch Assignment dialog box opens. The dialog box shows the current telephony server and the list of organizations that can be assigned to the server, with their current assignments (if any).

- Select the branches that should be assigned to this server.
The list refers to the registered branches of the patrons in the notification queue. In systems with multiple telephony servers, you can assign specific branches to a particular server to minimize long distance calls.
Example:
A large library system has two telephony servers, one located in the western portion of the district and the other in the eastern portion. The library assigns the branches that serve the western patrons to the western server, so calls going out from that server will tend to be local rather than long distance calls.
The branches you have changed are marked with an asterisk * until you save the assignments.
- Click OK to save your assignments.
Note:
If phone notification is chosen for overdue notices, hold request notices, hold cancellation notices, or serials claim notices, but the reporting branch is not assigned to a telephony server, the notices are printed.
- For Phone notification - Allow long distance, indicate whether the telephony server can dial toll-charged (long distance) calls:
- Select Yes to allow long-distance calls.
- Select No to prevent phone calls from being made to patrons whose phone numbers start with 1. Instead, a paper notice is printed automatically.
- If you want phone notification to strip a local area code from the telephone number, set these parameters:
- Phone notification - local area code - Identifies the area code local to the telephony server. Specify the three-digit area code with this parameter.
- Phone notification - Remove local area code before dialing - Set to Yes to strip the specified area code from the phone number.
When these two parameters are set, the following elements are removed from the start of the patron’s telephone number before dialing: [area code], 1[area code], and 1,[areacode].
Note:
If you have more than one local area code, you must remove the local area codes from the patron registration records in the database.
- In the Phone notification – Number of attempts box, type how many times the telephony server should try to call a phone number that has been unsuccessful (busy signal or no answer).
- In the Phone notification – Minimum wait after attempt box, type the number of minutes to wait after an unsuccessful call (busy signal or no answer) before dialing the same number again.
Note:
In setting Phone notification – Minimum wait after attempt and Phone notification – Number of attempts, consider your total volume of calls. If you have a low volume of calls, you set a short wait time, and set a large number of attempts, the same phone number might be called repeatedly in one day. If you have a large volume of calls, the attempts might be made over the course of two or three days even though the parameter settings are the same.
- In the box for Phone notification - Time required for voice call to be considered complete, type the minimum number of seconds a call should run for the notice be considered delivered.
- In the Phone notification – Outside line call prefix box, type the number (if any) needed to access a phone line before the phone number is dialed.
Note:
For the Outside line call prefix and Outside line long distance call prefix, an L tells the Dialogic® card to wait for a local dial tone before proceeding. A comma indicates a 2-second pause for the Dialogic card.
- In the Phone notification – Outside line long distance prefix box, type the number (if any) needed to access a phone line for a long-distance call before the phone number is dialed. If your phone system does not use a separate outside line for long-distance calls, you do not need to set this parameter.
Note:
This prefix is specific to your library telephone system. It is not the same as the prefix to a telephone number that indicates a long-distance call (see step 3).
- In the Phone notification lines (array) box, type which lines on the Dialogic board to use to make the calls.
Example:
Type 1,3,4 to use lines 1, 3, and 4.
Important:
If your system also includes inbound telephony, be sure you are not specifying a line used for incoming calls. Incoming lines are set in the Phone Attendant configuration utility. See Set Phone Attendant Options for Specific Lines.
- Set the Phone notification: Max number of overdue notices to the number of times a patron should be called regarding the same overdue items.
- To include the patron’s name in the notice greeting, set Phone notification - Use patron name in greeting to Yes.
- To provide optional details in overdue notices, set the following parameters:
- Overdues: Allow patron to list overdue titles - Set this parameter to Yes to provide a menu option for the patron to hear a list of the overdue titles.
- Overdues: Include material type when listing overdue titles - If you provide patrons the menu option to hear specific titles, you can set this parameter to Yes to list each item’s material type.
- Overdues: Include branch when listing overdue titles - If you provide patrons the menu option to hear specific titles, you can set this parameter to Yes to list each item’s assigned branch.
- Overdues: Maximum number of overdue titles to list - If you provide patrons the menu option to hear specific titles, use this parameter to limit the number of titles the system will list.
- To provide optional details in hold notices, set the following parameters:
- Holds: Allow patron to list held titles - Set this parameter to Yes to provide a menu option for the patron to hear a list of the held titles ready to be picked up.
- Holds: Include material type when listing held titles - If you provide patrons the menu option to hear specific titles, you can set this parameter to Yes to list each item’s material type.
- Holds: Maximum number of held titles to list - If you provide patrons the menu option to hear specific titles, use this parameter to limit the number of titles the system will list.
- To provide optional details in cancelled hold notices, set the following parameters:
- Cancels: Allow patron to list canceled titles - Set this parameter to Yes to provide a menu option for the patron to hear a list of the cancelled requests.
- Cancels: Include material type when listing canceled titles - If you provide patrons the menu option to hear specific titles, you can set this parameter to Yes to list each item’s material type.
- Cancels: Maximum number of canceled titles to list - If you provide patrons the menu option to hear specific titles, use this parameter to limit the number of titles the system will list.
Note:
For details about the circumstances that may cause a request status to change to Cancelled,
- Click the General tab in the details view of the Explorer.
- Double-click Organization designation for message content, and select the branch whose messages should be used for this server.
Messages are branch-specific. Of the branches assigned to this server, only one branch’s messages can be used for telephone notification. For more information about customizing telephony messages, see Customizing Telephony Messages.
- Select File | Save to save your changes.
See also: