Using Images as Hyperlinks
To create an image as a hyperlink:
- Store an image file in the live/screens directory of your Encore/WebPAC server.
- In the Image file text box of the resource definition, enter the path to the image relative to the screens directory and the image file name.
For example, if the image is named res_image.gif and is stored in the screens directory, enter "res_image.gif" in the Image file text box of the resource definition. - In the resource definition, enter a hyperlink containing #LinkImage#.
You must use the system variable #LinkImage# to create the hyperlink. Using #LinkImage# causes the Pathfinder Pro resolution server to create a hyperlink by combining the resource URL and the image you enter.
The Pathfinder Pro resolution server replaces #LinkImage# with the image hyperlinked to the target resource URL. If you include text, the text is displayed but not linked.
For example, if in the resource definition named JSTOR, you enter:
| in the Image file text box: |
|---|
| the path and file name for the appropriate image |
| in the hyperlink text box: |
| Full text article at #LinkImage# |
then the hyperlink displays as:
Full text article at 
Entering the Link in the Resource Definition
To create an image as a link:
- Store an image file in the live/screens directory of your WebPAC server.
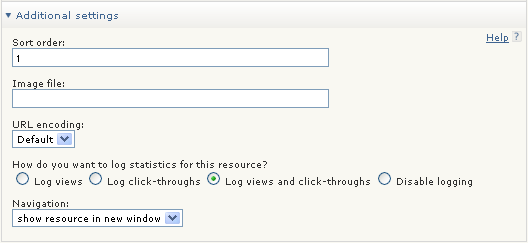
- From the Resources tab, expand Additional Settings.

- In the Image file text box, enter the path to the image relative to the screens directory and the image file name.
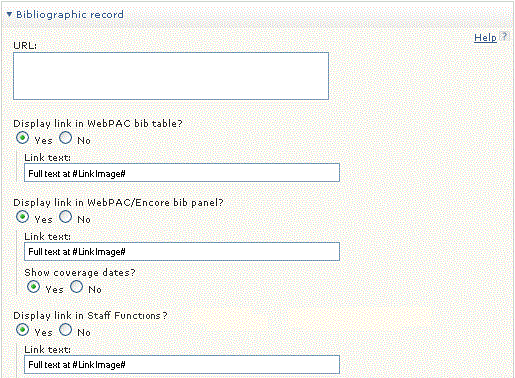
For example, if the image is named res_image.gif and is stored in the screens directory, enter "res_image.gif" in the Image file text box of the resource definition. - From the Resources tab, expand Browse or Bibliographic record and choose where to display links by clicking Yes radio buttons.

-
In the Link text text box, enter a link containing #LinkImage#. - Choose Save.