Editing the Forward Table
To edit entries in the Forward table, choose Admin | Parameters | Web Access Management | Forward Table.
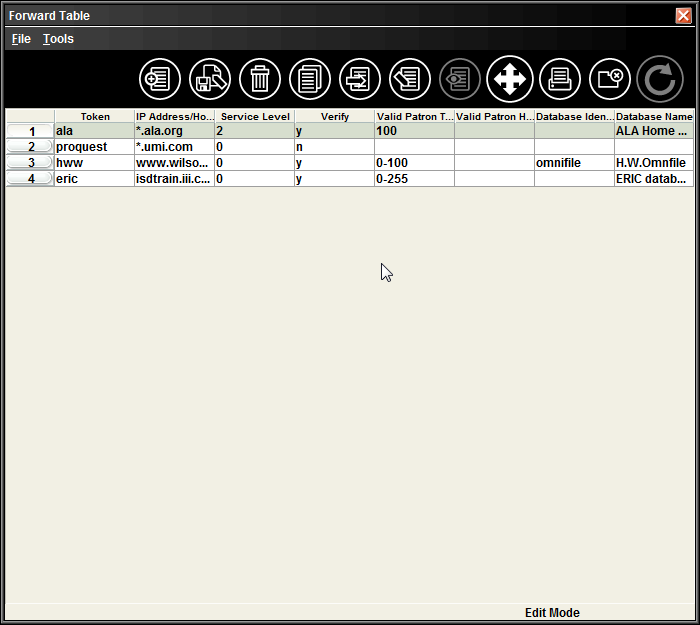
Each entry in the Forward table consists of the following:
Token
The token element identifies each entry when reporting Web Access Management usage. Tokens must be unique and contain at least three, but no more than eight, characters. Tokens are case-sensitive (e.g., "forbes" and "Forbes" are considered to be different tokens). When the client activates a /wm/<token> command link, the Web server looks up the entry for <token> in the Forward table.
IP Address/Host Name
The IP address or host name of the remote server to which to forward the client browser's request. If the host name of the server is used, the Web server must be able to resolve it using a domain name server.
NOTE
The administrators for the remote server must add the IP address of your Innovative server to their own access tables. Make certain to give them this information when setting up forwarding to their server.
If you are using the Innovative Proxy Server to access this remote server, you can include "wildcards" in the host name (for example, *.umi.com ). Do not use wildcards in the last position of a host name. You can use wildcards, for example, to access remote databases or services which are mounted on more than one physical machine.
Service Level
The minimum Service Level required to access the remote server from the Innovative Web server. This service level is compared to the service level of the login that is using the Innovative Web server, e.g., webpac, webremote (for a discussion of WebPAC logins, see Administering User Accounts). If the login's Service Level is less than this value, the login will not be allowed to access the remote server.
Verify
This element indicates whether Web Access Management performs patron verification ('y') or not ('n'). Alternatively, the value of this element can be a Service Level (a number from 0-9); if the login's Service Level is less than the Verify value, the Web server requires patron verification; otherwise, verification is not required. See Web Access Management and Patron Verification for more information.
Valid Patron Types
The range of P TYPE codes that are allowed to forward requests to this server. The range is specified as a single number (e.g., 1), a list of numbers separated by commas (e.g., 1,2,5,15), a range of numbers (e.g., 1-34), or a combination of the two (e.g., 1,3,5-12,34,37,51-63). If you want to allow all patrons to forward requests to this server, enter 0-1999.
Valid Patron Home Libs
Your organization can restrict access based on the Home Library field in a patron record (Patron Home Libs). If your organization does not use the Patron Home Libs field, then leave this field blank.
Database Identifier
If a database vendor offers more than one database on a single server, a database identifier will be provided to you by that vendor for each database to which your library subscribes. The library may limit access for each of these databases separately, based on the login's service level or the value of the PTYPE field in the patron's record.
For example, you could configure your Forward table to set a psych database to service level 4 and valid patron types 0-100, then set a med database to service level 5 and valid patron types 10-19 and 30. Your organization would offer access to each of these databases by providing links on WebPAC pages that include this database ID as part of the URL. For example:
<A HREF="http://www.researchdb.com/psych">Psychology database</A>
<A HREF="http://www.researchdb.com/med">Medical database</A>
If a WebPAC user selects the Psychology database link, Web Access Management will use the data in the psych entry to validate the patron's service level and patron type and then forward the connection to the remote server. Similarly, if the user selects the Medical database link, the med entry will be used.
To forward requests for databases offered by this same vendor other than those identified as psych and med, create another entry without a database identifier. The URL for this Forward table entry would be:
<A HREF="http://www.researchdb.com">General Research databases</A>
When there are multiple Forward table entries with the same value in the IP Addr/Host Name element, the entry without a database ID must appear after those that do use database IDs. This is because Web Access Management reads the Forward table from the top to the bottom and uses the first entry that matches the URL. An entry with a blank database ID element matches every URL with an ID in this element.
Database Name
The database name can be a maximum of 30 alphanumeric characters and is used to report statistics.
Logging Type
This entry accepts two possible values:
- N -- If logging type is 'N', don't log anything for that database
- Y -- If logging type is 'Y', apply category filters to each request for that database and do one of the following:
- If match a filter with category label 'X', then don't log that request
- If match a filter with any category label other than "X", then log with that category label
- If no match found, then log without any category label
Menu options used to edit the Forward table are:
Append
Select this option to add a new entry to the end of the Forward table. The system will prompt you to key each data element for the new entry (see the description of the data elements above). By default, the Forward table can contain 1,000 entries. Contact Innovative to change this.
Save
To save your changes to the Forward table, click Save. If you make changes to the Forward table and do not save those changes, the system prompts you to save before you exit the Forward table.
Delete
To delete an entry, select it and choose Delete. The deletion is not final until you save your changes.
Copy
To add a new resource entry that is similar to one that already exists in the table, you can copy the existing entry and modify the appropriate data elements. The new entry is added to the end of the table. By default, the Forward table can contain up to 1,000 entries. Contact Innovative to change this.
Insert
To insert a new resource entry, choose Insert. On the Insert dialog, complete the prompts as needed.
Choose OK after you are done or choose Cancel to cancel the changes. Choose Print to print the entry you are adding.
Edit
To edit the elements of an existing entry, select the entry and choose Edit.
Modify your entry as needed. Choose OK once you are done or choose Cancel to cancel the changes. Choose Print if you want to print the entry you are editing.
Move
To reorganize the entries, highlight the entry that you want to move and choose Move. The system then asks:
Move entries to row:
Enter the row number and choose OK. The entry will be inserted at the selected point, and all succeeding entries will be shifted down one position.
To print the Forward table, choose Print. Select the printer to use, then choose OK.
Close
Choose Close to close the Forward table.