Use a Template to Create a Publication Pattern
To create a publication pattern for a Serial Holdings record using a publication pattern template:
- Search for and select the bibliographic record for the serial title, right-click, and select Create > Serial Holdings Record.
Note:
This is only one method for creating a serial holdings record. You can also select File > New, Serial Holdings Record from the Polaris Shortcut Bar and then link to the bibliographic record. For other methods of creating a serial holdings record, see Create a serial holdings record.
A blank Serial Holdings Record workform appears.
Tip:
The bold type indicates information that is required before you can save the record.
- Enter the required information and save the serial holdings record.
- Click the Add/Create Pattern icon or press CTRL+SHIFT+N.
![]()
The Create Publication Pattern - Pattern Options wizard appears.
Tip:
Use the Next and Back buttons to navigate the wizard.
- Click the Template Name column to sort the titles alphabetically.
- Click anywhere in the list of templates, and type the first letter of the template’s name. The cursor will jump to the template name or close to it so you can find it quickly.
- Select the template.
Note:
If you chose the wrong template, click the Back button and make another selection.
- Click Next.
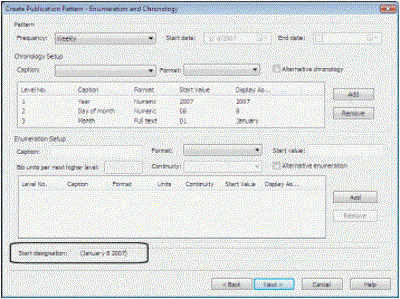
The Enumeration and Chronology page appears, and the Start designation is displayed on the bottom of the page. The date in the Start date box defaults to the template’s start date.
Important:
This is the start date of the template, not your subscription’s start date.
If your subscription begins after this start date, or the first issue you want to predict is after this date, do not change the start date. If you change the start date for a publication pattern template, you must re-enter the enumeration The designation reflecting the alphabetic or numeric scheme used by the publisher on an item or assigned when the holdings statement is created to identify the individual bibliographic or physical parts and to show the relationship of each unit to the unit as a whole. captions and values. Instead of changing the start date, remove the predicted issues that come before the first issue you want to predict. See step 13.

- Check the enumeration and chronology The date(s) used by the publisher on a serially-issued bibliographic unit to help identify or indicate when it was published. The chronology may reflect the dates of coverage, publication, or printing.. It is not necessary to change the enumeration and chronology if you want to start your expected issues after the template’s start date. Simply remove the issues on the Prediction Results page of the Publication Pattern wizard. See step 13.
Important:
If you change the frequency of the pattern, the regularity is removed and another default regularity (to match the selected frequency) will take its place. Only change the frequency if the pattern template is not at all suitable. If you change the frequency by mistake, click Cancel on the last page of the pattern wizard and exit without saving the modified template.
- Click Next to go to the next page of the wizard.
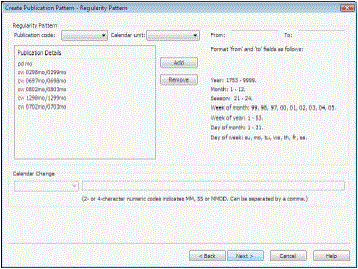
The Regularity Pattern page appears with the publication details.

- Click Next to go to the next page of the wizard.
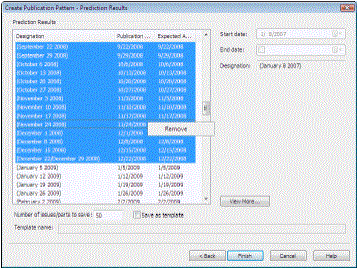
The Prediction Results page appears.
Tip:
If the predicted issues do not appear as you expected, click the Back button and make changes. If you click the Cancel button, the Publication Pattern wizard closes and your changes will not be saved.
- Check the predicted issues and verify that they appear as expected.
Important:
If you used a template with a start date before the actual start of your subscription to this title, there may be issues prior to the issues you want to generate. You need to remove the predicted issues before clicking the Finish button.
- If you want to see more issues than those displayed in the Prediction Results list, click View More.
The number of issues that appear in the Prediction Results list is the number of issues that will be generated.
Important:
Keep clicking View More until you see the first issue you want to predict.
- Remove all the predicted issues with dates before your subscription start date by doing the following steps:
- Select the issue directly above the first issue you want to generate.
- Press CTRL+SHIFT+Home.
- Right-click, and select Remove.
Tip:
This procedure only removes issues or parts from the predicted list; the issues or parts listed are not yet records in the Polaris system. When you have generated issues or parts records and you want to remove them, you delete them (see Delete single or multiple serial issues/parts).

After you remove issues, the Number of issues/parts to save box displays the number of issues remaining.
- Click Finish to create the expected issues.
The expected issues appear in the Check In workform. See Checking In Serials.