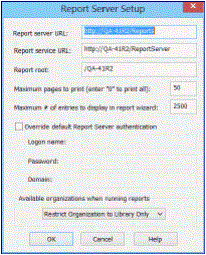
Specify a server for Reporting Services
To specify the server where SQL Server Reporting Services is installed, set up Windows authentication to the server (optional), and specify what organizations are available for selection in report parameters.
Note:
If your Web server is outside the firewall, you can also specify a proxy server to provide access to the Web server for SQL Server Reporting Services. See Specify a proxy server for Reporting Services.
- In the Administration Explorer tree view, open the Profiles folder for the organization or staff member, and select the Staff Client tab in the details view.
- Double-click Report Server. The Report Server Setup dialog box appears.
- Type the URL for the report server in the Report Server URL box. The URL may begin with http:// or https://
- Type the URL for Report Services (Report Manager and Report Designer, if you use it) in the Report service URL box.
- Specify the appropriate report root folder in the Report Root box. The default is /Polaris.
- Specify the number of pages that trigger a message when the report is run.
- (System level only) Set the maximum number of entries that should appear in list boxes and other controls in the report wizard, where users select report parameters from a list. The default setting is 2500. The maximum value is 9999.
- If you want to use authentication for a special Windows account instead of the staff user’s logon credential, follow these steps:
- Select Override default Report Server authentication. The log-in information boxes become available for use.
- Type the log-in name, password, and domain name in the appropriate boxes.
- To set the organizations that appear as parameter options when the staff member sets up a report to run, select one of the following options in the Available organizations when running reports box:
- Unrestricted - Any or all organizations in the system are available for selection in the Organizations report parameter list.
- Restrict Organization to Branch Only - Only the staff member’s logged-on branch appears in the Organizations list.
- Restrict Organization to Library Only - The Organizations list includes the staff member’s logged-on branch and the other branches associated with the parent library of the logged-on branch.
- Click OK on the dialog box.
- Select File > Save.
Note:
For more information about listing staff members in the Explorer, see List staff members in the Explorer.
Note:
The Maximum # of entries to display in report wizard option is available at the system level only.

Important:
Keep the Report Services URL confidential. Limiting access to the Report Manager helps to prevent missing reports and missing printing services.
Note:
A consortium may set up a unique root folder for each member library system. Specify the appropriate root folder for the organization you are setting up.
These characters cannot be used in the Report Root field:
; (semi-colon)
? (question mark)
: (colon)
@ ('at' sign)
& (ampersand)
= (equals sign)
+ (plus sign)
$ (dollar sign)
, (comma)
\ (back slash)
* (asterisk)
< (less than sign)
> (greater than sign)
| (vertical pipe)
" (double quote)
A dialog box will appear when the PDF would exceed the specified number of pages, so that staff members do not have to wait a long time for a report to generate. When the dialog box appears, the staff member can choose to generate all the pages, or a limited number of pages.
For more information about this setting, see Security for Reports.
Note:
Certain reports are available only at the branch level. For these reports, the Organizations list is in alphabetical order. For reports available at the system, library, or branch level, the organizations are listed in hierarchical order (system, library A, library A’s branches, library B, library B’s branches, and so forth).
Related Information
Running reports from the staff client - Using Polaris Standard Reports