Configure remote database usage settings
Usage settings for remote databases can be defined at the system, library, or branch level. To configure usage for each remote database:
- In the Administration Explorer tree view, open the Profiles folder for the organization, and click the PowerPAC tab in the details view.
- Double-click the Remote databases: Usage settings profile. The Remote Databases: Usage Settings dialog box opens.
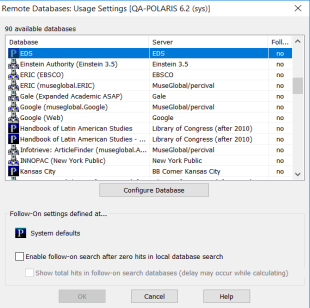
The database list is filtered based on the organization’s resource group membership. The number of entries is displayed at the top of the list. The Follow On column indicates whether the database has been configured to be a follow-on search database for the organization (see step 6).
Note:
Each database can inherit configuration settings independently of the other databases. The icon to the left of the database name indicates the level at which the database was configured.
- To enable any remote databases to be suggested automatically if a search of the local database yields no results, select the Enable follow-on search after zero hits in local database search checkbox. To also show the total number of hits in the follow-on search databases, select the Show total hits in follow-on search databases checkbox.
Once follow-on searching is enabled, you can set specific databases for the follow-on search. See step 6.
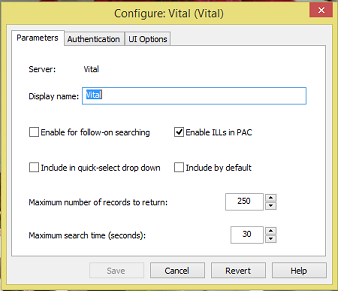
- Select the database you want to configure, and click Configure Database. The Configure <Database Name> dialog box opens to the Parameters tabbed page.
Note:
The Revert button returns all settings in this dialog box to those of the parent organization (System, Library, or System defaults).
- (Optional) Specify a PowerPAC display name for this database, if you want a name other than that shown.
- To designate this database for follow-on searching, select Enable for follow-on searching.
Note:
This option is available only if follow-on searching has been enabled for remote databases on the Remote Databases Usage Settings dialog box (see step 3). The database must also be added as a search target for this organization’s PAC. See Organizing Target Databases for PowerPAC Display.
Consider selecting databases that are universally available to all patrons, regardless of location (all branches, both in-house and remote locations) or patron code, and that do not require logon. If you select a database that requires logging on, the patron will be required to be logged on before the follow-on search occurs. If you select a database that is not available to all patrons, then that database will not be searched during the follow-on search. See Follow-On Search Display in PowerPAC.
Note:
You cannot select more follow-on databases than the limit set with the PowerPAC profile Remote databases: Maximum number that can be searched at once. See Maximum Number of Databases Searchable at One Time. Conversely, you cannot set a maximum number that is fewer than the number of follow-on databases you have selected.
- To enable interlibrary loan (ILL) requests from the PowerPAC for this remote database, select Enable ILLs in PAC. This checkbox is checked by default. If you do not want to enable ILL requests for this database, clear the Enable ILLs in PAC checkbox.
Important:
To allow ILL requests to be sent to remote databases from the PAC, the Enable checkbox must be selected in the ILL options dialog box available from the Parameters Request tab (Parameters, Request, ILL options).
- To include this database in PowerPAC searches by default, select Include by default. For more information about this feature, see Default Remote Databases in PowerPAC Searches.
Note:
The PowerPAC profile Remote databases: Maximum number that can be searched at once sets the maximum number of databases that can be searched at one time. The system honors this limit when including remote databases to be searched by default. For example, if you set the maximum number that can be searched at once to 10, but select 12 to be searched by default, only the first 10 will be selected in PowerPAC.
- To include the database in the Using drop-down list box in the PowerPAC, select the Include in quick-select drop down checkbox.
The illustration shows an example from PowerPAC.
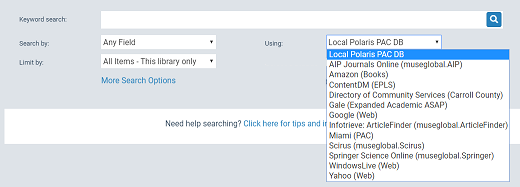
The PowerPAC Using field always includes the local database. When at least one remote database is specified for the Using quick-select drop down, the drop-down list includes the local database and any remote databases specified for inclusion. However, the drop-down list suppresses a database from display according to access restrictions (see steps 13-16), even if it is selected for inclusion.
Note:
A database must be selected to appear in at least one place in the Remote Databases: Categorization of Target Databases dialog box for the organization. See Organizing Target Databases for PowerPAC Display. If the database is not currently categorized and you select Include in quick-select drop down, a warning message appears and the selection is stopped.
- Specify the retrieved records limit by selecting a number in the Maximum number of records to return box.
- Specify the search time limit in seconds by selecting a number in the Maximum search time (seconds) box.
- Click Save.
- Click the Authentication tab to set the authentication methods. The Authentication tab page has three subtabs: Restrictions, Patron Codes, and IP Addresses. The Restrictions subtab is displayed first.
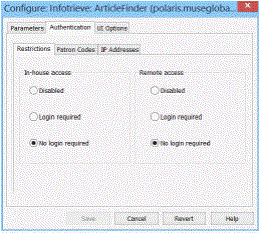
- On the Restrictions subtab, specify whether and how patrons access the database from in-house computers within the library and from remote computers:
- Select one of the following options under In-house access:
-
Disabled - Prevents patrons from accessing the database from a library computer.
-
Login required - Requires patrons to log on with their library account credentials to access the database from a library computer.
-
No login required - Patrons can access the database from a library computer without logging on.
Note:
For information about setting the criteria that determine whether a workstation is in-house or remote,
- Select one of the following options under Remote access:
- Disabled - Prevents patrons from accessing the database from a computer outside of the library.
- Login required - Requires patrons to log in with their library account credentials to access the database from a computer outside of the library.
- No login required - Patrons can access the database from a computer outside of the library without logging in.
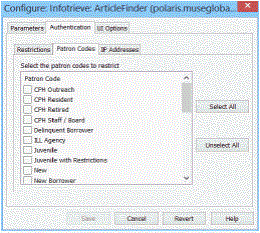
- To control access to the database by patron code, select the Patron Codes subtab, and select the patron codes to restrict. Patrons whose records have the selected patron code will be prevented from accessing the database.
Important:
If you choose to restrict access by patron code, you must also require the patron to log in (see Step 13). If you do not require log-in, your settings for restricted patron codes are ignored.
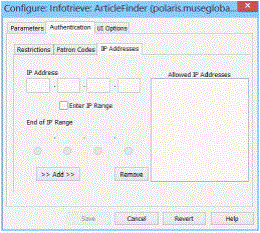
- To allow access to the remote database by the IP address of the PAC search computer, select the IP Addresses subtab, and do the following:
- Type the IP address in the top boxes and click Add.
- To include an IP address range, select Enter IP range, type the beginning IP address in the top boxes and the last two digits of the ending IP address in the bottom boxes.
The IP addresses allowed access are listed in the Allowed IP Addresses box.
- To remove an IP address, select it and click the Remove button.
- Select the UI Options tab to define the search access points that are available for the selected database and search type as follows:
Note:
The default access points for all search types are: Author, Subject, and Title.
- Keyword - Select the access points available for a keyword search with this database selected. ISBN and Any field are additional default access point for keyword searches.
- Advanced - Select the access points available for an advanced search with this database selected. ISBN and Any field are additional default access point for advanced searches.
- Phrase - Select the access points available for a phrase search with this database selected. Any field is an additional default access point for phrase searches.
- Exact - Select the access points available for an exact search with this database is selected.
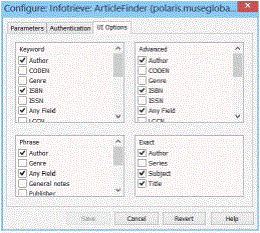
Your settings also control the types of searches available in the PowerPAC Other Searches dashboard that is displayed with results when this database is searched.
- Click Save to save the settings.
Related Information
Filtering PAC remote database search results - You can set up a Contextual Query Language (CQL) filter for a particular Z39.50 connection that filters the results to show only those materials that patrons can actually request.