Managing Feature It Promotions
Libraries can use Feature It to generate awareness of relevant resources that might otherwise go undiscovered in the public access catalog or in the community. With Feature It, you can promote library materials, web resources, and/or community organizations and events in the context of specific search results, similar to “You might also like” features on many popular web sites.
Note:
Feature It and Community Profiles are available by separate licenses.
Use the Cataloging Promotions function in the staff client to select resources to feature, and to specify the conditions under which they will be featured.
Once promotions are set up, when one or more of the PowerPAC user’s search terms (16 words maximum) match the triggers and filters associated with one or more promotion records, promotion links are displayed in a position you specify on the PowerPAC search results screen. A maximum of 8 promotion links can be displayed. If more than 8 promotion links match the user’s search terms, a relevancy ranking formula is applied to select those most relevant to the user’s search terms. (Relevancy is based on the words entered as triggers in the promotion record, not on the metadata in the featured resource records.)
The example shows promotion links for community resources on the dashboard, and library material promotion links at the top of the search results list.
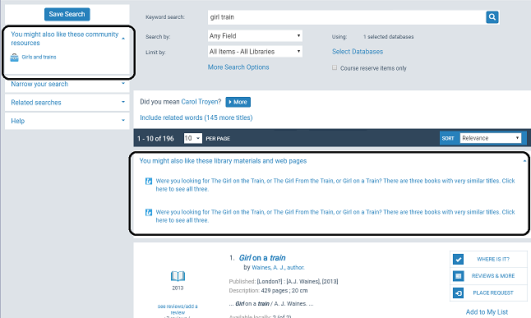
For bibliographic searches, promotions may be displayed for keyword, phrase, exact, advanced, and Boolean searches by one of the following access points (Search by): Any field, Author, General notes, Publisher, Series, Subject, Title. Promotions are not available for course reserve searches or browse searches. However, when the user selects a heading in a browse search headings list, promotions are displayed along with the titles associated with the heading. The selected heading is considered to be the user’s search term when determining which promotions to display.
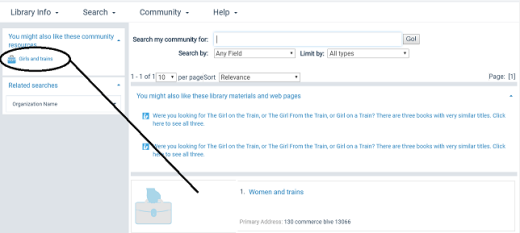
Promotions are also available for community keyword searches by one of the following access points: Any Field, Organization Name, Event Name, Services available, Subject, Notes. Promotions are not available for community browse searches, but when the user selects a heading in community browse results, promotions are displayed along with the records associated with the heading. As with bibliographic browse results, the selected heading is considered to be the user’s search term when determining which promotions to display.
When the user clicks a promotion for a bibliographic record, a deep link to the catalog, or a community/event record, a search is launched for the appropriate bibliographic or community/event record, and the record is displayed in the PowerPAC results list.
When the user clicks a promotion link that is a URL for an external resource, a new browser window opens.
You can enable Feature It for library materials and web resources, community profile and event information (if licensed), or both, setting a separate display placement for each or presenting all promotions in one merged list. In the PAC display, the library icon  indicates bibliographic materials. The briefcase icon
  indicates community information.
For library (bibliographic) material, the list header is You might also like these library materials and web pages. For community information, the list header is You might also like these community resources. For a merged list, the header is You might also like. You can edit the headers in Polaris Language Editor (WebAdmin). The language string IDs are:
- Bibliographic materials - PACML_PACFEATURE_DASHHEAD
- Community information - PACML_CIPACFEATURE_DASHHEAD
- Merged list - PACML_FEATURE_DASHHEAD
In the staff client, use the Cataloging Promotions workform to set up promotions for specific resources
Note:
You can set Feature It display options at the system, library, or branch level. The system uses the settings for the PowerPAC connection organization.
- In the Administration Explorer tree view, open the Profiles folder for the organization, and click the PowerPAC tab in the details view.
- Double-click Feature It: Screen display options. The Feature It: Screen display options dialog box opens.
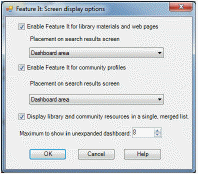
- To set up Feature It for library materials and web resources:
- Select Enable Feature It for library materials and web pages.This setting enables promotion links for library materials and featured URLs when the user searches for either bibliographic records or community information.
- Select the promotion placement on the search results screen. You can select Dashboard area, Beginning of search results, or End of search results.
- To set up Feature It for community information:
- Select Enable Feature It for community profiles. This setting enables promotion links for community information when the user searches for either bibliographic records or community information.
- Select the promotion placement on the search results screen. You can select Dashboard area, Beginning of search results, or End of search results.
Note:
Community Profiles is a separately licensed feature.
- To display library materials and community profile information in one list:
- Enable both options and choose the same display position for both. See steps 3 and 4.
- Select Display library and community resources in a single merged list.
- If you have selected Dashboard area as the placement for an enabled Feature It option, set the maximum number of promotion links to show in an unexpanded dashboard list.
The maximum (and default) value is 8 promotion links. Since this list can occupy considerable dashboard space at the top of the dashboard, forcing the user to scroll to see search filters and related searches, you might want to set the value to a lower number. In this case, the dashboard list displays a more link when appropriate. The user can click more to expand the list (up to 8 links) and less to collapse it. If you set this value to 0, the list is completely collapsed and the user must click a plus sign to expand it.
- Click OK.