Assign web parts to public pages
Each organization specifies which web parts are displayed on the dashboard for specific pages. You can add and remove web parts from individual pages without affecting other pages, and change the order in which web parts appear on any specific page.
Note:
Custom web parts must be defined at the system level before they can be assigned to public pages at the branch level. See Create a custom web part. Web parts set up for Polaris PowerPAC are available to be assigned to Children’s PAC pages, and web parts set up for the Children’s PAC are available to be assigned to Polaris PowerPAC pages.
To specify which web parts are available on specific public pages for an organization:
Important:
Web parts are inherited from the system level unless you make any change at the branch level. Then none are inherited for that branch and you must make the appropriate assignments at the branch level.
- In the Administration Explorer tree view, open the Profiles folder for the organization, and select the PowerPAC tab (or Children’s PAC tab) in the details view.
Note:
You assign web parts to Polaris PowerPAC Children’s Edition separately from Polaris PowerPAC, but the procedure is the same.
-
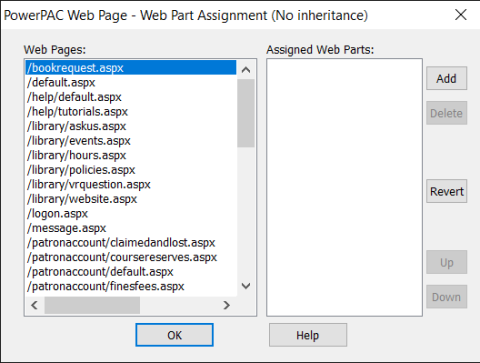
Double-click Dashboards: Web Page/Web Part Assignment. The Web Page - Web Part Assignment dialog box opens.
-
In the Web Pages list, select the public page to which you want to assign web parts:
- If you are assigning web parts to Polaris PowerPAC pages, see Setting Public Access Profiles and Parameters for information about each page.
-
If you are assigning web parts to Polaris PowerPAC Children’s Edition pages, see Setting Public Access Profiles and Parameters for information about each page.
Tip:
To set a page to use the same web parts specified for the page in a parent organization, select the page, and select Revert.The web parts currently assigned to the page are shown in the Assigned Web Parts list.
- To assign a web part to the selected page, do the following:
Select Add. The Web Page - Add Web Parts dialog box appears.
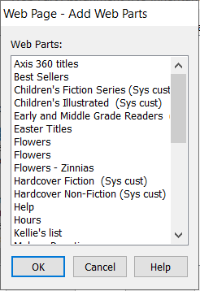
- Select the web parts you want to assign to the webpage.
Select OK.
The selected web parts are displayed in the Assigned Web Parts list on the Web Page - Web Part Assignment dialog box. The order of the list determines the display order in the dashboard for the selected page. To change the position of a web part in the dashboard, select the web part in the Assigned Web Parts list, and select Up or Down.
- Repeat steps 3 and 4 for each page to which you want to assign web parts for this organization.
- Select OK on the Web Page - Web Part Assignment dialog box.
- Select File > Save.
Related Information
- Delete a web part from a page - On the Web Page - Web Part Assignment dialog box, select the web part in the Assigned Web Parts list, and select Delete.
- Revert to system-level settings - On the Web Page - Web Part Assignment dialog box, select Revert.
- Set the default display of web parts - You can determine whether web parts are expanded or closed by default when a page opens. (Patrons can always select a control in the header to expand or close a web part.) To set the default display to expanded web parts, set the PowerPAC profile Dashboards: Expanded to Yes. To set the default display to closed web parts, set the profile to No.