Setting Up Saved Searches in the PAC
Using the search agent, registered patrons can save any search except browse searches, and have the saved searches run automatically either weekly or monthly. (Patrons can also run a saved search manually, at any time.) Saved search criteria have full Unicode support; that is, saved searches can contain non-ASCII characters. Each search run looks for results in the local database that are new since the last run. The results are automatically sent to an email address the patron specifies. By accessing their patron accounts, patrons can view, edit, and delete saved searches. The result count displayed in the PAC patron account shows the total number of new records found in all weekly and/or monthly runs (excluding the initial run).
Note:
Saved searches return results from the local database only, even if the original search included remote databases.
You specify a maximum number of titles to return in the email message. If the maximum is exceeded, the email message includes a link that allows the patron to retrieve the entire set of new titles. Resource groups are honored in saved searches, and a logon link is displayed for eContent in the search results email message. If the patron’s registered branch is a member of a resource group for the econtent, the patron can access the eContent.
The system also stores a “DaysToBacktrack” value, set to 180 days. This allows records that did not match the search criteria in a previous run, but that match now (for example, because a record’s Display in PAC setting has been changed) to be reported once they become available.
The search agent is available in Polaris PowerPAC and Mobile PAC. The example shows the Save Search option in the PowerPAC dashboard.
For each organization that makes the search agent available, you can specify how many searches a patron can have currently saved, the maximum total number of new titles that can be returned when a search is run, and the number of times a search can be run. You specify whether to offer weekly search runs, monthly search runs, or both, and designate a “from” address to appear in the email message that delivers the search results to the patron.
The SQL job SDIDaily runs nightly to process the appropriate saved searches. That is, on any given night, both the weekly and monthly searches scheduled to run on that date are processed. Any errors in the job are reported in an error log, which is placed by default in C:\ProgramData\Polaris\[version]\Logs\SDIAgent (server installation). If there is a datalink (instance), the default location is C:\ProgramData\Polaris\[version]\[DataLinkName]\Logs\SDIAgent.
To set up and enable the search agent:
- In the Administration Explorer tree view, open the Parameters folder for the organization, and click the PAC tab in the details view.
- Double-click Search agent parameters. The Search Agent Parameters dialog box opens.
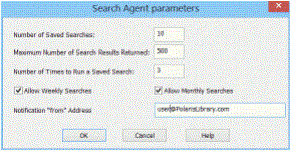
- In the Number of Saved Searches box, type the maximum number of searches a patron can have saved at a time.
- In the Maximum Number of Search Results Returned box, type the maximum number of titles that any run of a saved search can return after filtering for newness.
The default value is 500. Since 500 is a potentially large number to include in an e-mail message, you may want to set this to a lower number. (The minimum value is 1, and the maximum value is 1000.)
- In the Number of Times to Run a Saved Search box, type the maximum number of times a saved search can be run.
Note:
Patrons can set the number of times to run a saved search, up to the maximum you specify with this setting.
- Specify what search frequencies to offer to patrons by selecting either or both of the following options:
- Select the Allow Weekly Searches checkbox to offer patrons the option of running a saved search weekly.
- Select the Allow Monthly Searches checkbox to offer patrons the option of running a saved search monthly.
The frequency options you specify are displayed in the form that patrons complete when they save searches. The form always offers the additional option Suspend, which the patron might use to stop the search for a period of time.
- To set up a “from” address for the notification e-mail, type the address in the Notification “from” Address box. The address can be a real address or a fictitious account. The address must contain the @ symbol; for example, yoursearch@yourlibrary.org
- Click OK on the dialog box.
- In the Administration Explorer, open the Profiles folder for the organization, and click the PAC tab in the details view.
- Double-click Search Agent: Enable, and select Yes.
Note:
To allow logged-in patrons to view a list of their saved searches in the dashboard area of the Polaris PowerPAC window, set the PowerPAC profile Single Login: Enable to Yes.
- Select File > Save.
Related Information
- Book jacket images in search agent results - When a saved search is run, book jackets are displayed in the results based on the Enriched Data setting for the patron’s registered branch. See Setting PowerPAC Narrow/Related Search Options.
- Patron email format - All saved searches sent to the same patron email address must be in the same email format. If the patron specifies a format different from existing saved searches when saving a new search, a message provides the options to specify a different format for the new search or to change all the others.
- Mobile PAC interface - See Saved Searches (Search Agent) in Mobile PAC.