Set up online patron self-registration
Polaris creates a a patron record when a patron registers for a new library account online from Polaris PowerPAC or Mobile PAC. Polaris uses your self-registration format, if you have one defined. By default, Polaris issues the patron a temporary barcode beginning with PACREG. The temporary barcode allows the patron to do certain operations online, such as request a hold, but blocks the patron from checking out materials until the new record is verified by staff.
You can also set Polaris to send an automatic notification email to a library staff account. When the notification arrives, staff members can review the registration information and create the library card.
To allow patrons to register for either type of barcode online
Important:
Do this procedure for each branch that allows patron self-registration.
- In the Administration Explorer tree view, open the Profiles folder for the branch, and click the PAC tab in the details view.
- Double-click Patron access options. The Patron Access Options dialog opens.
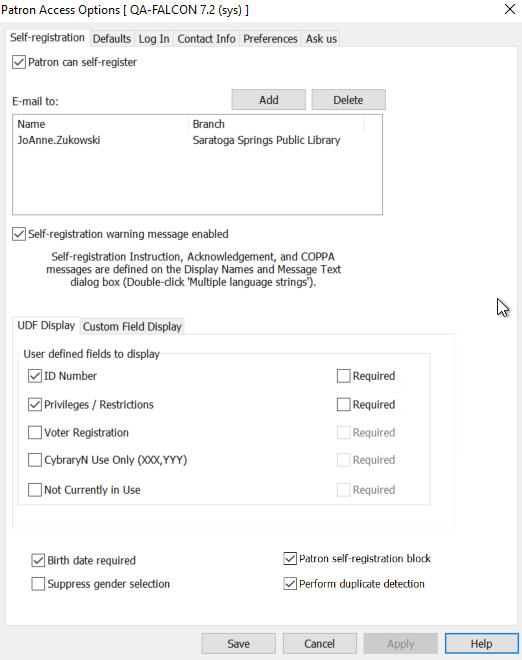
- On the Self-registration tabbed page, select the Patron can self-register checkbox to make online registration available. When this option is selected, patrons see a register now link on PAC logon pages such as the Patron Account logon page and the Ask Us logon page. Clearing the checkbox removes the link, and self-registration is not available.
- To specify a staff address for automatic notification email, do the following:
- Click Add. The Polaris Find Tool appears.
- Search for the staff member or members who should receive the registration notification messages, and select their names in the results list.
- Right-click the highlighted names, and choose Select from the context menu. The Patron Access Options dialog appears, and the selected names appear in the E-mail to list.
- To enable a message regarding self-registration, select the Self-registration warning message enabled checkbox. This message allows the library to comply with the Children’s Online Privacy Act. For information about editing the text of this message, see Editing Messages and Labels.
- To display user-defined fields in the patron self-registration pages in the PAC, and to specify that certain user-defined fields are required, do the following:
- Select the UDF Display tab to display the available user-defined fields (UDFs).
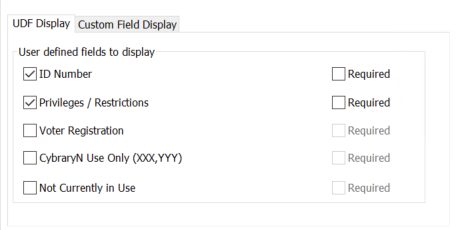
- Under User defined fields to display, select the UDFs you want to display.
- To indicate that a selected UDF is a required field, select the Required checkbox.
- To display patron custom data fields (PCDFs) in the patron self-registration pages in the PAC, and to specify that certain PCDFs are required, do the following:
- Select the Custom Field Display tab to display the available PCDFs.
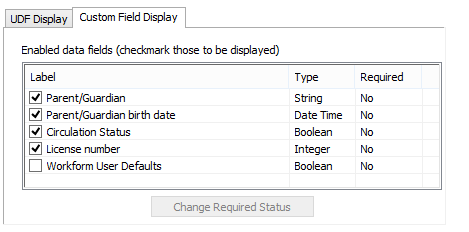
- To display a PCDF in the patron self-registration page in the PAC, select a checkbox under Label.
- To indicate that a PCDF is a required field, select the PCDF, and click Change Required Status. The status changes from No (the default) to Yes.
- To continue setting self-registration display preferences, do the following:
- To require a birth date for self-registration, select Birth date required.
Notes:
When it is included in PAC self-registration, the system uses the birth date to check for duplicate patron records in addition to the first name and last name. If no birth date is supplied, duplicate checking uses only the first and last names.
Innovative recommends requiring the Birth date field if your library wants to restrict checkouts and holds based on the patron's age. See "Using Age-Related Loan Policies" in the Leap documentation for more information.
- To allow patrons to proceed through the self-registration without selecting a gender, select Suppress gender selection.
- To include a verification block on all patrons who self-register in the PAC, Mobile PAC, or Polaris API, select Patron self-registration block.
- To require a duplicate detection check on a patron's information during self-registration, select Perform Duplicate Detection. To disable duplicate detection on patron information entered in PowerPAC, MobilePAC, or Polaris API, clear Perform Duplicate Detection.
Note:To completely disable duplicate detection on patron information entered in PowerPAC, MobilePAC, or Polaris API, ensure the following option is also cleared:
Open the Polaris Administration Explorer, and select Parameters > Patron Services > Duplicate Detection Options.

Ensure the Name on Identification (First and Last) > PAC option is cleared.
- To require a birth date for self-registration, select Birth date required.

- Click the Defaults tab, and specify the default values for patron records created through self-registration:
Notes:
Library staff members can change the default values when they review the online registration.The default notification method is set by the Patron Services parameter Express patron registration options.- Patron code - Select the patron code to assign to all self-registered patrons. You might want all self-registered patrons to have the same code assigned to the majority of your patrons, or you might have a patron code specifically identifying self-registered patrons.
- Language - Select the default language for self-registered patrons.
- Statistical Class - Select the default statistical classification for self-registered patrons.
- Expiration term - Set the default period of time before the library card expires. To set a date according to the current date (such as two years from today), select months or years in the second Expiration term box, and enter a number in the first box. To set a precise date, select exact date in the second Expiration term box; then click the calendar icon and choose a date from the calendar in the first box (or enter the date in the format shown in the Expiration term box).
- Address check term - Set the default period of time when the registration address should be verified. To set a date according to the current date (such as two years from today), selectmonths or years in the second Address check termbox, and enter a number in the first box. To set a precise date, select exact date in the second Address check term box; then click the calendar icon and choose a date from the calendar in the first box (or enter the date in the format shown in theAddress check term box).
- To specify default values for user-defined fields (UDFs) in PAC self-registration pages, do the following:
- On the Defaults tabbed page, select the UDFs subtab to display the UDFs for your organization.
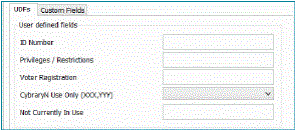
- To specify a default value for a text field, enter the text.
- To specify a default value for a dropdown list, select an option in the list.
Note:
For the best usability, specify a default option if you require a drop-menu UDF. If you don't, the field is blank in a new record. The user must select an option, but it might not be obvious they need to do so.- Click Apply to apply your settings.
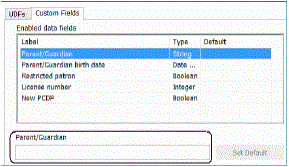
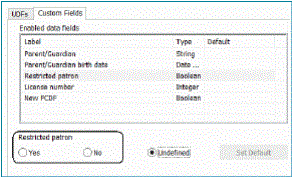
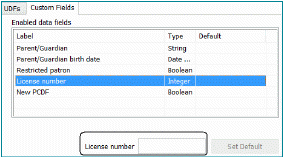
- To specify default values for patron custom data fields (PCDFs) in PAC self-registration pages, do the following:
- On the Defaults tabbed page, select the Custom Fields subtab to display the PCDFs that are available for your organization.

- Select the data field, and do the following:
Note:
A Date field type cannot have a default value.- String custom field - When you select a string field type, you can enter a default value of up to 255 characters.
- Boolean custom field - When you select a Boolean field type, you can select a default value of Yes or No. Boolean fields appear as checkboxes in the patron registration forms. If the default is set to Yes, the checkbox is selected. If the default is No, the checkbox is cleared.
- Integer custom field - When you select an Integer field type, you can enter a default value of up to 255 numbers in the box.
- String custom field - When you select a string field type, you can enter a default value of up to 255 characters.
- After defining the default value for a field, click Set Default.
- When you are finished making changes, click Apply.
- Click Save, and close the dialog box.
Related Information
- Remove block on self-registered patron record -
- Notification preference - The default notification preference for self-registered patrons is the notification setting for the Patron Services parameter Express patron registration options (General defaults tab). The patron can choose another method from the dropdown list during self-registration, and staff can change the notification preference when they verify the registration. You can filter the methods available for selection;
- EReceipts - If the patron’s registered branch has enabled eReceipts
- Registered branch - The patron chooses a registered branch from a list during self-registration. The order of branches in the list is controlled by the PAC profile Branch list order. The setting for the current connection branch is used. When the profile is set to Yes, the branch names appear in ascending alphabetical order by name. When the profile is set to No, the branch names appear in ascending numerical order by internal organization ID. With either setting, the system organization is always first.