View circulation status names, edit descriptions, and add Leap banner text
Circulation statuses are defined at the System level and cannot be modified. However, if you have the required permissions, you can modify the description and/or the circulation status that appears at the bottom of the book jacket image on the Item Record workform in Leap. For more information on the Item Record workform in Leap, see the Leap help.
To view the standard names for item circulation statuses, edit descriptions, and add Leap Item Record workform banner text:
Note:
You can modify the description for any circulation status, and you can use the same description for more than one status, but be cautious in applying the same description to multiple circulation statuses, since this may confuse both staff and patrons.
-
In the Administration Explorer tree view, open the Database Tables folder for the organization, and select Circulation Statuses.
The Circulation Statuses table is displayed in the details view.

-
Double-click the circulation status entry or click
 .
. The Modify: Item Status dialog box appears.

-
Type the new description in the Description box. Modify the description so that it is understandable to everyone, including patrons. The modification affects only the description that is displayed; it remains associated with the underlying circulation status that appears in the Name box.
Note:
The non-circulating item status applies to those items where Non-circulating is checked in the item record. When you modify the description for this status, your description is displayed in the PAC for these items, but the description is not available as a Find Tool search filter or an option for bulk change. The actual status is Non-circulating. -
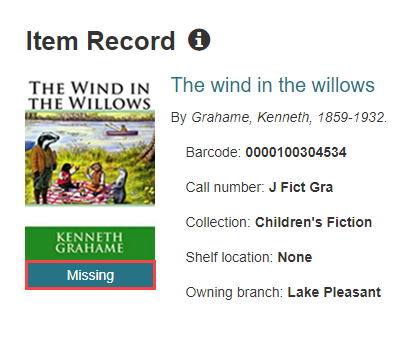
If your library uses Leap and you want to display the circulation status on the bottom of the bookjacket image on the Item Record workform, type the text in the Banner Text box.
The example below shows the banner text in the Leap Item Record workform.
-
Click OK.


Related Information
- Shelving status - When an item is returned to its assigned branch and checked in, the item’s circulation status becomes In even though the item may not be returned immediately to the shelf. For each material type, you can set a period of time during which the checked-in item’s In status is displayed as Shelving (or another appropriate description). See Setting Shelving Status.
- Non-circulating items - See Setting Up Non-Circulating Items.
- Suppressing from PAC by circulation status - You can suppress items with specific circulation statuses from the PAC availability display. See
- Circulation statuses and how they occur - See Default Circulation Statuses.