Receive an ILL Item
When you receive an interlibrary loan item, you create temporary catalog records. Then you can check out the item to the requesting patron.
To receive an interlibrary loan item and create temporary bibliographic and item records:
Important:
Before you use the interlibrary loan function for the first time, create the ILL Item template. See Create ILL item templates.
Note:
ILL item records cannot be changed via bulk change.
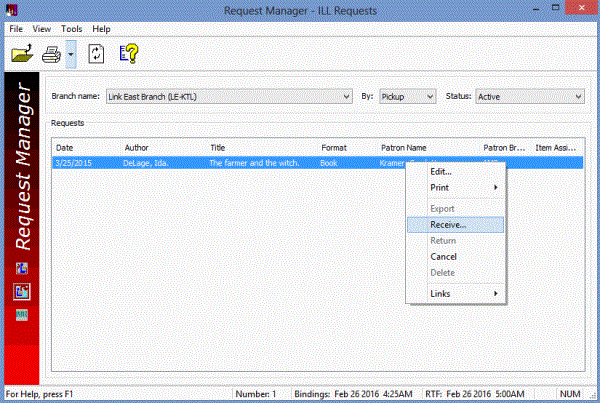
- Display the Active ILL request you want to receive on the Request Manager workform - ILL Requests view. See Display ILL requests in the Requests Manager.
Note:
You can also view ILL requests for a specific patron in the ILL requests list on the Patron Status workform - Requests view.
- Right-click the ILL request to be received, and select Receive from the context menu. You must receive each ILL item individually.

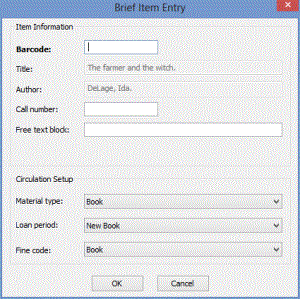
The Brief Item Entry dialog box appears.

- Complete these steps to fill in the Brief Item Entry dialog box:
- Type or scan an item barcode in the Barcode box.
Tip:
To facilitate searching, you may want to place identifying information such as ILL in the Call number box.
- If you want to add a blocking note to the item, type the note in the Free text block box.
- Review the default settings in the remaining boxes and change them, if necessary.
- Click OK to submit your settings.
Temporary bibliographic and item records are created. A message indicates that the item was created, and the item status is Held.
Important:
If your branch is not the pick-up branch, the item status is In-transit. You must ship the item to the pick-up branch.
- Click OK to acknowledge the message.
The following events occur automatically:
- The ILL request status changes to Received.
- A hold notice is generated for the patron.
- An ILL slip is printed.
- An in-transit slip is printed if your branch is not the pick-up branch.
Important:
When you first install Polaris, you need to set up Polaris to print receipts and slips. See Setting Up Receipt Printing from Workforms.
- When the patron arrives to pick up the item, check out the item. See Check out an item.