Re-Importing Existing Non-Integrated OverDrive Records
The import profile must have specific settings that enable the integration with Polaris circulation. Other settings depend on your library’s decisions.
You can create multiple import profiles, each with a specific item template selected, so that the eContent item records are created for specific collections. Then, if your exported non-integrated ebooks and audio-ebooks are in different files, you can import them in separate processes.
Note:
Newly-purchased OverDrive eContent records will be imported automatically using the default Integrated ebook bibs import profile (or a renamed copy of this profile) selected in the OverDrive Vendor Account workform. See Automatic Import Profile Selected in the OverDrive Vendor Account.
To set up the import profile and then import the existing non-integrated OverDrive bibs.
Note:
If this profile is already set up, skip step 1.
- Create an import profile specifically for importing existing non-integrated OverDrive eContent.
You can start with a new import profile, or select an existing profile, rename it, and modify the settings. For general information about copying and renaming import profiles, see Copy a Polaris read-only import profile.
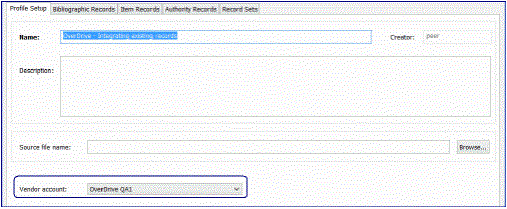
- On the Profile Setup tab, type a new name for the import profile, and select the OverDrive account in the Vendor account box.
- Select the Bibliographic Records tab. If you have deleted all your OverDrive records, you can turn off duplicate detection.
Work with your Polaris site manager to determine which duplicate-detection settings are appropriate for your library.
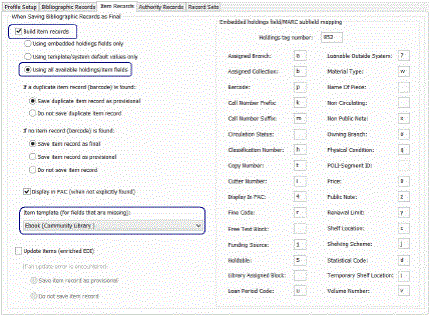
- Select the Item Records tab, and ensure that the following options are set:
- Build item records checkbox is checked
- Using all available holdings/item fields is selected.
- Item template (for fields that are missing): The correct eContent item template is selected.
Note:
You can select any item template when you import existing non-integrated OverDrive eContent. However, if your library uses resource groups, ensure that the item template’s assigned branch is in the resource group that shares the OverDrive vendor account. When new OverDrive eContent is purchased by the library, the automatic process uses the specific Ebook automatic import item template selected in the OverDrive Vendor Account.
- (Optional) Select the Authority Records tab, and modify the settings.
- Select the Record Set tab, and ensure that the record sets are named appropriately to identify the types of records in them.
- Save the import profile.
The import profile is available to select when re-importing existing OverDrive eContent bibs to enable the integration with Polaris circulation.
- After the import profile is set up, to re-import the OverDrive bibs, select Utilities > Importing > Full Import.
- Select the import profile created in step 1.
- On the Profile Setup tab, click Add and select the file of exported non-integrated OverDrive bibs to import.
- Click the Import button.
The OverDrive titles are imported and integrated with Polaris circulation, and item records are created. After the import is complete, an overnight process synchronizes items out and hold requests in existing patron accounts.
Note:
If you want to add call numbers from the 099 tag to the newly-created eContent item records, you can select the Use call number fields from bib record setting on the Item Bulk Change dialog box.