Creating a cloudLibrary Integrated Vendor Account
To create a vendor account for a cloudLibrary (formerly 3M Cloud Library) integrated eContent vendor:
Tip:
You cannot create a new Vendor Account by selecting File > New from the Polaris Shortcut Bar.
- Select the Administration > Explorer > Vendor.
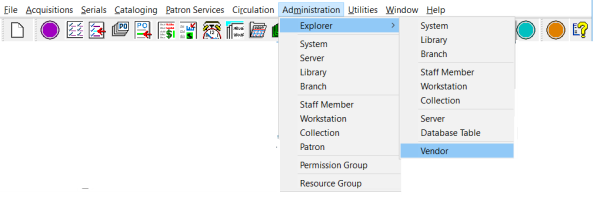
The Administration Explorer - Vendor window appears.
- Select the cloudLibrary vendor, right-click, and select New.
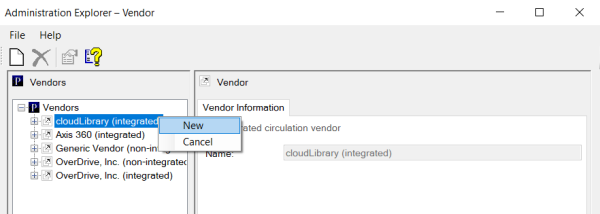
The Vendor Account workform opens.
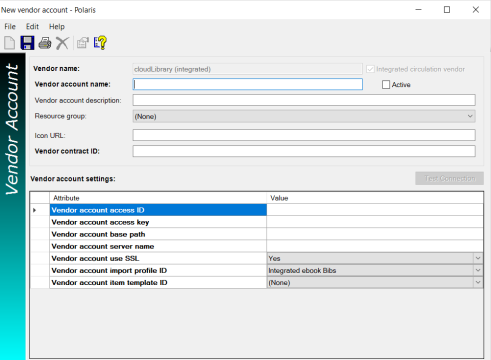
- Modify the editable fields and test the vendor connection as follows:
Note:
Required fields are labeled in bold.
- Vendor name - cloudLibrary (Integrated). System-supplied; read-only
- Integrated circulation vendor - This checkbox is automatically checked if the vendor’s eContent are integrated with Polaris.
- Active - This checkbox is initially unchecked when you are creating a vendor account for an integrated eContent vendor. Leave the checkbox unchecked, and enter the account information. Innovative Interfaces activates the vendor account.
- Vendor account name - (required) The library supplies a unique name to identify the account.
- AccountID - The account ID is supplied by Polaris when the account is saved, and it appears in the title bar of the Vendor Account workform.
- Vendor account description (optional) - The library can add a description for the vendor account.
- Resource group (optional) - The library can select a resource group to limit access to the eContent by branch. For more information on resource groups, see Polaris staff client online Help.
- Icon URL (optional) - The library can specify a URL location for the icon that represents the eContent vendor. The icon is always sized at 16x16 pixels so it is aligned correctly in the PAC. For an integrated eContent vendor, the icon appears next to the TOM icon in PAC displays. If a bibliographic record has multiple resource entities for different integrated vendor accounts, and more than one resource entity is eligible for display in PAC based on resource group filtering, the default icon for the PAC theme is used.
- Vendor contract ID - The vendor’s contract ID is required for integrated eContent vendors. The contract ID must be unique, and it can contain up to 255 characters.
- Vendor account access ID - The library’s access ID for the eContent vendor account.
- Vendor account access key - The library’s access key for the eContent vendor account.
- Vendor account base path - The URL path to the library’s resources at eContent vendor.
- Vendor account server name - The vendor account server name.
- Vendor account use SSL - The library selects Yes or No to indicate whether Secure Socket Layer is used.
- Vendor account import profile ID - The import profile for automatic API-driven imports for the integrated eContent vendor. The PolarisExec Integrated eContent Bibs profile, or a renamed copy of this profile. See Create cloudLibrary eContent import profile(s).
- Vendor account item template ID - The library creates the item template used during the automatic API-driven import process. The item template name must begin with eContent automatic import or eContent automatic import. See Set up the eContent item templates for cloudLibrary.
Tips:
The library’s server should be set within 5 minutes of the correct time because 3M has a 5-minute time difference threshold on their servers. In addition, the SSL must be configured correctly.
- Test connection - Save the Vendor Account workform, and click the Test Connection button to test the API settings in the vendor account and ensure that a connection is made to the vendor’s service (cloudLibraryAPI). If the test is successful, a message confirms that the connection was made. If a connection problem is encountered, one of the following messages may appear: Library account does not exist; Incorrect URL; There was a problem communicating with the cloudLibraryAPI service; or other error messages as they become implemented by the 3M API service.
The test details display the test start and end date/time, the test duration in milliseconds, and the API method used in the test, for example, Get Item circulation.
- Save the Vendor Account workform.
- Ask your Polaris representative to activate the vendor account, which starts the API consumer service.
Important:
After activating a vendor account, or reactivating a suspended vendor account, an IIS reset is required so that the PAC shows the correct information for the vendor's resources. For example, the IIS reset enables the Check Out or Place Hold button to be displayed instead of the Temporarily Unavailable button. Polaris Hosted customers should contact Polaris Customer Support to perform an IIS reset.