Bulk Change Bibliographic Records
You can use Leap to change the Non-MARC, Leader, and MARC tag information on several bibliographic records at once. You can do the following with data fields:
- Insert a new tag.
- Insert a subfield in a tag in any location within that tag, or insert a subfield before or after a specific subfield.
- Delete the first instance of a tag, the last instance of a tag, or all instances of a tag.
- Delete a subfield with any data or specific data, or delete the last instance of the subfield.
- Change a specific tag’s subfield code without changing the data in the subfield.
- Replace a tag’s subfield data with specific data.
- Change a tag’s indicator only.
- Correct non-filing indicators.
Note:
The following tags/subfields cannot be modified or deleted because they are used in duplicate detection: 010 subfield $a, 020 subfield $a, 022 subfield $a, 024 subfield $a, 028 subfield $a, 035 subfield $a, and 037 subfield $a.
To bulk change data fields in bibliographic records
- Go to a bibliographic record set in Leap.
-
Select ACTIONS > Bulk Change.
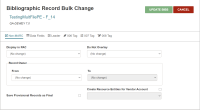
The Bibliographic Record Bulk Change workform opens.
- Select a tab to choose the type of data to change in this record set:
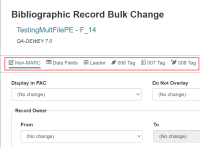
- Non-MARC: Select this tab to change Polaris-specific bibliographic information (such as Display in PAC or Do Not Overlay).
- Data Fields: Select the drop-down list under Operation to choose the type of change to make (for example, insert a new tag, delete a tag, insert a subfield).
- Leader: Select this tab to make changes to the LDR (such as Records status, Bibliographic level, or Encoding level).
- 006 Tag: Select this tab to make changes to the 006 tag (such as for Books, Index, Language, or Cataloging Source).
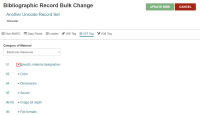
- 007 Tag: Select this tab to make changes to the 007 tag (such as for Electronic Resource, Motion Picture, Sound Recording, or Text).
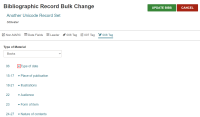
- 008 Tag: Select this tab to make changes to the 008 tag (such as for Books, Index, Language, or Cataloging Source).
Change Non-MARC Information
To change the following Polaris-specific information
- Modify the fields:
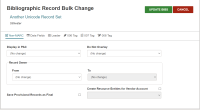
- Display in PAC: to display (or not display) the records in the PAC, select Checked or Unchecked.
- Do Not Overlay: to change the setting that specifies if the bibliographic records can be overlaid, select Checked or Unchecked.
- Record Owner: to change the owner of the records, select the current owner in the From list, and select the new owner in the To list.
- Save Provisional Records as Final: to change provisional bibliographic records to final records, select the checkbox to the right.
- Create Resource Entities for Vendor Account: to create resource entities to manage electronic resources, select the Create Resource Entities for Vendor Account checkbox, and then select a vendor account from the list.
-
Select UPDATE BIBS.
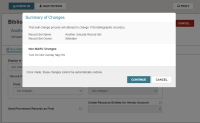
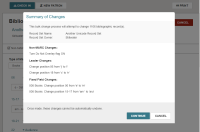
The Summary of Changes dialog opens.
-
Select CONTINUE.
A message tells you the change was added to the bulk change queue. Leap returns you to the Bibliographic Record Set page.
Select Data Fields to Change
To add data field changes to the change queue
- In the Operation box, select the operation you want the bulk change to perform on the data fields you specify.
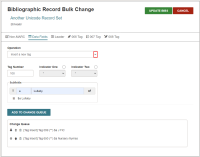
The operation choices are:
Insert a new tag
Insert new subfield(s) into an existing tag (before a specific subfield)
Insert new subfield(s) into an existing tag (after a specific subfield)
Delete an existing tag (first instance only)
Delete an existing tag (last instance only)
Delete an existing tag (all instances)
Delete a subfield (any data) from an existing tag
Delete a subfield (with specific data) from an existing tag
Delete a subfield (any data) from an existing tag (last instance only)
Change a tag's number only (subfields and data stay the same)
Change a specific tag's subfield code only (data stays the same)
Replace a tag's subfield (with specific data)
Correct non-filing indicator values (initial articles 'a', 'an', or 'the')
- Modify the data fields and subfields for the operation.
-
Select the Add button to add a subfield.
-
Select ADD TO CHANGE QUEUE.
Leap adds the modification to the list in the change queue.
- (Optional) Use the arrows in the change queue to reorder changes.
-
When you have completed your changes to the data fields, select UPDATE BIBS.
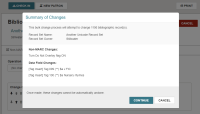
The Summary of Changes dialog opens.
-
Select CONTINUE.
A message tells you the change was added to the bulk change queue. Leap returns you to the Bibliographic Record Set page.
Specify the Leader
To change the Leader information
- Go to the position you want to change.
- In the From field on the left, select the value to change.
- In the "To" field on the right, select the value to put in the selected position.
- Select any other positions you want to change in the Leader, and specify the "From" and "To" values.
-
Select UPDATE BIBS.
The Summary of Changes dialog opens.
-
Select CONTINUE.
A message tells you the change was added to the bulk change queue. Leap returns you to the Bibliographic Record Set page.
Note:
When you select the LDR/06, a message reminds you to make the appropriate changes to the 008 tag.
Tip:
If you are correcting invalid values, you can select an invalid value for the position in the From box, or you can select {All invalid values} from the list. The bulk change process replaces the invalid values with the selection in the "To" box.
Specify the 006 Tag
The 006 tag complements the 008 tag, and modifying either a 008 or a 006 tag in Leap works the same way. Refer to Specify the 008 Tag for step-by-step instructions.
Specify the 007 Tag
To change 007 tag information
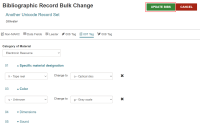
- Select the category to edit from the Category of Material list.
-
Select the down-arrow that corresponds to the 007 tag position you want to change.
- To change an existing value, select a "From" value from the left drop-down list and a "To" value from the right drop-down list.
- Select the positions you want to change in the 007 tag for all records in the record set.
-
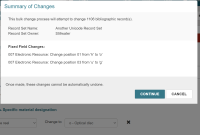
Select UPDATE BIBS.
The Summary of Changes dialog opens.
-
Select CONTINUE.
A message tells you the change was added to the bulk change queue. Leap returns you to the Bibliographic Record Set page.
Specify the 008 Tag
To change 008 tag information
- From the Type of Material list, select the material type to edit.
-
Select the down-arrow that corresponds to the 008 tag position you want to change.
- To change an existing value, select a "From" value from the left drop-down list, and select a "To" value from the right drop-down list.
- Select the positions you want to change in the 008 tag for all records in the record set.
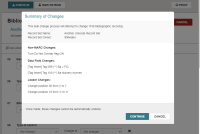
- Check the Summary, and do one of the following:
- Select CONTINUE to make the bulk changes. A message tells you the change was added to the bulk change queue. Leap returns you to the Bibliographic Record Set page.
- Select CANCEL to return to the Bibliographic Bulk Change page without making changes.
-
Select CONTINUE.
A message tells you the change was added to the bulk change queue. Leap returns you to the Bibliographic Record Set page.
The Summary of Changes dialog opens.
Next, you can View Bibliographic Bulk Change Report or Delete a Job.

