Create an Authority Record
You can create authority records in Leap if you have the Authority records: Create permission enabled in Polaris Administration. For more information about cataloging permissions, search for "Cataloging Permissions" in the Polaris staff client help.
Tip:
You can use keyboard shortcuts when creating authority records. See Cataloging Keyboard Shortcuts for a list of all available shortcuts.
-
Select New > Authority Record.
A New Authority Record dialog appears.
-
(Optional) If you want to use a template to create the new record, select a template from the Authority Record Template list. By default, no template is selected.
Note:
For more information about record templates, search for "Using Cataloging Templates" in the Polaris staff client help. -
Select OK.
The New Authority Record workform appears. If you are using a template, the workform displays the MARC fields specified in the template. If you are not using a template, the workform displays the following fields:
- Leader
- 008 field
-
Add or edit MARC tag data by doing one or more of the following:
-
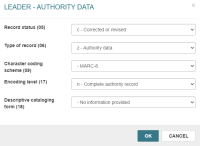
 Edit the Leader or the 008 control field.
You can edit the Leader and the 008 control field. You cannot edit the 001 tag (Control Number) or the 005 tag (Date and Time of Latest Transaction).
To edit the Leader or the 008 control field
-
 Edit an existing data field tag.
To edit a data field tag
- Select the checkbox beside the tag you want to edit.
-
Select EDIT TAG.
Note:
You can also use a keyboard shortcut to open a tag for editing. To do this, press "E".A dialog appears.
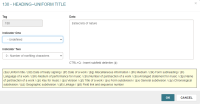
Note:
If your library or branch has enabled the Display MARC field description setting in Polaris Administration, the dialog displays the valid MARC subfield definitions for the current MARC tag in a yellow box. For more information, search for "Turn MARC Tag Name Display On or Off" in the Polaris staff client help. - (Optional) Select a value from the Indicator One list to edit the first indicator.
- (Optional) Select a value from the Indicator Two list to edit the second indicator.
-
(Optional) Enter text in the Data box to edit subfield data.
Note:
Press Ctrl + Q to insert a new subfield delimiter (‡). - Select OK to close the dialog and retain your changes.
-
 Add a new control field.
You can add an 008 control field to the authority record only if the record does not already contain one.
To add an 008 control field
-
Select INSERT to open the INSERT menu.
Note:
You can also use a keyboard shortcut to open the INSERT menu. To do this, press "I". -
Select 008 Control Field.
A dialog appears. The dialog contains editable fields that correspond to the MARC field you selected.
- Edit MARC data.
- Select OK to close the dialog and retain your changes.
-
-
 Add a new data field tag.
To add a data field tag
- Select INSERT to open the INSERT menu.
-
Select Data Field.
Note:
You can also use a keyboard shortcut to open the Data Field dialog. To do this, press "I" and then "F".The Insert Data Field dialog appears.
-
Enter a three-digit tag number in the Tag box. The tag number must be between 010 and 999.
The dialog updates to display appropriate values in the Indicator One and Indicator Two lists.
Note:
If your library or branch has enabled the Display MARC field description setting in Polaris Administration, the dialog also displays the valid MARC subfield definitions for the current MARC tag in a yellow box. For more information, search for "Turn MARC Tag Name Display On or Off" in the Polaris staff client help. - (Optional) Select a value from the Indicator One list to specify the first indicator.
- (Optional) Select a value from the Indicator Two list to specify the second indicator.
-
Enter text in the Data box to add subfield data.
Note:
Press Ctrl + Q to insert a new subfield delimiter (‡). - Select OK to close the dialog and retain your changes.
-
 Reorder tags.
Note:
If your library has enabled automatic MARC tag sorting for authority records, Leap sorts the tags in the authority record in the order specified in the MARC validation profile when you save the record. You do not need to manually reorder tags, and Leap does not save any changes to the tag order that you make manually. For more information about automatic tag sorting, search for "Turn Automatic MARC Tag Sorting On or Off" in the Polaris staff client help.If your library has not enabled automatic MARC tag sorting for authority records, you can change the order of the MARC tags in a authority record. The following conditions apply:
- You cannot move the Leader, the 001 tag, or the 005 tag.
- You cannot move an 008 control field below a data field tag. You also cannot move a data field tag above an 008 control field.
To reorder tags in the authority record
- Select the checkbox next to the tag you want to move.
-
Select MOVE TAG UP or MOVE TAG DOWN.
Note:
You can also press Shift + Up arrow or Shift + Down arrow.
-
 Delete a tag.
You cannot delete the 001 tag, the 005 tag, or any tag that your library has defined as a required authority record tag. For more information about required tags, search for "Administering MARC Validation and Display" in the Polaris staff client help.
To delete a tag
- Select the checkbox next to the tag you want to delete.
-
Select DELETE TAG.
Note:
You can also use a keyboard shortcut to delete the selected tag. To do this, press "D".
-
-
Select SAVE to save the new record to the database.
Leap performs record validation and duplicate detection and then saves the record. For more information, see Authority Record Validation and Duplicate Checking.


