Register a New Patron
To register a new patron:
Tip:
You can also copy a patron record to register a new patron.
- Select New > Patron Record or click the NEW PATRON button.

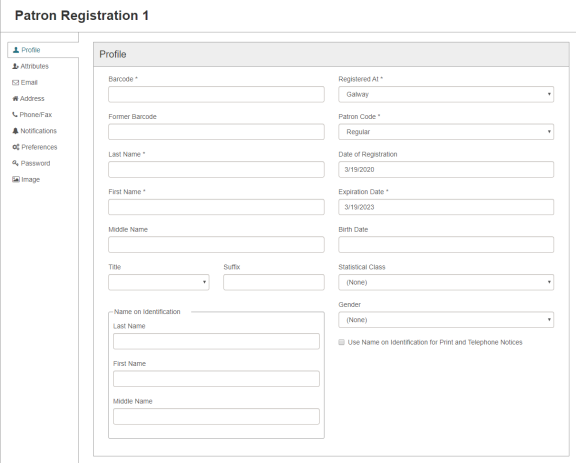
The Patron Registration page appears with the Profile view selected.
Tips:
Required fields are marked with an asterisk.
You can use the vertical scroll bar to scroll through the sections of the Patron Registration page.
Or, to quickly go to a section of page, select an option in the left navigation bar.
- In the Profiles section, enter the following information:
- Scan the patron's barcode in the Barcode box, or type the barcode.
Note:
If the patron was registered previously and had a library card with a barcode, enter the old barcode number in the Former barcode box.- Type the patron’s name in the Last name, First Name, and Middle Name boxes.
If a patron has a preferred name that's different from the patron's legal name, enter the preferred name here, and enter the patron's legal name in the Name on Identification section.
Do not use spaces when typing compound last names. For example, type MacDonald (instead of Mac Donald).
- Select the patron’s title in the Title box.
- Type the patron’s suffix (such as Sr., Jr., II, or Ph.D.) in the Suffix box.
(Optional) If you entered a preferred name for the patron, enter the patron's legal name in the Name on Identification section.
- If the patron wants to use their legal name on print and phone notices, select Use Name on Identification for Print and Telephone notices.
- Select the patron’s registration branch in the Registered At box.
- Select the patron’s code in the Patron Code box.
- Click/tap in the Expiration Date box to open a calendar, and select the date that the patron’s registration will expire.
- Type the patron’s birth date in the Birth Date box.
- Select a statistical class for the patron.
- Select Gender from the drop down menu.
If you provide both preferred and legal names, Polaris uses the Name on Identification section for collection agency reporting.
Don't use the fields in the Name on Identification section to record anything other than the patron's legal name.
- Select Attributes in the navigation bar to go to the Attributes section, and enter additional information in the user-defined and custom data fields that your library has set up. For more information on user-defined and patron custom data fields, see the Polaris staff client online Help.
- Select Email in the navigation bar to go to the Email view, and enter the patron's email address and alternate email address (if applicable).

- Select Address in the navigation bar to go to the Addresses section, and click the ADDRESS button to add the patron’s address.
The Address section expands.
- Enter the following information in the expanded Address section:
- Select an address type in the Address Type box.
- Enter the postal code in the Postal Code box. The City, State, and County boxes are filled in based on the postal code you entered. If these boxes are not automatically filled, you can type the city, state, and county. If the state, province, or county is not required as part of the address, you can leave the State and County boxes empty.
- Type the patron’s street address in the Street Address box and, if necessary, the Street Address Line 2 box.
- Click/tap in the Address Check Date box, and select a date when the patron’s address should be checked. Or, under Term, select a number and then select Years or Months. The address check date changes when you select a term.
- Select Phone/Fax in the navigation bar and enter the patron's phone number(s) and fax number (if applicable).
- Select Notification Settings to go to the Notification Settings section.
- In the Notification Settings section, select from the following options:
- Select the address type where notices will be sent. The addresses must be entered in the Addresses section to appear in this list. For example, if you specified a home address, it is listed as Home.
- Select the electronic receipt option in the eReceipt Option box.
- Select the notification option to use in the Notification Option box.
- If an additional text message notice will be sent to the patron, select the Additional TXT Notice box and then select from the following:
- Text Messaging Phone
- Wireless Carrier
- Select Preferences to go to the Preferences section.
- In the Preferences section, select the check boxes that indicate the patron's preferences:
- Under Exclude from Notices and Reminders, select the notice and reminder types that the patron does not want to receive.
- If the patron speaks a language other than English, select the preferred language from the Language list.
- Select the other applicable preference check boxes.
- In the Password section, enter the patron’s password and re-enter it in the Password (Confirm) box.
If the passwords do not match, the Password (Confirm) box has a red border.
- To save a patron’s picture in the record, go to the Patron Image section, and do the following steps:
Note:
To take a new patron photograph from a workstation, a webcam must be installed. If you are running Leap on an iPad, you can use the iPad camera.
- Select UPDATE IMAGE.
- Click/tap SELECT IMAGE and select one of the following options:
- TAKE PHOTO - The camera opens. Take the patron’s photo and select Use Photo to use the image as it was captured. You can select Retake to take a new photograph.
- CHOOSE EXISTING- Browse and select the existing patron photo. On an iPad, you can select a photo from the Camera Roll.

The picture is displayed in the Update Image view.
- Select SAVE to save the patron’s picture.
Select CLOSE to close the Update Image box and return to the patron’s record.
- Select SAVE to save the new patron record.
If no similar patron records are found, the new patron record is saved.
If potential duplicate patron records are found in the database, a Record Not Saved dialog box opens that lists the potential duplicates. See Merge Patron Records for steps on how to merge duplicates.