Outreach Services (ORS)
You can use Leap to designate a patron for outreach services, as you would in the Staff Client. You can create a profile of the patron's reading and media interests, delivery preferences, service dates, and other information. Based on the patron's interest profile, Leap generates a selection list of titles. From the Selection list, you can select available items for a pick list, pull the items on the list, and place holds.
If the outreach services patron has designated an individual to pick up the items, you can contact the designated individual to pick up the items, and the items circulate in the normal way. Alternatively, you can pull the items on the pick list and pack them for delivery. You can set aside the packed items for delivery drivers. If the delivery method is by mail, you can use the Staff Client to print mailing labels or export patron address information to another application.
The service dates on each ORS patron's profile help you manage outreach services for multiple patrons.
Follow the procedures below to enable and manage Outreach Services in Leap:
- Enabling Outreach Services for a Patron and Creating a Selection List
- Adding to a Pick List
- Working with a Pick List
- Arranging Delivery of the Pick List Items
- Rating Returned Pick List Items
Enabling Outreach Services for a Patron and Creating a Selection List
- Search for a patron using the Find Tool.
- Open a Patron Record from the search results.
- Go to the Reader Services view.
- Select the Outreach Enabled check box and click Save. The Update Last Service Date, Preferences, and Selection List buttons are enabled.

- In the Outreach Services section of the Reader Services view, do the following:
- Set Outreach Status: Activate and deactivate the outreach services for this patron.
- Set Dates: If the patron's outreach services status is inactive, set a reactivate date.
- Number of items to Send: Enter the maximum number of items the patron can receive each service.
- Patron Selection Only: Select if the patron only wants to receive items from the Pick List items. If the check box is cleared, library staff can also choose items.
- Allow previous items to be resent: Select if the patron can receive the same items again.
- Months to Wait: Enter the number of months to wait before resending items previously sent.
If you want to adjust the last service date, select the Update Last Service Date button, and select a date from the calendar.
If desired, set the Next Service date.
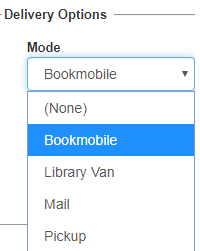
- In the Delivery Options section, do the following:
- Select a delivery mode, route, and stop, if applicable.
- Define either a specific delivery date or a recurring schedule.
- If the patron has designated a person to pick up items, enter the person's name.
- Add notes as needed.
- Click Preferences and select at least one preference for the patron.
- Click the Selection List button to open the ORS Selection List workform.
- Click Build List to generate a selection list for the patron based on the preferences.
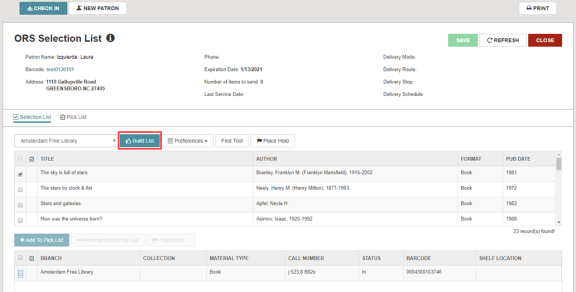
- Open the Find Tool to search for and add other items to the selection list.
- Select a row in the selection list and click the Place Hold button to place a hold from the patron's Holds view. Once the hold request is created, you return to the ORS Selection List workform. Your held item is marked with a flag.
Create a Pick List from a Selection List
To create a pick list from a selection list:
- To add items to a pick list, do the following:
- Select a row in the top portion of the selection list. Available items appear in the lower portion of the selection list.
- Select an available item from the lower portion of the selection list and click +Add To Pick List. The pick list title is marked with a check.
- To remove items from a pick list, do the following:
- Select a checked row in the top portion of the selection list.
- Select the pick-list item from the lower portion of the selection list and click -Remove From Pick List. The check beside the title is removed.
Adding to a Pick List
Add to a Pick List from Holds
To add items on hold for this patron to their pick list:
- Go to the Pick List View in the ORS Selection List workform.
- Click the ACTIONS menu and select Add Held Items.
Add to a Pick List Using Barcodes
If you have already pulled items for a pick list, you can add them to the pick list using the items' barcodes.
To add to a pick list using barcodes:
- Go to the Pick List view in the ORS Selection List workform.
- Place your cursor in the Scan or enter barcode field and scan or type an item's barcode.
- Click or press the enter button to add the item to the pick list.
Add to a Pick List Using RFID
If you have already pulled items for a pick list, you can add them to the pick list using the items' RFID tags.
To add to a pick list using RFID tags:
- Go to the Pick List View in the ORS Selection List workform.
- Place an RFID-tagged item on the antenna tray.
- Click or press the enter button to add the item to the pick list.
Add to a Pick List Using Find Tool
To add to a pick list using the Find Tool:
- Go to the Pick List view in the ORS Selection List workform.
- Click the FIND TOOL button.
- Enter a keyword or search string and click the Search (magnifying glass) button. A list of results appears.
- Click a line to select the item. To select multiple items, hold the Control key and select the items.
- Click OPEN to add all selected items to the pick list.
Working with a Pick List
Once you create a pick list, you can filter and select items within the list.
By selecting items and using the ACTIONS menu, you can do the following with the items on the list:
- Place Hold
- Remove items
Arranging Delivery of the Pick List Items
Library staff can arrange delivery of the pick list items. Use any of the following delivery methods:
- Pick up: Contact the individual designated to pick up items for the patron.
- Delivery: Arrange for library delivery drivers to deliver the items.
- Mail: Use the Staff Client to print mailing labels or export patron address information to another application.
Select and Schedule a Delivery
- Open an ORS-enabled patron record and go to the Reader Services view.
- Use the Delivery Options section of the Reader Services view to do the following:
- Set Delivery Mode: Select the delivery method for this patron's items.
- Set Route and Stop: Select a route. The Stop drop-down list offers options based on the route.
- Schedule: Select either an exact date or the frequency of deliveries. If you select Exact Date, enter the date to deliver in the next field. If you select Daily, you can enter the number of days between deliveries in the Every _ day(s) field. All other schedule options operate according to the Last Service and Next Service dates in the Outreach Services section.

- Pickup Person: Enter the name of the individual authorized to pick up and return items for this patron.
- Set Delivery Mode: Select the delivery method for this patron's items.
Rating Returned Pick List Items
When an outreach patron returns pick list items, library staff can enter a rating for each item.
Enter a Rating
- Go to the patron's Profile and select the Reading History view.
- Select an item in the patron's reading history, and click Add / Modify Rating.

- Select a rating from the drop-down list and enter a note.
- Click UPDATE RATING. The rating and note appear in the Reading History table.
Note: If the patron has checked out and rated the same title more than once, each rating appears until the bibliographic records are purged.