Using Patron Checkout Limits
Sierra allows you to use more flexible lending policies, by limiting checkout by item type, item location and library location for each patron type. The number of items that patrons can checkout must be set between 0 and 999. You can enter limits manually or import them. Refer to "Importing and Exporting Patron Checkout Limits" on page 1 for more details.
If a specific item type or patron type combination is not configured, the system treats it as unlimited, and as such subject to other loan rule limits.
Once a patron has reached the limit set up for their location, item type and library location, the following screen appears when they try to checkout additional items:
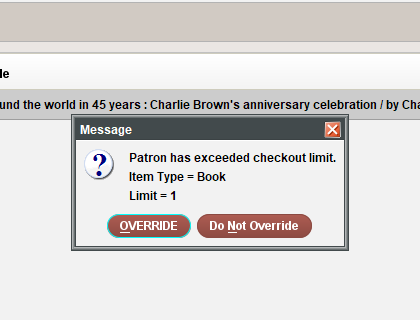
Authorized staff users can override the limit block from this screen.
You can also print the location served map under Admin | Parameters | Circulation | Print Locations Served Map.
Setting up Patron Checkout Limits
You can set up three types of Patron Checkout Limits:
-
Item Type Blocks
-
Item Location Blocks
-
Library Location Blocks
Setting up Item Type Blocks
You can add, edit or delete item type blocks:
To add item type blocks:
-
Select Admin | Parameters | Circulation | Patron Checkout Limits.
The Item Type Blocks tab of Patron Checkout Limits table appears.
-
Select Add from the toolbar.
OR
Select Tools | Add.
The Add Block dialog box appears.
-
Enter the required information.
The available fields are:
-
Item Type - Start typing the item type name or double-click the field to open a popup window and select the desired item type.
-
Patron Type - Start typing the patron type name or double-click the field to open a popup window and select the desired patron type.
-
Max Item - Enter a maximum amount of items for the limit.
-
-
Select Save.
The item type block is saved.
To edit item type blocks:
-
Select Admin | Parameters | Circulation | Patron Checkout Limits.
The Item Type Blocks tab of the Patron Checkout Limits table appears.
-
Select the item type block you wish to edit.
-
Select Edit.
OR
Select Tools | Edit.
The Edit Block dialog box appears.
-
Edit the Max Item field.
-
Select Save.
The edited item type block is saved.
To delete item type blocks:
-
Select Admin | Parameters | Circulation | Patron Checkout Limits.
The Item Type Blocks tab of the Patron Checkout Limits table appears.
-
Select the item type block you wish to delete.
The Delete Item Block dialog box appears.
-
Select Yes.
The item type block is deleted from the table.
Setting up Item Location Blocks
You can add, edit or delete item location blocks:
To add item location blocks:
-
Select Admin | Parameters | Circulation | Patron Checkout Limits.
The Item Type Blocks tab of Patron Checkout Limits table appears.
-
Select Item Location Blocks tab.
The Item Location Blocks tab of the Patron Checkout Limit table appears.
-
Select Add from the toolbar.
OR
Select Tools | Add.
The Add Block dialog box appears.
-
Enter the required information.
The available fields are:
-
Item Location - Start typing the item location name or double-click the field to open a popup window and select the desired item location.
-
Patron Type - Start typing the patron type name or double-click the field to open a popup window and select the desired patron type.
-
Max Item - Enter a maximum amount of items for the limit.
-
-
Select Save.
The item location block is saved.
To edit a an item location block:
-
Select Admin | Parameters | Circulation | Patron Checkout Limits.
The Item Type Blocks tab of the Patron Checkout Limits table appears.
-
Select Item Location Blocks tab.
The Item Location Blocks tab of the Patron Checkout Limit table appears.
-
Select the item location block you wish to edit.
-
Select Edit.
OR
Select Tools | Edit.
The Edit Block dialog box appears.
-
Edit the Max Item field.
-
Select Save.
The edited item location block is saved.
To delete an item location block:
-
Select Admin | Parameters | Circulation | Patron Checkout Limits.
The Item Type Blocks tab of the Patron Checkout Limits table appears.
-
Select Item Location Type Blocks tab.
The Item Location Blocks tab of the Patron Checkout Limit table appears.
-
Select the item location block you wish to delete.
The Delete Item Block dialog box appears.
-
Select Yes.
The item location block is deleted from the table.
Setting up Library Location Blocks
You can add, edit or delete library location blocks. Library location refers to locations served.
To add library location blocks:
-
Select Admin | Parameters | Circulation | Patron Checkout Limits.
The Item Type Blocks tab of Patron Checkout Limits table appears.
-
Select Library Location Blocks tab.
The Library Location Blocks tab of the Patron Checkout Limit table appears.
-
Select Add from the toolbar.
OR
Select Tools | Add.
The Add Block dialog box appears.
-
Enter the required information.
The available fields are:
-
Library Location - Start typing the library location name or double-click the field to open a popup window and select the desired library location.
-
Patron Type - Start typing the patron type name or double-click the field to open a popup window and select the desired patron type.
-
Max Item - Enter a maximum amount of items for the limit.
-
-
Select Save.
The library location block is saved.
To edit a an library location block:
-
Select Admin | Parameters | Circulation | Patron Checkout Limits.
The Item Type Blocks tab of the Patron Checkout Limits table appears.
-
Select Library Location Blocks tab.
The Library Location Blocks tab of the Patron Checkout Limit table appears.
-
Select the library location block you wish to edit.
-
Select Edit.
OR
Select Tools | Edit.
The Edit Block dialog box appears.
-
Edit the Max Item field.
-
Select Save.
The edited item location block is saved.
To delete library location blocks:
-
Select Admin | Parameters | Circulation | Patron Checkout Limits.
The Item Type Blocks tab of the Patron Checkout Limits table appears.
-
Select Library Location Blocks tab.
The Library Location Blocks tab of the Patron Checkout Limit table appears.
-
Select an library location block you wish to delete.
The Delete Item Block dialog box appears.
-
Select Yes.
The item location block is deleted from the table.
Importing and Exporting Patron Checkout Limits
Sierra allows you to import new or export existing configurations of Patron Checkout Limits table. When importing new configurations, Sierra allows .csv and .txt file formats. To ensure consistency across platforms, Sierra allows you to export configurations in .txt file format.
To import patron checkout limits:
-
Select Admin | Parameters | Circulation | Patron Checkout Limits.
The Item Type Blocks tab of the Patron Checkout Limits table appears.
-
Select the tab for the type of block you wish to import.
-
Select Import on the toolbar.
OR
Select File | Import.
The confirmation prompt appears with a warning that the current values are going to be replaced.
-
Select Yes.
The dialog box appears.
-
Select the file you want to import.
-
Select Choose.
The configuration is now imported.
To export patron checkout limits:
-
Select Admin | Parameters | Circulation | Patron Checkout Limits.
The Item Type Blocks tab of the Patron Checkout Limits table appears.
-
Select the tab for the type of block you wish to import.
-
Select Export on the toolbar.
OR
Select File | Export.
The Choose output file dialog appears.
-
Enter the name of the file and choose the file format.
-
Select Save.
The configuration is exported.