Uploading SSO IDs to Staff User Accounts
If your organization has enabled SAML-based authentication for staff, you must enter an SSO ID in each staff user account before they can begin using SAML authentication. During the authentication process, Sierra compares the attribute returned by the identify provider (IdP) against the SSO ID to allow access.
In the Administration Application, you can upload these IDs in batch using a comma-separated values (.csv) file. When processing the file, Sierra loads the ID for each staff user to the SSO ID field of their user account. For information on how to format your file, see the File Format section below.
To upload a file of SSO IDs:
- In the Sierra Administration application, click SAML Configuration in the Back End Management section.
- Select the Upload SSO IDs tab.
- Click Browse.
- Navigate to the file that you want to upload, and click Open. The system returns you to the Upload SSO IDs tab and displays the path of the file you selected.
- Click UPLOAD. Sierra processes the file.
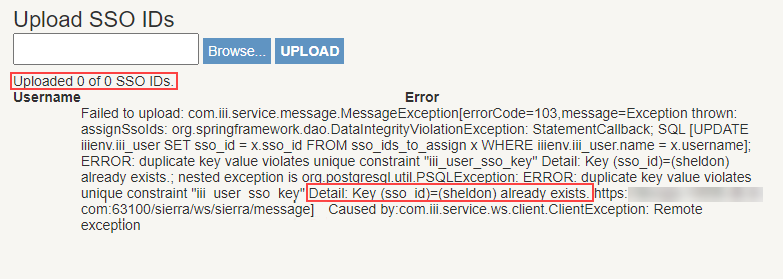
If there are any invalid entries in the file, the system displays an error message and exits the process. For example, the following image shows an error caused by an SSO ID value that already exists in the system.
When Sierra detects an error, it makes no changes to user accounts. To correct the error, locate the SSO ID that caused the error, change or remove that entry in your input file, and try uploading it again.
File Format
Input files must have the following format:
- The first row is the header row. Sierra ignores this line.
- Each subsequent row contains the data for a single staff user in the format [username],[sso_id] where:
- [username] -- The login name from the user's account in Sierra. This value is case-sensitive.
- [sso_id] -- The match point from the IdP to use during authentication. This value must be unique and is case-sensitive.
