Add a Staff Member
To add a staff member
-
On the Polaris System Administration (web-based) Home screen, select Staff Members.
The Staff Members screen appears.
-
Select +New Staff Member.
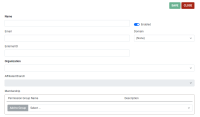
A new staff member workform appears.
- In the Name box, enter the staff member name. The name must be unique within the staff member's domain.
- (Optional) Select the Enabled toggle to enable or disable the staff member. When a staff member's record is enabled, the staff member can sign in to Polaris.
- Enter the staff member's email address in the Email box.
-
If your Polaris installation is a multi-domain system, select the staff member's network domain from the Domain list.
Note:
For more information about multi-domain Polaris installations, search for "Multi-Domain System Support" in the Polaris staff client help. -
If your library's process for authenticating staff members requires an external ID, enter the value in the External ID box.
The external ID must be unique and a maximum of 100 characters.
Note:
The external ID may be used during the authentication process when a staff member signs in to Leap or Polaris System Administration (web-based). For more information, see The Staff Member External ID Field. - From the Organization list, select the organization the staff member is associated with. The Organization list includes both libraries and branches.
- If you selected a library from the Organization list, select the branch the staff member is associated with from the Affiliated Branch list.
-
(Optional) Add the staff member to one or more permission groups. To do this:
- In the Membership box, select a permission group.
- Select Add to Group.
Note:
A new staff member has no permissions until you assign them to the staff member record. For more information about permissions and permission groups, search for "Granting Permissions" or "Managing Permissions with Permission Groups" in the Polaris staff client help. - Select SAVE.
