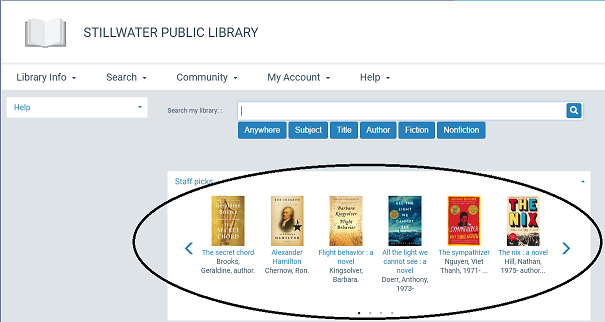
Content Carousels on the PowerPAC Portal Page
A content carousel is a rotating graphical representation of a list of materials in the local library catalog, displayed on the PowerPAC portal page. The PowerPAC user can click or tap any title in the carousel to launch a search for the title in the library catalog.
Each carousel can consist of a specified bibliographic record set created in the staff client, or titles from any of the following system-defined and automatic dashboards (Web parts):
- Most Circulated Titles
- On-Order Items
- New Books
- New Large Print
- New Sound Recordings
- New Videos
- BookSense best-seller lists:
- Children's Fiction Series
- Children’s Illustrated
- Early and Middle Grade Readers
- Hardcover Fiction
- Hardcover Non-Fiction
- Mass Market
- Trade Paperback Fiction
- Trade Paperback Non-Fiction
- Young Adult
Tip:
The content carousel is not intended to be an alternate display of the best-seller lists as they appear in the dashboard. Instead, it is an entry point into the library’s collection because it contains only materials known to be in the library’s database.
For more information about these system-defined and automatic Web parts, see Defining Web Parts for Dashboards.
Carousels based on record sets are populated when they are displayed. If a title is added to or deleted from a record set, the carousel is updated when the page cache is refreshed (for example, through IIS reset or auto-cycling), rather than every time the carousel appears. If the record set is deleted, the carousel is not created and does not appear on the page. Carousels based on automatic and system-defined dashboards are also refreshed to reflect new content whenever the cache is rebuilt in PowerPAC.
There is no limit to the number of content carousels that can appear on the portal page, but you may find that displaying too many content carousels will adversely affect response time.
Tip:
If a bibliographic record on a carousel is deleted or updated to not display in PAC, it will continue to display on the carousel until the cache is rebuilt. If the user selects that record before the cache is rebuilt, the search returns 0 results.
- Carousel title display - Content carousels display only titles for which there is a bibliographic record in the local database. The record must be set to display in PAC, and the record status must be final. For each title, the carousel contains the cover image if any, and title and author tags and subfields specified in the Primary Display Title and Primary Display Author database tables. When the PAC connection is to a branch, carousels based on new titles include only new titles for that branch. When the PAC connection is to the system, the carousel includes new titles for the whole system.
- Sort order and entry point - Carousels based on ranked best-seller lists are sorted in the ranked order provided by the best-seller list supplier. All other carousels are sorted in title order. The carousel “starts” at a random point in the list every time it appears, and the display is circular. That is, the user can scroll endlessly through the carousel. When the carousel reaches the end of the designated sort order (when the scrolling forward) or the beginning (when scrolling backward), the carousel continues at the beginning (or end) of the sorted list.
-
Maximum entries - Content carousels display a maximum of 50 titles. If the list that generates the carousel contains more than 50 items, only the first 50 items in the sorted list appear in the carousel, using the sort order described above.
- Content carousels and rotating book jackets - You can enable a rotating, random book jacket image on the portal page. The user clicks the book jacket image and if the title is not in the library catalog, the user can request that the library purchase it. For details, see Set up rotating book jackets. While it is possible to enable both rotating book jackets and content carousels on the portal page, the display may confuse the user since the features may appear somewhat similar but serve different purposes. Polaris recommends that you enable one or the other of these features, but not both. If you do enable both, the content carousel appears below the rotating book jacket image.
You can set up content carousels at the system, library, or branch level. The system uses the settings of the PowerPAC connection organization. To set up content carousels:
Important:
Content carousels are displayed on the PowerPAC portal page. You must also enable the portal page. See Set up Polaris PowerPAC.
- To enable the display of cover images in content carousels, check that enriched data options for cover images have been set in Polaris Administration. See Enabling Enriched Data.
- In the Administration Explorer tree view, open the Profiles folder for the organization, and select the PowerPAC tab in the details view.
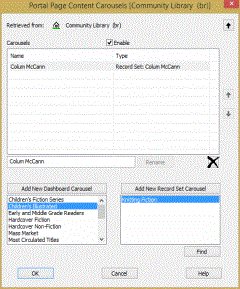
- Double-click Portal page content carousels. The Portal Page Content Carousels dialog box opens.
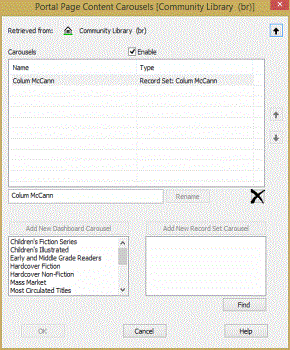
- Select Enable.
- To add a dashboard carousel, select a dashboard (Web part) from the dashboard list and click Add New Dashboard Carousel. The selected dashboard appears in the Carousels list in the upper part of the dialog box. For more information about these lists, see Defining Web Parts for Dashboards.
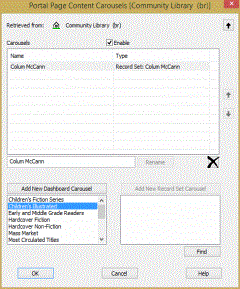
- To add a record set carousel, follow these steps:
- Click Find. The Find Tool for bibliographic record sets opens.
- Search for the record set and select one or more record sets in the results lists.
Tip:
You can search for any bibliographic record set. Existing rules and permissions are in effect when searching for and selecting record sets. For example, you cannot find record sets owned by individuals other than yourself.
The record set or sets you selected are displayed in the record set list.
- To create the carousel, select the record set in the list and click Add New Record Set Carousel. The selected record set appears in the Carousels list in the upper part of the dialog box.
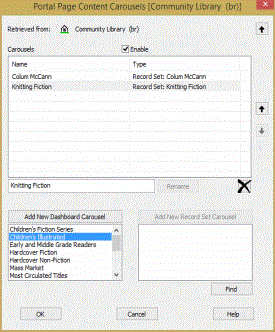
- By default, the carousel name is the name of the dashboard or record set. To assign a different display name for the PAC:
- Select the carousel in the Carousels list. The name appears in the text box just below the list.
- Type the new name and click Rename.
- To set the display order of multiple carousels, select a carousel and click the up arrow to move it closer to the top of the list, or click the down arrow to move it closer to the bottom. The order of the list represents the display order in PAC.
- Click OK.
Related Information
- Delete a carousel - Select the carousel in the Carousels list and click the Remove carousel icon
 .
. - Inherit settings from a parent organization - The top of the dialog box indicates the organization where the current carousel options have been set. To inherit the settings of the parent organization, click the up arrow at the top of the dialog box.
- Content carousels and Community Profiles - For libraries that use Polaris Community Profiles, organization representatives can display content carousels on the organization’s page in PAC search results or on the organization’s own web site through widgets that are created with ContentXChange. These carousels can consist of title lists or searches saved in association with the organization representative’s patron account.