Declare an Item Lost
When you declare an item lost, you can manage any charges for the lost item and (optionally) bill the patron for the charges.
To assign a Lost status to a patron’s checked-out item and (optionally) bill the patron:
Important:
For billed items, if your library system does not automatically declare them lost, use the following procedure to declare the billed item lost and handle the charge at the same time. Although you can pay a billed item from the Patron Status workform -Account view, it is preferable to use the Declare lost item dialog box as described in this procedure, so that you are handling the charge and the item. If you simply pay the billed item from the Patron Status workform -Account view, then the item is not removed from the Items Out list, and the item status is not changed to Lost.
- Display the patron’s record in the Patron Status workform. See Find patron services and related records.
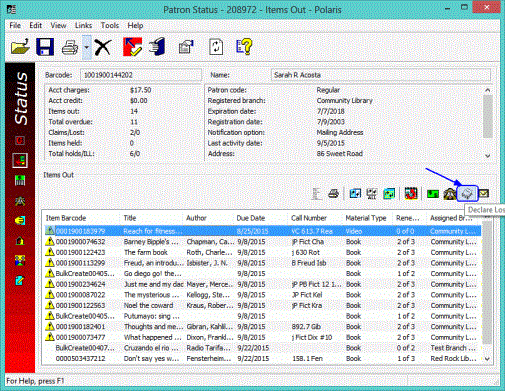
- Select View, Items Out or click
 to display the Items Out view.
 - Select the appropriate line item in the Items Out list.
- Click
 or press CTRL+L.

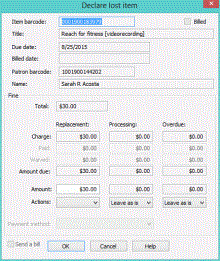
The Declare lost item dialog box opens.

If the patron has already received a bill for the item, the Billed checkbox is selected. If the item is not overdue, or your library does not charge for overdues, all the Overdue boxes are unavailable.
- Manage the replacement charge by following these steps:
Important:
If your library uses Active Payment Manager (Class Point of Sale) to manage payments, you cannot pay the charge from this dialog box. Instead, you must charge the patron’s account, then pay the charge from the Patron Status workform - Account view.
- To change the replacement amount, type the new amount in the Replacement Amount box. This allows you to process a partial payment. It does not change the amount of the charge.
- Select Charge, Pay, or Waive in the Replacement Actions box. (Charge places the charge on the patron’s account.) If you selected Pay, then select a payment type in the Payment method box. If your library accepts credit card payments, and the patron wants to pay with a credit card, select Credit card in the method box.
Note:
For a billed item, the options are Leave as is, Pay or Waive. The charge has already been posted to the patron’s account.
- Manage the processing fee, if any, by following these steps:
- If you want to change the amount, type the new amount in the Processing Amount box. This allows you to process a partial payment. It does not change the amount of the charge.
- Select Charge, Pay, or Waive in the Processing Actions box. (Charge places the charge on the patron’s account.) If you selected Pay, then select a payment type in the Payment method box. If your library accepts credit card payments, and the patron wants to pay with a credit card, select Credit card in the method box.
- If there is an overdue charge, manage the charge by following these steps:
- If you want to change the overdue amount, type the new amount in the Overdue Amount box. This allows you to process a partial payment. It does not change the amount of the charge.
- Select Charge, Pay, or Waive in the Overdue Actions box. (Charge places the charge on the patron’s account. This option may be unavailable if your library charges the overdue fine only when a lost item is recovered.) If you selected Pay, then select a payment type in the Payment method box. If your library accepts credit card payments, and the patron wants to pay with a credit card, select Credit card in the method box.
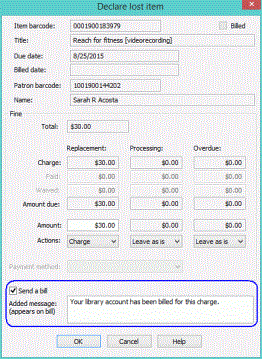
- To bill any charges where Charge is selected in the Actions row for any column (Replacement, Processing, or Overdue), select the Send a bill checkbox. If this checkbox is selected, the area below the checkbox expands to display the added message. You can edit the added message.

- Click OK on the dialog box.
The Items Out view appears, but the item declared lost no longer appears in the Items Out list. If you paid or waived an amount and you set Polaris to print fine receipts from the Patron Status workform, a receipt prints. See Setting Up Receipt Printing from Workforms.
After an item is declared lost, patron and item records are automatically updated:
Tip:
You can open the item record for a lost item from the Patron Status workform - Claims view. Right-click the item in the Claims list, and select Links, Item Record.
- The item is removed from the patron’s Items Out view and moves to the Claims view.
- The transaction is displayed on the Patron Status workform - Account view or the Transaction Summary dialog box.
- If the patron’s account was charged a replacement cost, and the cost was not paid or waived, the Lost item counter is incremented on the Patron Status workform - General view and the Patron Status workform - Claims view. You may need to refresh the view (press F5) to see the change.
- The patron barcode is moved to the Previous borrower box on the Item Record workform - Circulation view, if the Patron Services parameter Last use patron display is set to Yes in Polaris Administration.
- The item circulation status changes to Lost.
- Any hold request status for the item changes to Not-supplied.
- If you selected Send a bill, the patron is billed for the charge.
Related Information
- Reconciling charges - If you charged an amount for the lost item, you pay or waive the charge from the Patron Status workform - Account view. See Pay charges from the Account view.
Important:
If an item is found at circulation after it has been declared lost, the item status and patron account need to be resolved. Your library may set certain automatic actions that are taken in this situation, or you may manually manage the item and patron record through the Resolve lost item dialog box. If you manage recovered items manually, see Resolve a lost-and-unpaid item at circulation and Resolve a lost-and-paid item at circulation.
- Lost item counter - The count in the Lost item counter on the Patron Status workform - General view and the Patron Status workform - Claims view increases when a replacement cost for an item is charged to the patron’s account. When the charges related to the item are paid, waived, or otherwise resolved, the count decreases.