Set up an e-source target
To set up access restrictions and authentication data elements for an e-source target:
- Obtain the following information from the e-source target provider:
- URL for the target’s login page - The complete URL for the target’s login page (not the site’s home page, or account setup page). Polaris automatically passes your library’s authentication information to this URL.
- Connection data parameters - Connection data parameters are set up in sets consisting of Name and Value. Name is the descriptive field name that the database provider uses to prompt for input. Value is the actual text string that the database provider assigns to your library when the subscription is established.
Example:
A vendor requires a user ID and a password to access a database, so you define two parameters (two sets of Name and Value data elements). For the first set, Name is UserID. Value is WESTSIDELIBRARY. For the second set, Name is Password and Value is read.
- Transfer type (Get or Post) - The protocol for passing authentication data from your library to the e-source target. Get displays authentication information in the URL string, unless Secure Socket Layer (SSL) is enabled at the server level. Post does not display the authentication information. Most vendors can use the post method. To determine this information yourself, see Example - E-Source Target Post Transfer Type and Example - E-Source Target Get Transfer Type.
- In the Administration Explorer tree view, open the Profiles folder for the organization, and click the PowerPAC tab in the details view.
- Double-click Categorization of ESource targets. The ESource Categorization dialog box appears.

Tip:
Click Revert to restore system-level settings.
- Select a category for the new target (optional), and click Add Target. The Add ESource Target dialog box appears.
Note:
Root is the default category, represented by a tree icon. Other categories are represented by folder icons. See Organizing E-Source Targets.

- Set up general information for the target as follows:
- Type a name for the target in the Name box. This name is displayed on the PAC E-Sources page.
- Type a brief (890-character maximum) description in the Description box, if you want to display a description on the PAC E-Sources page.
Tip:
The message can inform patrons of any use restrictions for the target, or to highlight a new offering.
- Type a brief message in the Message box, if you want to display a message to patrons regarding the target.
- Input the complete URL for the target’s log-in page in the URL box.
- Select Get or Post in the Transfer Type box (see step 1). If you are unsure of the transfer type, see Example - E-Source Target Post Transfer Type and Example - E-Source Target Get Transfer Type.
- To set in-library access to the target, select an option under Inhouse access (General Restrictions tabbed page):
- To make the e-source unavailable to in-house users, select Disabled.
Note:
If you disable access for both in-house and remote users (see step 7), the e-source will be displayed on the PowerPAC page as unlinked text.
- To make the e-source available from in-house workstations only to registered patrons, select Login required. If you select this option, you can further restrict access by blocking selected patron codes. See step 8.
- To make the e-source available from in-house workstations to anyone, select No login required.
By default, if a workstation is registered in Polaris Administration, it is automatically considered “in-house.” If the workstation is not registered in Polaris Administration, but the IP address is listed in the system-level In-House IP Addresses database table, it is considered to be in-house. If you use Polaris PowerPAC on workstations within the library, you may want to list them in the In-House IP Addresses database table. If neither the workstation nor the IP address is found in the system, the user is considered remote.
Note:
By default, the system checks both the In-House IP Addresses table and registered workstations to determine if a computer is in-house. However, if you experience performance issues related to e-source restrictions, you can set the system to check only the In-House IP Addresses table.
- To set remote access to the target, select an option under Remote access (General Restrictions tabbed page):
- To make the e-source unavailable to remote users, select Disabled.
Note:
If you disable access for both remote and in-house users (see step 6), the e-source will be displayed on the PowerPAC page as unlinked text.
- To make the e-source available from remote workstations only to registered patrons, select Login required. If you select this option, you can further restrict access by blocking selected patron codes. See step 8.
- To make the e-source available from remote workstations to anyone, select No login required.
- If you have required login for in-house or remote access, and you want to prevent patrons with certain patron codes from accessing the target, follow these steps:
- Click the Patron Codes tab on the Add E-Source Target dialog box.
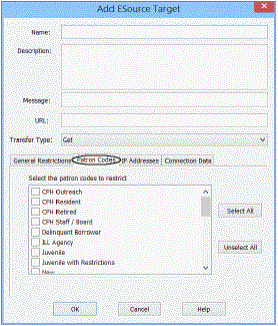
- Select the codes you want to prevent from accessing the target. Patrons who are assigned these codes cannot access the e-source target.
Important:
Your patron code settings are used only if you have required log-in for in-house or remote access.
- If you want to allow access only from certain IP addresses, follow these steps:
Important:
Set this restriction if you want to allow access only from the specific IP addresses listed here. If at least one address is listed, the system blocks access from any workstations or IP addresses that are not listed here, regardless of any other access restrictions you may have set. You might use this setting to limit access to a very specialized (and costly) research site.
- Click the IP Addresses tab on the Add ESource Target dialog box.
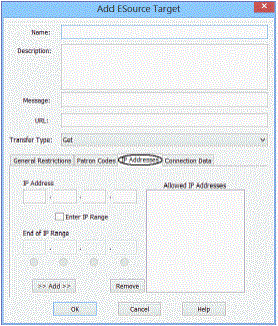
- Define IP addresses using one of the following methods:
- To define IP addresses one at a time, type each IP address in the boxes and click Add. The addresses are displayed in the Allowed IP Addresses list.
- To define a range of IP addresses, select the Enter IP Range checkbox. Then enter the first address of the range in the IP address boxes, and enter the last address of the range in the End of IP Range boxes. Click the radio button below the appropriate End of IP Range box to specify if the last number in the range is in that address segment. Click Add to add the range to the Allowed IP Addresses list.
Note:
To remove IP addresses from the Allowed IP Addresses list, select the address and click Remove. Use CTRL+select or SHIFT+select to select multiple entries.
- Set connection parameters for the target by following these steps:
- Click the Connection Data tab on the Add ESource Target dialog box.
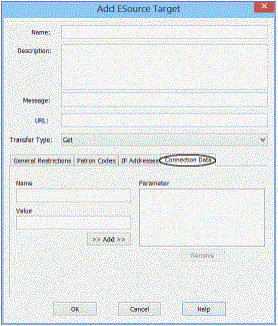
- Type a name in the Name box, type a value in the Value box for the first parameter, and click Add.
Note:
The Name requirement is specific to the vendor, and the Value requirement is set up in your organization’s account with the vendor. See step 1.
- Repeat step b to add as many parameters as the e-source provider requires for connection authentication.
- Click OK on the Add ESource Target dialog box. The new target is represented by a book icon in the ESource Categorization dialog box.
- Click OK on the ESource Categorization dialog box.
Related Information
- Connection setup examples - Example - E-Source Target Post Transfer Type and Example - E-Source Target Get Transfer Type
- Modify an e-source target - Select the target in the ESource Categorization dialog box, and click Modify. The Modify ESource Target dialog box offers the same functions as the Add ESource Target dialog box.
- E-Source reports - You can print a report of the e-source targets you have set up, including any access restrictions and connection requirements. You can also choose to log e-source transactions for custom reports. See E-Source Reports.