Set up hold pickup slips
Hold pickup slips are formatted for libraries that allow patrons to pick up their own held items. These slips require a line mode receipt printer.
At the System level, you can set options to combine the hold pickup and in-transit slips or append hold call slip to the pickup slip.
To set up hold pickup slips:
Note:
Your settings for the holds pickup slip also apply to the equivalent ILL pickup slip, which is printed when an interlibrary loan item is received.
- In the Administration Explorer tree view, open the Parameters folder for the organization, and select the Patron Services tabbed page in the details view.
- Double-click Hold pickup slip options. The Hold Pickup Slip Options dialog box opens.
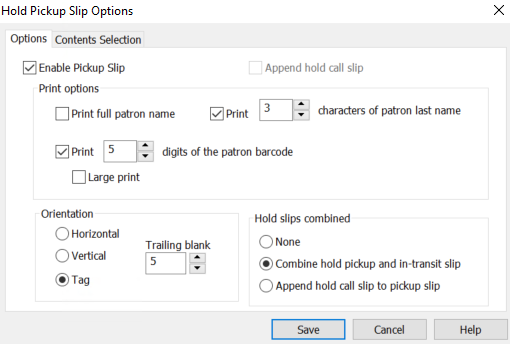
- Select Enable Pickup Slip.
- Specify the patron identification to appear on the slip:
- Select Print full patron name to print the entire name in this format: Last name (comma), First name (no comma) and Middle initial. Example: Smith John T.
- Print x characters of patron last name, and set the number of characters to print the name in this format: First x number of characters of the last name (no comma) and the first initial of first name. Example: Smit J
If the control is set to print only 1 character of the last name, only the first character of the last name is printed, not the first or middle initial.
If you chose to include the patron’s name or limited characters, it is printed in bold, large characters at the top of the slip. If you do not check either option, no name appears on the slip.
Note:
Printer limitations restrict the name to approximately 38 characters, depending on the width of the characters and the printer model. Very long names may be cut off even if you specified the full patron name. If you set the number of characters to 1, only the first character of the last name is printed.- To include a patron barcode on the slip, select Print x digits of the patron barcode, and specify the number of digits to print, counting to the left from the last digit of the barcode.
Note:
Print x digits of the patron barcode must be selected (checked) at the pickup branch to allow for the patron’s barcode to print on the slip. See Set in-transit slip options.- To print the barcode in large print, select Large print.
- Select a printing orientation for the slip:
- Horizontal (default) - The hold pickup slip is inserted in the material, exposing the patron name and pickup date. The material is shelved so that the slip extends horizontally from the material.
- Vertical - The hold pickup slip is a wrapper that is typically taped to the spine of the material. The pickup date is printed horizontally at the top and the patron’s name is printed vertically down the slip. Any additional content is printed in small type under the pickup date.
- Tag - The hold pickup slip is inserted into the material. When the slip is inserted, the patron name and pickup date are exposed at the top of the slip, printed horizontally, and the “tail” of the slip is inside the material. The material is shelved so that the slip extends above the material. Any additional content is printed in small type under the item barcode.
- Select a number in the Trailing blank spin control to specify the number of blank lines to insert on the right side or horizontal slips or the bottom of vertical slips.
- Under Hold slips combined, select one of the following options:
- None - This is the default. Hold slips are not combined.
- Combine hold pickup and in-transit slip - When this option is selected at the System level, hold pickup and in-transit slips are combined.
- Append hold call slip to pickup slip - When this option is selected at the System level, check the Append call slip checkbox. The option will be selected for all organizations in the system, but it can be unchecked.
- To print additional fields on the hold pickup slip, click the Contents Selection tab. The Contents Selection tab displays the available options in the left column of the dialog box, and the selected options in the right column.
- To add a field to be printed on hold pickup slips, select it in the Options column and click Add to add it to the Selections column. To remove a field, select it in the Selections column and click Remove.
- last 4 digits of patron phone - You can add the last four digits of the patron’s phone number after the patron’s name, in the same large font. The system uses the last four consecutive numeric characters of the Phone 1 field in the patron record. If this field is blank, or if four consecutive numeric characters cannot be found, no number is printed.
Examples:
315 634-4512 ext 123
634-4512 WORK
In both cases, the system sees alpha characters in the last 4 characters and moves left until it identifies 4 consecutive numbers. The slip will print 4512.634-4512 ex 1234
The system identifies and prints 1234 because there are 4 consecutive numbers.451 ex.123
The system cannot identify 4 consecutive numbers. No numbers will be printed on the slip.- Pickup branch abbreviation - When selected, the pickup branch abbreviation is printed on all holds pickup slips, and on combination in-transit/holds pickup slips, regardless of format, at the top of the slip. On horizontal slips, the branch abbreviation is printed above the patron name in bold capital letters the same font size as the date. On vertical slips, it is printed above the “Pickup by” date, also in bold capital letters the same size as the date. On tag slips, it is printed above the patron name in the same size font as the “Pickup by” date.
- Title - When selected, the title is printed on the hold pickup slips.
- Item barcode - The full item barcode is printed.
Note:
Libraries that process items for holds centrally, sorting held items by pickup branch, may want to select the pickup branch abbreviation option to print at the top of the holds pickup slip for ease in sorting.- Unclaimed date - The Unclaimed date is the date to pull the item from the shelf if it has not been picked up. The date is based on a time period defined by the pickup branch.
Note:
If your library is using a combined in-transit/hold pickup slip, this date is not available because the slip is printed when the item goes in-transit. - Click OK on the dialog box. The Administration Explorer (Parameters - Patron Services) appears.
Note:
At each staff client workstation, you must enable the slip from each workform that generates the slip. See