Set receipt printer control codes
To enable large print, bold print, red print, underlining, auto-cutting, or cash drawer for standard receipt printers, or to add other kinds of receipt printers to your system:
Note:
Install the appropriate printer drivers on the staff client workstations that use receipt printers.
- In the Administration Explorer tree view, open the Profiles folder at the system level, and select the Staff Client tabbed page in the details view.
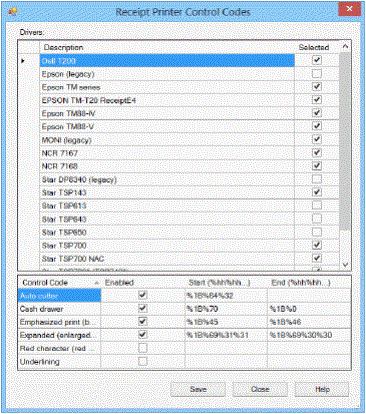
- Double-click Receipt printer control codes. The Receipt Printer Control Codes dialog box appears.

- If you use receipt printers already listed in the Drivers list, To set optional features for them:
Note:
Repeat these steps for each printer in your system.
- Select the printer in the Drivers list.
- Select the checkbox for each feature (such as expanded, bold, red, auto-cut, cash drawer) you want to enable for that printer.
A specific printer may not support all these features. If a feature is not supported, the Start and End code fields are blank.
Note:
The Expanded setting affects in-transit and hold slips. On the in-transit slip, the destination branch’s name is printed in a font that is twice as large as the font on the rest of the slip. On the hold slip, the patron’s name and the unclaimed date are printed in the large font. Although you set this option for specific receipt printers, if you choose to print these slips on a page printer, the font is also enlarged.
- To list the printer for selection in Polaris workforms, be sure the Selected option is checked.
- Click Save.
- To add a receipt printer and enable special features for it, follow these steps:
Note:
You can add more than one printer. Repeat these steps for each printer you want to add.
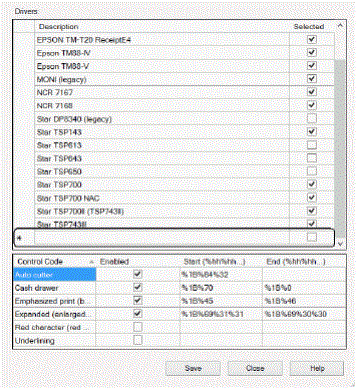
- Scroll the Drivers list to the last blank field, which is marked by an asterisk.

- Select the blank field and type the printer name in the field.
- Click Save.
- Select your printer in the Drivers list, and select the checkbox for each feature you want to enable. Your printer may not support all features.
- For each enabled feature, select the Start and End code fields, and type the appropriate codes in the format shown.
See your printer documentation for the correct codes. Some models may require only a start code for some features.
Note:
If you select Cash drawer, the receipt printer must be connected to a cash drawer via an RJ11 connector that signals the cash drawer to open automatically when a receipt is printed. You can also set a staff client profile at the system, library, or branch level to open the cash drawer when a receipt is printed only if the payment was a cash payment. See Set option to open the cash drawer only for cash fine receipts.
- To list the printer for selection in Polaris workforms, select the Selected option.
- Click Save.
- To suppress an unused printer from the receipt printer list in Polaris workforms, clear (uncheck) the Selected checkbox for the printer.
If you change multiple printers, you must click Save after each printer change.
- Click Close.