Enable media dispenser processing
Note:
If the workstation on which Leap is running does not have the Polaris staff client installed, you must set the Workstation parameter, Media dispenser: Use local security manager to Yes.
To set up media dispenser processing in Polaris Administration for the Polaris staff client, Leap, and ExpressCheck:
Note:
The media dispenser parameter can be set at the System, Library, or Branch organization level in Polaris Administration. To enable the media unit, you must obtain and enter the full network address or URL of the dispenser unit. Your network administrator determines the network address when the device is installed on your network.
- In the Administration Explorer tree view, click the organization to expand the tree view.
- Click Parameters to display the details view for the organization's parameters.
- Click the SelfCheck Unit tab in the details view to display the self check unit parameters.
- Double-click the SelfCheck Unit parameter Media dispenser settings.
The Media Dispenser Settings setup dialog box opens with the General tab displayed.
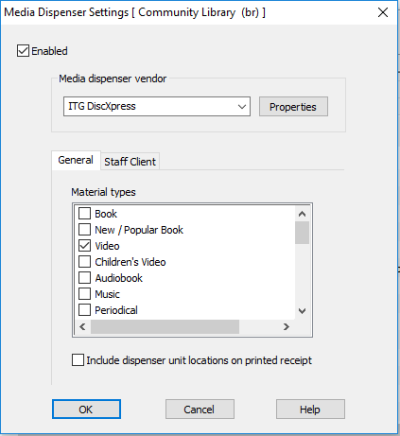
- Select Enabled.
- Click the Properties button to open the Properties dialog box.
- On the Properties dialog box, type the full network address or URL of the dispenser unit (100-character limit) in the Network location box, and click OK to close the dialog box.
- On the General tab, check the material types that can be dispensed by the unit. Select at least one item material type.
- (Optional) Check Include dispenser unit location on printed receipt. This option applies to staff client, Leap, and ExpressCheck receipts. Check-out receipts must be enabled for the staff client and Leap workforms, and for ExpressCheck to include this information on a printed receipt.
- Click the Staff Client tab.
- Type the text to appear on the receipt in the Receipt text box (250-character limit).
- (Optional) To issue a message when checking out from a media unit, check the Enable check-out warning box, and type the warning text in the box. The default warning message text is Please retrieve items from the dispensing unit. You can customize the message in the text box (250-character limit). If this warning message is enabled, it is displayed for each dispenser item during checkout. The staff member clicks OK to acknowledge the message and continue.
- Click OK on the Media Dispenser Settings dialog box to save the settings.
Note:
If you are using Leap from a workstation that does not have the Polaris staff client installed, the workstation must be set up to use the local security manager for the media dispenser.
Display Media Dispenser Acknowledgment Message in Polaris ExpressCheck
To display an on-screen dispenser acknowledgment message in Polaris ExpressCheck:
- Open the SelfCheck Unit parameter Polaris ExpressCheck: Enable.
- Select Dispenser acknowledgment message.
- Click OK on the Polaris ExpressCheck Enable dialog box.
- The default message is Checkout Completed Successfully! Please retrieve item from the dispensing unit. You can edit the message using Polaris Language Editor (WebAdmin); the string ID is EC_TEXT_CHECKOUT_COMPLETE_DISPENSER
A similar message is printed on the ExpressCheck check-out receipt. The default message is Please retrieve items from the dispensing unit. As appropriate items are checked out at the ExpressCheck workstation, the screen also displays the reminder message Please remove items from the dispensing unit. These messages are also available for editing using Polaris Language Editor. The strings IDs are
EC_TEXT_CHECKOUT_RCPT_DISPENSER
EC_TEXT_DISPENSER_REMINDERIf the system fails to communicate with the dispenser unit during checkout, the ExpressCheck workstation displays an on-screen message, also available for editing. The default text is The dispensing unit is not responding. The item cannot be checked out. Please contact a librarian. The string ID in Polaris Language Editor is
EC_TEXT_CHECKOUT_ERROR_DISPENSER_COMM