Add a loan period
To add a loan period in the Loan Periods policy table:
Note:
You must set up the Loan Period Codes policy table (see Defining Loan Period Codes) and Patron Code policy table (see Defining Patron Codes) before you do this procedure. Default loan period values are set with the Patron Services parameter Fine and Loan period defaults, and the default value is used when you add a new loan period code until you change it.
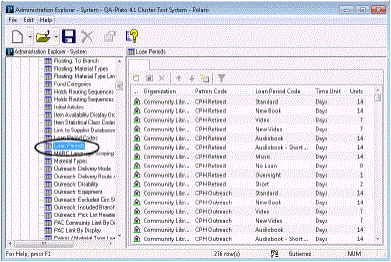
- In the Administration Explorer tree view, open the Policy Tables folder for the organization, and select Loan Periods. The Loan Periods table is displayed in the details view.
Note:
To better manage memory, a program-defined row limit determines whether this table can be opened at a specific organizational level. For example, if the table is opened at the system level and would require more than the limit (comprising entries from all branches) to be loaded, you will see a message advising you to open the table at a lower organizational level.

- Click
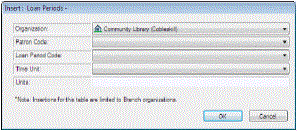
 to display the Insert Loan Periods dialog box.

- Select the branch for which you are assigning the loan period in the Organization list.
Note:
If the Loan Periods policy table is opened at the branch level, only the branch name is displayed in the Organization list.
- Select the patron code for the loan period in the Patron Code box.
- Select an entry in the Loan Period Code box to associate with the patron code shown in the Patron Code box.
Note:
The options available in the Load Period Code box depend on the organization you selected. See Defining Loan Period Codes.
- Select one of the following loan duration units in the Time Unit box:
- Days
- Hours
- Minutes
- Type the number of time units allowed for this loan period in the Units box.
Note:
To set up a non-circulating loan period code, type 0 in the Units box.
- Click OK in the dialog box. The Loan Periods policy table appears with the new loan period entry. The status bar indicates that the modification is pending.
- Select File > Save to save your changes. The status bar indicates that the record is saved.
Related Information
- Modify a table entry - Select the entry and click
 . You can change the loan period code and duration in an entry; the assigned library and patron code cannot be changed in an existing loan period.
 - Set recurring or specific due dates by patron code only - See Setting End-of-Term Due Dates.
- Undefined loan period - You can set a default value to use at check-out when a specific patron code/loan period code combination does not exist in the Loan Periods table. See Undefined and Standard Loan Periods.
- Lending library schedule - Due date calculation takes into account the closed dates, closed days, and hours of operation for the lending library. See Closed Dates and Days.
- Hourly loans - The Patron Services parameter Overnight loan period affects the date and time due for hourly loan items. See Hourly Loans.