Create, Edit, and Delete Patron Associations
To create and edit an association between patron records:
- Display the patron’s record in the Patron Status workform. See Find patron services and related records.
- Select View, Associations or click
 to display the Associations view.
- Click
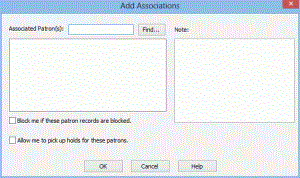
 or press CTRL+A to display the Add Associations dialog box.

- Enter the barcode of the patron with whom you want to create an association, using one of these methods:
- Scan the barcode from the patron’s library card, or type the barcode in the Associated Patron(s) box, and press ENTER.
- If you do not have the patron’s library card, click Find to display the Polaris Find Tool and search for the patron’s record. Right-click the record in the results list and choose Select from the context menu.
The patron’s barcode appears in the Associated Patron(s) box.
- If you want to add more associations to the record, repeat the previous step until all the patron barcodes have been entered.
- If you want to enter a note, type the text in the Note box.
Important:
Make sure that your note is clear, because the same text appears on both records. For example, “Mother” is an ambiguous note because it appears on both the parent’s record and the child’s record. “Jane Patron is the mother” is a clearer note. If you are creating multiple associations at the same time, the same note is added to all the associations.
- Select Block me if these patron records are blocked if you want to block this record at checkout or renewal when any of the associated records are blocked. The “me” in “Block me” refers to the record you have open and are adding the associations to.
- Note:
If you want the block to work both ways - that is, Patron A is blocked when Patron B is blocked, and Patron B is blocked when Patron A is blocked - set up the association with Patron B from Patron A’s record and check Block me as described here. Then open Patron B’s record, select Patron A in the Associations list, and click to edit the association with Patron A, checking Block me.
 - Select Allow me to pick up holds for these patrons if you want the primary patron to be able to pick up and check out items with holds placed by the associated patron.
- Click OK to save your settings.
The Associations view appears with the additional patrons in the Associations list. The association with this record appears in the Associations view of all the patron records you added as associations. When a patron record has associated records, the Associations view icon on the Patron Status workform changes from a gray background to yellow. If the patron has a blocking relationship with any of the associated patron records, this is noted in the Block Me column. If the patron is allowed to pick up held items for the associated patron, a Yes is displayed in the Allow Me column.
- To edit a patron association, select the associated patron in the list, and click
 (or press CTRL+E) to display the Edit Association dialog box. You can edit any text in the Note box, and/or change the Block me or Allow me setting. If you edit the note, your changes appears in the Associations view of both the primary and associated patron records.
- To check an associated patron’s blocks from the Patron Status workform, select Tools, Check Associated Patron Blocks.
A dialog box displays a list of blocks on the associated patron records. You can double-click any block to open the appropriate Patron Status workform view for the associated patron record.
- To delete an association, select the patron association or associations that you want to delete in the Associations list, and click
 (or press CTRL+D). The association no longer appears in the Associations list. When you delete an association, you are deleting the relationship between the two records, not the records themselves.
Note:
The standard Polaris report Associated Patron Groups lists all patron records that are linked in associations. In the Polaris Reports Manager, select Public Services, Patron Services to access the report.