Setting Up the Preferred Vendor Accounts Policy Table
If your library uses the cloudLink feature for sharing cloudLibrary titles among multiple libraries, use the Preferred Vendor Accounts policy table to ensure that patron check-outs and requests appear under a single library for resources that are being shared via cloudLink. Polaris libraries that use cloudLibrary without implementing the cloudLink feature do not need to use this table.
Note:
To add or delete entries in the table, you must have the new permission Modify preferred vendor accounts table: Allow. This permission is added by default to the Administrator permission group.
To add a Preferred Vendor Account to the table:
- Expand the System, Library, or Branch-level node in the Polaris Administration Explorer.
- Select Policy Tables > Preferred Vendor Accounts.
The Preferred Vendor Accounts policy table appears. The table contains an organization name, vendor description, and vendor account name. Only one preferred vendor account can be set for each branch. If a duplicate is found, the following message appears: An organization can only have one preferred vendor account per vendor.
- Click
 to open the Insert: Vendor Accounts dialog box.
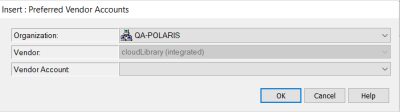
- Select the cloudLink account from the Vendor Account drop-down list, and click OK.
The Preferred Vendor Account is set for the organization.
Note:
If you delete a cloudLibrary vendor account, the corresponding entry in the Preferred Vendor Accounts policy table is automatically deleted.