Create a New Import Profile
Although it is preferable to start with an existing Polaris read-only import profile and copy it, you can create your own import profiles and set all the options on each tab of the Import Profile window.
To create a new import profile:
- Select Utilities > Importing > Profile Manager from the Polaris Shortcut Bar.
The Import Profile Manager appears.
- Select File > New, press CTRL+N, or click the New button.
The Create Import Profile window appears.
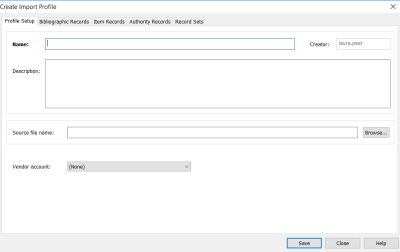
- Type a name for the profile in the Name box.
- Type a description for the profile in the Description box.
- (Optional) If you want to include a default source file name or directory in the import profile, click Browse and locate the source file or directory location.
Note:
If the MARC or MARCXML files for this import profile are always saved in the same desktop or network location, you can save the file or directory location in the profile. If a file name is saved in the profile, the file will be selected automatically (if it exists) when a user imports records using this profile. If a directory is saved in the profile, the directory location will automatically display when a user clicks the Add button.
- Click Save to save the new import profile.
When you save the import profile, the title of the dialog box changes to Modify Import Profile.
Note:
The Vendor account is used only when you are setting up an import profile for an ebook vendor.
- Select the following tabs and set the import options:
- Bibliographic Records - See Set import options for bibliographic records.
- Item Records - See Set import options for item records.
- Authority Records - See Set import options for authority records.
- Record Sets - See Set import options for record sets .
- After setting up the relevant options on each tab, click Save to save the new import profile.
- Click Close to close the saved profile.