Set up Payflow Link processing in Polaris Administration
To set up Polaris for Payflow Link credit card processing in Polaris Administration:
- In the Administration Explorer tree view, open the Parameters folder for the organization, and click the Credit Card Payment tab in the details view.
- Double-click Online Payments: Configure. The Online Payments Settings dialog box opens.
- Select Payflow Link in the Payment processing gateway list.
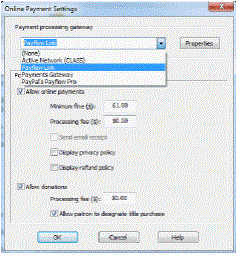
- Click Properties. The Payflow Link Properties dialog box opens.
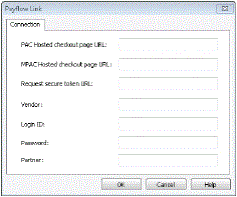
- Enter the following settings on the Connection tabbed page, then click OK:
- PAC Hosted checkout page URL - From PowerPAC, the redirect page link to the Payflow Link hosted checkout page (maximum 250 characters, alphanumeric). Obtain this setting from Payflow Link. Example: https://payflowlink.paypal.com
- MPAC Hosted checkout page URL - From Mobile PAC, the redirect page link to the Payflow Link hosted checkout page (maximum 250 characters, alphanumeric). Obtain this setting from Payflow Link.
- Request secure token URL - The PayFlow API URL:
https://payflowpro.paypal.com for live operation, or
https://pilot-payflowpro.paypal.com for test. - Vendor - Optional. Your library’s main account name. Obtain this setting from Payflow Link.
- Login ID - Your Payflow Link login ID.
- Password - Your Payflow Link password.
- Partner - Typically PayPal. However, if you set up an account through a partner such as bank, type the partner’s code. Obtain this setting from your partner; for example, WFB for Wells Fargo bank.
- To set up credit card payments from Polaris PowerPAC, be sure PayFlow Link is still selected in the Online Payments Settings dialog box, and follow these steps:
- Click the PowerPAC tab on the Online Payments Settings dialog box, if it is not already selected.
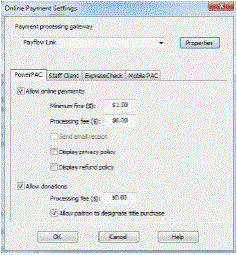
- Select Allow online payments. The payment options become available.
- Set the minimum fine amount you want to accept by credit card payment. The default value is the lowest possible value, $0.01. If the amount the patron owes falls below your setting, the Pay fines link is not displayed in the PAC.
- To charge a processing fee for fine payments, specify the amount in the Processing fee box for online payments. The maximum value is $20.00.
- To display a privacy policy link in Polaris PowerPAC, select Display privacy policy. See: Privacy and Refund Policy Display Options.
- To display a refund policy link in Polaris PowerPAC, select Display refund policy. See: Privacy and Refund Policy Display Options.
- To accept credit card payments for donations, select Allow donations.
- To charge a processing fee for donations, specify the amount in the Processing fee box for donation payments. The maximum value is $20.00.
- To allow donors to direct a donation toward a title purchase in a specific subject area, select Allow patron to designate title purchase. This option places an appropriate control on the donations page, where the donor can specify a title purchase.
- To set up credit card payments from Mobile PAC, follow these steps:
- Click the Mobile PAC tab on the Online Payments Settings dialog box.
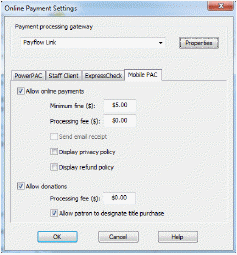
- Select Allow online payments. The payment options become available.
- Set the minimum fine amount you want to accept by credit card payment. The default value is the lowest possible value, $0.01. If the amount the patron owes falls below your setting, the Pay fines link is not displayed in Mobile PAC.
- To charge a processing fee for fine payments, specify the amount in the Processing fee box for online payments. The maximum value is $20.00.
- To display a privacy policy link in Mobile PAC, select Display privacy policy. See Privacy and Refund Policy Display Options.
- To display a refund policy link in Mobile PAC, select Display refund policy. See Privacy and Refund Policy Display Options.
- To accept credit card payments for donations, select Allow donations.
- To charge a processing fee for donations, specify the amount in the Processing fee box for donation payments. The maximum value is $20.00.
- To allow donors to direct a donation toward a title purchase in a specific subject area, select Allow patron to designate title purchase. This option places an appropriate control on the donations page, where the donor can specify a title purchase.
- Click OK to save your settings.