Set Import Options for Bibliographic Records
To set the import profile options for bibliographic records:
-
Select the Bibliographic Records tab in the Modify Import Profile window.
The Bibliographic Records tabbed page appears.
Note:
To create item records from embedded holdings when importing bibliographic records, see Set Import Options for Item Records.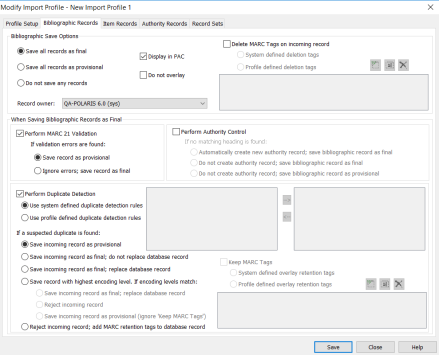
-
Select the organization that will own the records in the Record owner box.
Note:
The record owner is the organization that can determine the permissions related to the record. - Select one of the following options under Bibliographic Save Options:
- Save all records as final to save all the incoming records as final.
- Save all records as provisional to save the incoming records as provisional.
Do not save any records to reject all incoming bibliographic records.
Note:
You could select this option when importing a mixed file with bibliographic and authority records, and you only want to save the authority records.
- If you do not want the imported records to display in the PAC, clear the Display in PAC checkbox. The Display in PAC box is checked by default.
- To protect all incoming records that are saved to the database so that they cannot be overlaid in future processing, select the Do not overlay box. All other import processing defined in the import profile is performed first, and only records that are saved to the database are flagged with the Do not overlay checkbox that prevents the records from being overlaid.
- To delete specific MARC tags from incoming records as they are saved to the database, select the Delete MARC Tags on incoming records checkbox, and select one of the following options:
- System defined deletion tags - Deletes the tags that are defined in the Bibliographic Tags Retain/Delete policy table in Polaris Administration.
- Profile defined deletion tags - Deletes tags that are defined in the import profile.
- System defined deletion tags - Deletes the tags that are defined in the Bibliographic Tags Retain/Delete policy table in Polaris Administration.
- If you select Profile defined deletion tags, do the following steps to specify the tags you want to delete:
Select
 to add a deletion tag.
The Delete Tags dialog box appears.
In the Tag box, type the tag you want to delete from the incoming record.
If you want all indicator values included, leave all the values in the Indicator 1 and Indicator 2 boxes highlighted.
Note:
Select a highlighted indicator value to remove it.Select OK to add the tag and indicator values to the list of tags to be deleted.
Tip:
If you are importing brief bibliographic records to be used to create purchase orders, select Ignore errors; save record as final.
- To check the MARC format of records you are saving as final, select Perform MARC 21 Validation, and choose one of the following options:
- Save record as provisional - Records with MARC format errors are saved as provisional.
Ignore errors; save record as final - Records are saved as final even when they have MARC format errors.
Note:
Bibliographic records must have a Leader and 008 tag to be imported and saved in the Polaris database even if MARC validation is not performed.
Records in MARC XML format are validated using the MARC validation: Bibliographic profile in Polaris Administration. In addition, the XML structure of the file is checked to ensure it conforms to the MARC XML standard. If the file does not conform to the standard, the records are not imported, and an error appears in the import report.Tip:
If your library has a subscription to a remote database of authority records, the remote database is automatically searched when no matching authority record is found. The new authority record is saved in the database and linked to the new bibliographic records.
- If you select Perform Authority Control, select one of the following options:
- Automatically create new authority record; save bibliographic record as final - A new authority record is created, and the bibliographic record is saved as final.
- Do not create authority record; save bibliographic record as final - No authority record is created, and the bibliographic record is saved as final.
- Do not create authority record; save bibliographic record as provisional - No authority record is created, and the bibliographic record is saved as provisional.
- To check for duplicate bibliographic records that already exist in the Polaris database, select Perform Duplicate Detection, and choose one of the following options:
- Use system defined duplicate detection rules - Use the standard duplicate detection rules that are set in Polaris Administration.
- Use profile defined duplicate detection rules - Use the duplicate detection rules that are set up in the profile. If you select this option, you must define the duplicate detection rules.
- Use system defined duplicate detection rules - Use the standard duplicate detection rules that are set in Polaris Administration.
-
If you selected Use profile defined duplicate detection rules, do the following steps:
Note:
Skip this step if you selected Use system defined duplicate detection rules.-
Select the duplicate detection rules from the Rules to select list.
-
Select
 to add the rule to the Rules to apply (as unique groups) list.
Note:
You can select more than one rule, but these rules are applied as separate groups, so only one of the rules needs to be met for a record to be considered a duplicate. See
-
-
If you selected Perform Duplicate Detection, indicate how you want Polaris to handle duplicate records by selecting one of the following options under If a suspected duplicate is found:
-
Save incoming record as provisional - The incoming duplicate record is saved as provisional. Only the resident record with a status of final is indexed.
-
Save incoming record as final; do not replace database record - The incoming duplicate record is saved as final but does not replace the database record. Two similar or identical bibliographic records are saved to the database and both are indexed and searchable.
Tip:
The import report indicates if any database records that would have been replaced are protected from being overlaid because they are flagged with a Do not overlay checkbox. -
Save incoming record as final; replace database record - The existing record is overlayed by the new incoming record but its control number is retained. You can also select Keep MARC tags and select System defined overlay retention tags or Profile defined overlay retention tags.
-
Save record with highest encoding level. If encoding levels match:
-
Save incoming record as final; replace database record - This option is selected by default. You can also choose to reject the incoming record or save the incoming record as provisional. The control number is retained only when saving the record as final. You can also select Keep MARC tags (either system- or profile-defined) to retain specific tags from the replaced database record.
Tip:
For information on how records get overlaid based on encoding levels, see Bibliographic Overlay Based on Encoding Level. -
Reject incoming record - If this option is selected, you can also select Keep MARC tags (either system- or profile-defined) to retain tags from the incoming record that was rejected.
-
Save incoming record as provisional (Ignore ‘Keep MARC tags’) - If this option is selected, the incoming record is saved provisionally, and the database record remains. Even if the Keep MARC tags box is checked, the import ignores the setting.
Tip:
When an existing bibliographic record is overlaid with a new bibliographic record, the links to the item records are maintained and the circulation counts remain. In addition, any holds attached to the old record are transferred to the new record. These requests maintain their position in the holds queue. -
Reject incoming record; add MARC retention tags to database record - The incoming duplicate record is deleted, but any system-defined or profile-defined MARC tags are retained from the incoming record and appended to the database record. When you select this option, Keep MARC tags is selected automatically. You can select System defined overlay retention tags or Profile defined overlay retention tags.
-
-
-
If not already selected, select Keep MARC tags to retain specific tags from records that are overlaid or rejected, and select one of the following options:
Important:
When the profile is set to reject incoming duplicate records but retain certain MARC tags, these tags are retained in the database record, and the database record is added to the record set. See Set import options for record sets.- System defined overlay retention tags - Retains the tags that are defined in the Bibliographic Tags to Retain/Delete policy table in Polaris Administration policy tables. For more information about how retentions and deletions are processed,
-
Profile defined overlay retention tags - Retains tags that are defined in the profile.
Note:
If you are using a profile that is set to overlay or reject the incoming records and retain 970 tags (such as the Acquisitions Bibs profile), you may want to specify additional tags to retain such as the 020 (ISBN) or 024 (UPC). When these tags are retained from an incoming record that is a duplicate of an existing record, and the existing record has multiple ISBNs or UPCs, the most-recently added ISBN or UPC is at the top of the list in a purchase order line item.
- System defined overlay retention tags - Retains the tags that are defined in the Bibliographic Tags to Retain/Delete policy table in Polaris Administration policy tables. For more information about how retentions and deletions are processed,
- If you select Profile defined overlay retention tags, do the following steps to specify the tags you want to retain:
Select
 to add a retention tag.
The Retain Tags dialog box appears.
In the Tag box, type the tag you want to retain from the existing record.
If you want all indicator values included, leave all the values in the Indicator 1 and Indicator 2 boxes highlighted.
Note:
Select a highlighted indicator value to remove it.Select OK to add the tag and indicator values to the list of tags to be retained.
- Select Save to save the profile.
- Select Close to close the profile or select another tab to make other settings.
Setting Profile-Defined Duplicate Detection Rules
Only one rule needs to be met to identify the records as duplicates.
Duplicate Detection on the 024 (Other standard identifier)
If you are importing bibliographic records with an 024, Other Standard Identifier, select the Profile defined duplicate detection rules option in the import profile, and select the rules as follows:
- If the first indicator is 1 - Universal Product Code, select the incoming UPC = existing UPC rule.

- If the first indicator is 3 - International Article Number, select the incoming ISBN = existing ISBN rule.

- If the first indicator is anything other than 1 or 3, select the incoming 024$a = existing 024$a rule.
