Set up the local/system item availability display
To specify how an organization’s holdings are displayed in the PAC:
Note:
These settings control how information about specific items is displayed in Polaris PowerPAC, and Mobile PAC where noted. Use the PowerPAC profile Title display configure to specify the information that should be included in brief and expanded title information, which bibliographic-level title information should be displayed, and the labels for the information. See Configuring the PowerPAC Title Display.
In the Administration Explorer tree view, open the Profiles folder for the organization, and click the PowerPAC tab in the details view.
Double-click the profile Item Availability: Display local and system levels, and select one of the following options:
-
Yes - In Polaris PowerPAC, when a patron is connected to a branch, items for the branches defined as local for that branch are displayed and the patron can click a link to see those of other branches. When the patron is connected to the system organization, all branches’ items are displayed in one list.
-
No - Shows all holdings, both local and system, in one view.
Set the following additional PowerPAC profiles for the PowerPAC display:
-
Item Availability: Display last circ date - Set to Yes to display the last circulation date of the item.
-
Item Availability: Display notes - Set to Text to display any item or issue public notes as text, set to Icon to display an icon that the user hovers over to see the notes, or set to Do not display to suppress item or issue public notes from display.
Note:
For a serials public note to display in PAC, at least one issue or issue with a linked item must be added to a serials holdings record. If no issues exist, you can generate a “dummy” issue so the note will display.
-
Item Availability: Display textual holdings notes - Set to Text to display serials textual holdings notes as text, set to Icon to display an icon that the user hovers over to see the notes, or set to Do not display to suppress textual holdings notes from display.
Set the following PAC profiles to Yes or No to specify what information about each item should be displayed. These settings also affect Mobile PAC:
-
Item Availability: Display detailed item status - Set to Yes to display the specific item circulation status of unavailable items, such as Lost or Bindery. Set to No to display No items available or your own text for items that are unavailable for circulation for any reason. (You must also set Item Availability: Display status to Yes.) This setting also affects Mobile PAC.
Note:
If you set this profile to No, you can customize the text that is displayed to indicate that an item is unavailable. See Editing Messages and Labels.
-
Item Availability: Display due date in detailed item status - If you set Item Availability: Display detailed item status to Yes, you can set this parameter to display or suppress the item’s due date. (If you set Item Availability: Display detailed item status to No, you cannot display the due date.) This setting also affects Mobile PAC.
-
Item Availability: Display shelf location - Set to Yes to display an item’s shelf location. For more information, see Naming Shelf Locations. This setting also affects Mobile PAC.
-
Item Availability: Display status - Set to Yes to display an item’s availability status. If you set this to Yes, also review the setting for Item Availability: Display detailed item status. This setting also affects Mobile PAC.
-
Item Availability: Display type - Set to Yes to display the item’s material type. This setting also affects Mobile PAC.
In the Administration Explorer tree view, open the Policy Tables folder for the organization, and select Item Availability Display Order.
Note:
These System Administration permissions are required to modify this table: Access administration: Allow, Access tables: Allow, Modify item availability display order table: Allow. The organization level at which the table is opened determines the entries you see in the list.
The Item Availability Display Order table appears in the details view.
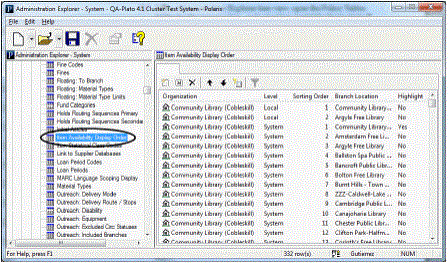
Click  to display the Insert Item Availability Display Order dialog box.
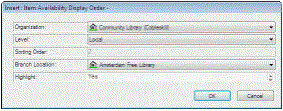
In the Organization box, select the organization for which the item availability entry is being set up. The new entry will affect the PAC item availability display for this organization.
Note:
If the Item Availability Display Order table is opened at the branch level, only the branch name is displayed in the Organization list.
In the Branch Location box, select the organization whose holdings you want to display in the PAC for the Organization branch.
Tip:
If you want a branch to display in both the Local and System Availability views, add it to the table twice, designating it as Local for one entry and System for the other.
Specify whether the item holdings for the organization named in the Branch Location box are displayed in the Local or System Availability view of the PAC for the Organization branch:
-
To display the Branch Location item holdings as local holdings, select Local in the Level box.
-
To display the Branch Location item holdings as system holdings, select System in the Level box.
Note:
If you set the PAC profile Item Availability: Display local and system levels to Yes, entries designated as Local are displayed in the Local Availability view, and entries designated as System are displayed when the user clicks the link to see all items. If you set the profile to No, only the entries designated as System are displayed.
Click OK on the dialog box.
The Item Availability Display Order dialog box closes. The new item availability display entry is displayed at the end of the policy table.
Position the item holdings in the availability display for the organization by following these steps:
a) Select (highlight) the branch location entry for which you want to change the displayed order.
b) To move the branch entry’s holdings higher on the list, click  .
.
c) To move the branch entry’s holdings lower on the list, click  .
.
The Sorting Order value changes for the entry as you position the entry.
Select File > Save.
Related Information
-
Modify an entry in the Item Availability Display Order policy table - Select the entry and click
 .You can change only the Highlight setting for an existing entry. If you need to change the entry in another way, delete the incorrect entry and create a new entry.
 -
Delete an entry in the Item Availability Display Order policy table - Select the entry and click
 . If you delete an entry in the middle of the sort order, the remaining entries are automatically reordered.
 -
Item availability display in Polaris PowerPAC - You can set the default item availability display for a branch or collection to expanded or closed, and make separate settings for non-serial and serial holdings. (Patrons can always select branch and collection controls to expand or close the list of items under each branch and collection.) To set the default display to expanded branch and collection lists for non-serial holdings, set the PowerPAC profile Item Availability: Expand non-serial titles to Yes. To set the default display to closed branch and collection lists, set the profile to No. To set the default display to expanded lists for serial holdings (those with a holdings statement for that particular branch), set the PowerPAC profile Item Availability: Expand serial titles to Yes. To set the default display to closed branch and collection lists, set the profile to No. (If you have extensive serial holdings, consider setting this profile to No to reduce scrolling in the PAC. Patrons can expand the lists they want to see at any time.)
-
Item Availability display in Mobile PAC - See Title Link: Find It.
-
Text-message call numbers from item availability display - See Sending Call Numbers by Text Message.
-
Item availability summary in Polaris PowerPAC - You can display a summary count of available items associated with a title, and the current number of holds on the title, on the initial search results pages. See Configuring the PowerPAC Title Display.
-
Item display and circulation status - You can specify item circulation statuses that should prevent an item from being displayed in PAC search results. See Suppress items by circulation status.
-
Suppressing availability for specific types of material - You can suppress availability information for designated types of material from the PowerPAC and Mobile PAC search results displays. See Suppressing Request and Availability Options.
-
Serials display in PAC availability views - Settings in the serial holdings record control the location-specific compressed holdings statement and the issues that are displayed.