Set In-Transit Slip Options
To set information options for in-transit, in-transit for hold slips, or combination in-transit and pickup slips:
Note:
When a library uses a combined in-transit slip, the library’s in-transit settings determine how information displays on the slip. For example, when an item is scanned at the original library, a combined slip prints containing the pickup branch name and the library name, in a format set per the original library’s in-transit settings. The patron name and other contents for the pickup slip are determined per the pickup branch’s setting.
- In the Administration Explorer tree view, open the Parameters folder for the organization, and select the Patron Services tabbed page in the details view.
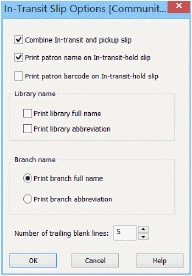
- Double-click In-transit slip options. The In-Transit Slip Options dialog box opens.

- To include a requesting patron’s name on the slip, select (check) Print patron name on In-transit-hold slip.
- To include a requesting patron’s barcode on the in-transit for hold slip, select (check) Print patron barcode on In-transit-hold slip.
Note:
For the patron’s barcode to display on the in-transit for hold slip, the pickup branch must have Print x digits of the patron barcode selected (checked) in Hold Pickup Slip Options. See Set hold slip options.
- (Optional) Select Print library full name, Print library abbreviation, or both to print the parent library of the destination branch. These options apply to all in-transit slips.
- For the destination branch name, select Print branch full name or Print branch abbreviation. This option applies to all in-transit slips. You must select one option.
- To control the length of the in-transit slip, select or type the number (0-999) of trailing blank lines to add to the slip.
- Click OK.
Note:
At each staff client workstation, you must enable the slip from each workform that generates the slip.
Related Information
Printing in-transit slips only for holds - Set the workstation to print receipts and slips.