Set check-in receipt options
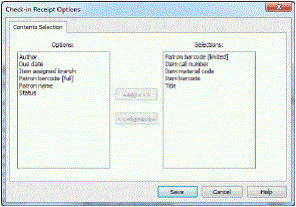
Check-in receipts can be printed from the Check In workform - Normal view and Check In workform - Bulk view. They include the item barcode, title, author, material type, call number, and patron’s limited barcode. The following information fields are also available for use: author, due date, item’s assigned branch, full patron barcode, patron name, status. You can set these options on the system, library, or branch level.
Note:
The Check In workform list view can also be printed on a receipt printer.
To set the information that appears on check-in receipts:
- In the Administration Explorer tree view, open the Parameters folder for the organization, and select the Patron Services tabbed page in the details view.
- Double-click Check-in: Receipt options. The Check-in Receipt Options dialog box appears.

- To include a field in the check-in receipt, select the field in the Options list and click Add. The field is placed in the Selections list.
- To remove a field from the check-in receipt, select the field in the Selections list, and click Remove. The field is placed in the Options list. To print check-in receipts, at least one field must be listed in Selections.
- Click Save on the dialog box.