Setting Up User-Defined Fields
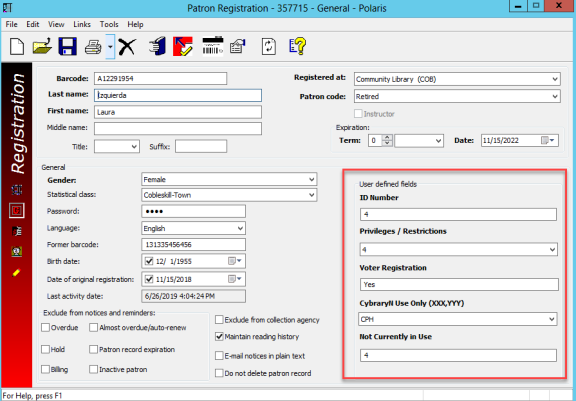
Your patron records can include up to five user-defined fields (UDFs). All five are searchable with the Polaris Find Tool. UDFs can be used for additional identification purposes and as criteria for detecting duplicate patron records.
Note:
Your library may allow users to log on to PAC using network credentials instead of the Polaris patron barcode or username and password. If so, a UDF should be defined for the patron’s network username.
The UDFs are set up when Polaris is implemented. At the system level, you can define UDFs as free-text fields where staff members type text, or as drop-menu options. If you define UDFs as drop-menu options, they appear in drop-menu list boxes everywhere UDFs can be selected.

Drop-menu option text can be edited, and the options can be deleted provided they are not used in any patron records. Individual branches can specify which drop-menu UDF options to display: determine the order of display; and designate default values to be used during patron registration, express registration Entering patron information during the check-out process as a service to new, unregistered patrons., and online registration from the PAC.
Note:
If you plan to use collection agency services, you may need a UDF to identify the guardian of a minor patron.
See also:
- Scanning a Driver’s License for Patron Registration
- View and Convert User-Defined Fields for Patron Records
- Set Drop-Menu User-Defined Fields for Organizations
- Setting Up Free Text User-Defined Fields for Use as Alternate IDs
Scanning a Driver’s License for Patron Registration
California libraries can enter information for a new patron in the patron record by scanning the 2D (two dimensional) barcode on a California driver’s license or ID.
Normal barcode scanners will not read data from a driver’s license. The license data is stored in a 2D format using PDF417 barcode symbology. Polaris has tested and recommends the Datalogic Gryphon GD4430 USB scanner. However, most 2D PDF417 USB wedge-type scanners should work.
Note:
This “Driver’s License Scan Facility” feature is separately licensed in Polaris.
A free-text Polaris user-defined field must be designated for the driver’s license number. By default, Polaris uses UDF 1. If your library uses a different UDF for the driver’s license, contact your Polaris Site Manager to change the UDF.
Note:
The designated user-defined field must be a free text field. If it is changed to a drop-menu field in Polaris Administration, the registration data is entered appropriately when the driver’s license barcode is scanned, but the ID number is not entered in the user-defined field on the patron record.
When the driver’s license is scanned during patron registration, the following driver’s license information is entered in the appropriate patron record fields:
- Name (Last, First Middle)
- Street address (up to two lines)
- City
- State
- Postal code
Note:
The address information is entered in the Home address fields in the Patron Registration workform.
- Birth date
- License number (entered in the designated user-defined field)
For registration instructions using this method
Technical Notes
- Before the Gryphon scanner is first used, it must be programmed to add a suffix of $ to the driver’s license barcode.
- To avoid problems with patron name and address formatting, you must configure the scanner to run in a mode that returns the line feed character, which indicates the end of each field in the driver's license. For the Gryphon 44XX scanner, the correct mode is USB Alternate Keyboard. The image for reconfiguring the Gryphon 44XX scanner is included in the scanner user guide.
- The code requires the file DriversLicenseParser.js. When the Polaris staff client is installed, the folder ProgramData\Polaris\[version]\Scripts is created. The file DriversLicenseParser.js must be placed in the Scripts folder.
Contact your Polaris Site Manager for technical assistance.