Enter Basic Community Information in the Staff Client
To enter or edit the basic information on the Profile tabbed page of the Community Record workform:
Note:
The Community Record workform must have information in the Organization name, Primary address, and Description fields before it can be saved.
- Open the Community Record workform. See Search for a Community Record in the Staff Client or Create a new community record in the staff client.
- To change the library that owns the record, select it in the Owner box.
- (Optional) If your library offers ContentXChange, select the system or branch in the ContentXChange widgets link to: box. (You can select a library level organization, but the setting will default to the system level since the PAC connection is either at the system or branch level.) For more information, see Using ContentXChange.
Note:
The ContentXChange Ask Us widget uses the selected organization's settings for Ask Us in PAC.
Note:
If a branch is selected, the PAC will open to that branch when someone clicks a ContentXChange link on an organization web page. If you change the branch, existing ContentXChange widgets will continue to work at the System level. If you want the older widgets to use the branch setting, these widgets will need to be recreated on the ContentXChange tab in PAC, and the new iframe embed code should be used to replace the old code on the website where the widget is being used.
- (Required) Type the community organization’s name in the Organization name box.
- To display the community record in the PAC, select Display in PAC.
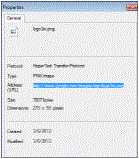
- On the Profile tabbed page, enter the URL for the organization’s graphic in the Logo URL box. The URL must point to an image file ending in .png, .jpg, gif etc. You cannot upload a logo from your desktop; it must be on a web page. If your organization’s logo is on a web page, select it, right-click and select Properties to see the URL. Then, copy and paste the URL into the Logo URL box.

Tip:
The logo size will not exceed 100 x 100 pixels; if the logo is larger, it will be resized automatically.
- Enter a description for the logo in the Logo Description box.
- On the Primary address subtab, enter the organization’s primary address in the Address, City, State/Province and Postal Code boxes. At least one address element is required.
Tip:
The Map It feature uses this address to create the map showing the location of the organization in the PAC. To see the map, you must first save and close the record. Then open it again, select the Preview tab, and expand the Map it section. If the location is not correct, you can override the automatic coordinates by typing them in the Latitude and Longitude boxes. Click the What’s this link to get the coordinates.
- Enter the primary contact information in the Phone number, Fax, Contact Person, and E-mail address boxes.
- If the organization has another address, click the Alternate address subtab, and enter the alternate address and contact information.
- If the map showing the organization’s location is not correct, click the What’s this link to find the coordinates by entering the address. Then, manually enter the organization’s coordinates in the Latitude and Longitude boxes.
- (Required) Type a description in the Description box.
- Type the organization’s hours in the Hours box. To enter more information, start typing in the next blank line.
- Select File > Save.