Remove Selected Group-Assigned Permissions
To remove group-assigned permissions for a specific staff member without affecting the permissions for all group members, copy the Permission Group workform, acquire only the permissions you want to give the staff member, and then remove the staff member from the original permission group.
To remove group-assigned permissions:
Note:
To remove all the permissions assigned by group membership, see Manage permission group membership.
- Select File > Open on the Administration Explorer menu bar, and specify the record type (Staff Member or Workstation) to find. The Polaris Find Tool opens.
- Search for the record from which you want to remove the permission.
- Right-click the record in the results list, and select Open from the context menu. The appropriate workform appears.
- Select View, Permissions to display the Is Permitted To list and the Membership list. The Membership list shows the permission groups to which the workstation or staff member belongs.
- In the Membership list, select the group that includes the permission(s) you want to remove, and click
 .
. - From the workform menu bar, select File > New > Permission Group. The New Permission Group dialog box appears.
- Select Copy Existing Work Form, and click OK. The new Permission Group workform is displayed with Untitled in the title bar, and the same members as the original permission group listed under Group Members.
- Type a new name for the group in the Group name box.
- Select File | Save.
- Select View, Permissions or click
 .
. - Acquire the original group’s permissions by following these steps:
- Click
 (Acquire) above the Permission List. The Polaris Find Tool appears with Permission Groups selected in the Object box.
 - Search for the original permission group.
- In the results list, right-click the original permission group record, and choose Select from the context menu. The permissions from the original group are added to the Permissions list.
- Click
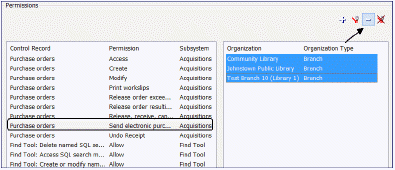
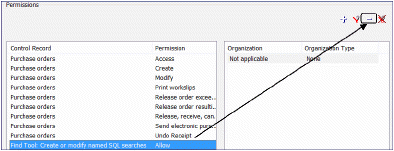
- Select the permission(s) you want to remove as follows:
- If the permission is organization-specific, the organizations for which it is set appear on the right side of the window. You can select the permission for multiple organizations at once.
Note:
When you open the Permissions view of the workform, the Membership list shows all permission groups to which the workstation or staff member belongs. If you select a permission from the permissions list, and the workstation or staff member has that permission due to permission group membership, the Membership list shows that permission group. Once a permission is selected, the Membership list no longer displays all the permission groups to which the workstation or staff member belongs. If the workstation or staff member was granted the permission directly, and did not receive the permission as a member of a permission group, nothing shows in the Membership list when that permission is selected.
Click  (Show my group membership) above the Membership list to re-list all the permission groups to which the workstation or staff member belongs.
The Permission Group workform opens.

- If the permission is not organization-specific, select it in the left side of the window.

- Click
 above the Permissions list.
 - Select File | Save.
- Select View, General, or click
 .
. - In the Group Members list, select the members that should not belong to this new group, and click
 above the Group Members list. Be sure to retain the workstation or staff member that needs the altered permission list.
 - Select File | Save.
- Return to the workstation or staff member record.
- Select the old permission group in the Membership list, and click
 to remove the workstation or staff member record from the old group.
 - Select File | Save.