Add a Date Closed
To define the dates when an organization is closed:
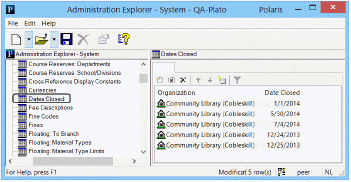
- In the Administration Explorer tree view, open the Policy Tables at or above the organization level, and select Dates Closed.
Example:
If you are setting the dates closed for all member branches of a library, open the table at the library level. You can add the dates at the library level. All member branches inherit the same dates. In addition, at the library level, you can add or delete dates for specific member branches.
Tip:
Click the column heads in the Dates Closed table to sort the entries by organization or by date.
The Dates Closed table appears in the details view.
- Click
 to display the Insert Dates Closed dialog box.
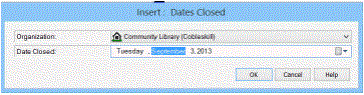
- Select the organization for the closed date in the Organization list.
If the Dates Closed policy table is opened at the branch level, only the branch name appears in the Organization list, and the dates closed apply only to that branch.
Tip:
You can type the date in the Date Closed box (day of week, month, day of month, year, or MM/DD/YYYY). If you type the wrong day of the week for the date, the day is automatically corrected.
- Click the calendar icon on the Date Closed box.
The calendar appears.
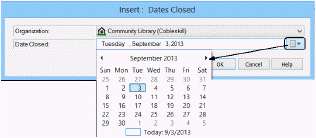
- Click the month arrows until the month for the closed date appears.
- Click the date on which the organization is closed.
The Insert Dates Closed dialog box appears.
- Click OK.
The Insert Dates Closed dialog box closes. The new closed date appears in the Dates Closed table. Modification pending appears in the status bar.
- Select File > Save.
Related Information
- Modify a table entry - Select the entry and click
 . The date in a displayed date closed entry is the only element you can change. You can change only the entries that display for the organization level at which the policy table is opened. If you need to change the entry for another organization, delete the entire incorrect entry and insert a new one.
 - Delete a table entry - Select the entry and click
 .
.