Add titles to a selection list one at a time
You can add a title to a selection list whether or not the bibliographic record is in the Polaris database. If the bibliographic record is in the database, you link to it in the Selection List Line Item workform. If the bibliographic record is not in the Polaris database, you can search a remote database for the title or enter the title information manually.
To add titles to a selection list:
Note:
In the Polaris Administration profile Selection List Line Item Defaults, you can set up defaults for the supplier, destination, collection, and fund so they fill in automatically when you create a new selection list line item. See
Tip:
You can also add titles in bulk from a record set to a selection list (see Bulk add titles to an existing selection list).
- Create the selection list following the instructions in Creating Selection Lists, or open an existing selection list.
- Click New on the Selection List workform line items toolbar, or press Ctrl+I.
- Do one of the following actions to enter the title information:
- Link to a bibliographic record in the Polaris database:
- If you know the ISBN for the title, type it in the ISBN/ISSN box, and press ENTER. If only one exact match for the ISBN is found in the Polaris database, the bibliographic information for that title is automatically filled in. The Find Tool opens if an exact match is not found, or if multiple records have the same ISBN.
-
If you do not know the ISBN for the title, click Find and use the Find Tool to search for and select the title. If the bibliographic record contains multiple ISBNs in the 020 tag or 024 tag indicator 3, they appear in a drop list in the ISBN box. Select the appropriate ISBN from the list.
- Enter bibliographic information for a title not in the Polaris database:
-
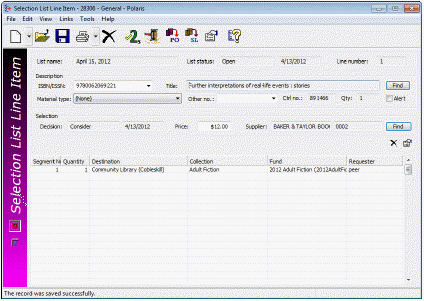
Type the title, ISBN, and other bibliographic information on the Selection List Line Item workform - General view. If the title is for non-print material, type the UPC (or other identifier) in the Other number box.
-
Select View > Additional Description and enter the author, publisher, edition, publication date, LCCN, series title and number (if applicable), reviews or summaries, and notes on the Additional Description view. Type a number in the Miscellaneous identifier box to identify the library that requested the title, or to add another identifier.
- Do a Z39.50 search of remote databases for a title not in the Polaris database, and copy it to the local database:
-
Click Find, and type the title, ISBN, author, subject or other information for the remote search in the Find Tool General tab.
-
Click the Databases tab, and select the remote databases to search.
-
Click Search, and select the bibliographic record in the search results. The title information appears in the Selection List Line Item workform, and a provisional bibliographic record is saved in the Polaris database.
- Select the material type in the Material type box.
- If the unit price is not automatically filled in, type the price in the Unit price box.
- To alert staff to this selection list line item, select the Alert box. When the selection list line item is copied to a purchase order, the Alert box is checked automatically on the Purchase Order Line Item workform if it is checked on the Selection List Line Item workform.
- (Optional) To select a supplier for the selection list line item, click Find next to the Supplier box, and use the Find Tool to search for and select the supplier.
- (Optional) To enter notes for a selection list line item, select View > Additional Description and type notes in the fields on the Additional Description view.
- Enter the distribution data for the selection list line item. See Enter or change selection list line item segments.
The Selection List Line Item workform appears.

Note:
The Other number box is used for the UPC or other identifier for non-print materials. The Other number box is filled in if the linked bibliographic record has a number in the 024$a, 028$a, or 037$a.
Tip:
When you enter bibliographic information for a title that is not in the Polaris database, the bibliographic record is not saved in the database until the selection list line item is copied to a purchase order.
Tip:
To do a Z39.50 search for a title from the Selection List Line Item workform, you must have the Acquisitions permission Create a bib record from acquisitions and serials: Allow and the Cataloging permission Bibliographic records: Create.
Note:
If you enter a note for a selection list line item, the note appears in the Non-public note field in the Purchase Order Line Item workform when you copy the selection list line item to a purchase order. The note is also copied to the purchase order line item workslip. If item records are created when the purchase order is released, the notes are copied to the Non-public note box in the Item Record workform. When you do an exact search for a selection list line item using notes, type an asterisk (*) before the search term to indicate that something may come before it.