Manage Serial Claims from the Claim Alert List
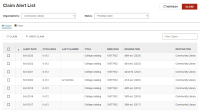
The Claim Alert List displays all serial issues and parts that are eligible to be claimed based on the Days After Release/Expected Arrival setting in the supplier record and the claim intervals configured in the serial holdings record.
Note:
You can access the Claim Alert List if you have the Claim alert list: Access permission enabled in Polaris Administration (staff client). For more information, search for "Acquisitions Workflow Permissions" in the Polaris staff client help.
This section covers the following topics:
Claim an Issue or Part from the Claim Alert List
Note:
You can claim serial issues or parts if you have the Serial issues/standing order parts: Claim permission enabled in Polaris Administration (staff client). For more information, search for "Serials Workflow Permissions" in the Polaris staff client help.
To claim a serial issue or part from the Claim Alert List
-
Select Utilities > Claim Alert List.
The Claim Alert List appears. By default, Leap displays the claim alerts for your current organization for issues with a status of Pending Claim.
-
(Optional) To view claim alerts for a different organization, select an organization from the Organizations list.
Leap refreshes the list of claim alerts.
-
(Optional) To view claim alerts for serial parts, select the Parts view.
Leap refreshes the list of claim alerts.
- Select the issues or parts you want to claim. You can select multiple issues or parts.
-
Select CLAIM.
Leap prompts you to confirm that you want to claim the issues or parts.
-
Select YES.
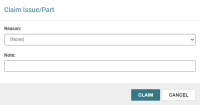
- (Optional) Select a claim reason from the Reason list.
- (Optional) Enter a note in the Note box. After you claim an issue, this note appears on the Claims view of the Issue Record workform.
-
Select CLAIM.
Leap does the following:
- Processes the claim
- Displays a success message
- Sets the status of the issue or part to Claimed
Undo a Claim from the Claim Alert List
Note:
You can undo claims if you have the Serial issues/standing order parts: Claim permission enabled in Polaris Administration (staff client). For more information, search for "Serials Workflow Permissions" in the Polaris staff client help.
To undo a claim from the Claim Alert List
-
Select Utilities > Claim Alert List.
The Claim Alert List appears. By default, Leap displays the claim alerts for your current organization for issues with a status of Pending Claim.
-
(Optional) To view claim alerts for a different organization, select an organization from the Organizations list.
Leap refreshes the list of claim alerts.
-
In the Status list, select the Claimed status.
Leap refreshes the list to display only claim alerts for issues with a status of Claimed.
-
(Optional) To view claim alerts for serial parts, select the Parts view.
Leap refreshes the list of claim alerts.
- Select the issue or part for which you want to undo the claim.
-
Select UNDO CLAIM.
Leap prompts you to confirm that you want to undo the claim.
-
Select YES.
Leap does the following:
- Reverses the claim
- Displays a success message
- Sets the status of the issue or part to the status it had before it was claimed

